
Instructions


Page 7
A reference trace and a view trace can be displayed in addition to the live trace. Up to 999
traces can be stored to permanent memory for recall to the screen or for data export. 999
instrument set-ups and 999 complete screen bitmaps can also be stored. All files can be given
user defined names.
USB interfaces are provided for direct file transfer to a PC or for connection of a USB Flash
drive.
Extensive convenience features for repetitive operation include auto-set, frequency presets,
and storage of the instrument state together with the trace file for simultaneous or independent
recall.
Pressing the Status/Help hard key brings up a full status screen and access to help screens
relevant to the current menu position.
An optional upgrade package (retro installable) provides additional features including high
resolution data capture (scan mode), data logging, sweep triggering, limit patterns,
compensation tables, automatic measurements, and more - see section 6.
More details of the product capabilities are given in the Specifications - section 15.
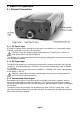
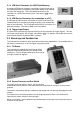
1.4 Initial Use - Charging the Battery | Switching On
As supplied, the internal battery is likely to be partly or fully discharged. At first use, the
instrument should therefore be plugged into the charger until the lamp next to the charge socket
stops flashing, which could take up to three hours - see section 2.1.1. The instrument can still
be used during this period.
The instrument is turned on or off by pressing the small round key marked Power for about one
second. When turning on, the screen backlight will flash briefly and a short beep will sound to
indicate that the key press has been recognised, there is then a short delay prior to operation
starting.
If the battery is too far discharged to allow operation, the instrument will turn off again and a
second short beep will be sounded.
1.4.1 Setting the Date and Time
The instrument contains a real-time clock that is used for time stamping of files. As supplied
the date and/or time may be incorrect.
Date and time can be checked from page 4 of the Status screens, or can be checked and
altered from Setup/Functions > System/File Ops > System Utilities > Power/Clock.
Note that the date format is DD-MM-YY and the time format is 24 hour.