User’s Manual CAR CAMCORDER -English-
CAR CAMCORDER User’s manual EN Welcome Thank you very much for purchasing our product. Before you start enjoying this product it’s recommend to read this user’s manual and follow the instructions step by step to get the best result with your new product. Best Regards, Service Team FCC Compliance Statement This device complies with Part 15 of the FCC Rules.
EN CAR CAMCORDER User’s manual CE Regulatory Notice This equipment complies with the requirements set out in the Council Directives on the Approximation of the Laws of the Member States relating Electromagnetic Compatibility (2004/108/EC); the Low Voltage Directive (2006/95/EC); the Restriction of The Use of Certain Hazardous Substances in Electrical And Electronic Equipment Directive (2002/95/EC), Turkish EEE Directive; the Commission Regulation (EC) No 1275/2008 implementing Directive 2005/32/EC of the
CAR CAMCORDER User’s manual EN Contents 1 Introduction ............................................................................................... 7 1.1 Features ............................................................................................... 7 1.2 Package Contents ................................................................................ 7 1.3 Product Overview ................................................................................. 8 2 Getting Started............
CAR CAMCORDER User’s manual EN 3.2 4 Playback Videos and Photos.............................................................. 18 3.2.1 Playing Videos ..................................................................... 19 3.2.2 Viewing Photos .................................................................... 19 3.2.3 The Playback Screen ........................................................... 20 3.2.4 Deleting Files .......................................................................
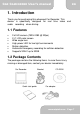
CAR CAMCORDER User’s manual EN 1. Introduction Thank you for purchasing this advanced Car Recorder. This device is specifically designed for real time video and audio recording when driving. 1.1 Features • • • • • • • Full HD camera (1920x1080 @ 30fps) 2.4” LCD color screen Wide angle lens High power LED for low light environments Motion detection Automatic Emergency recording for collision detection Supports SDHC up to 32GB 1.2 Package Contents The package contains the following items.
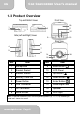
CAR CAMCORDER User’s manual EN 1.3 Product Overview Front View Top and Bottom Views 10 1 2 Side (Left and Right) Views 3 11 12 9 13 Rear View 6 4 7 5 8 16 14 15 Item No. No.
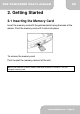
CAR CAMCORDER User’s manual EN 2. Getting Started 2.1 Inserting the Memory Card Insert the memory card with the gold contacts facing the back of the device. Push the memory card until it clicks into place. To remove the memory card Push to eject the memory card out of the slot. Note: Do not remove or insert the memory card when the device is turned on. This may damage the memory card. www.aiptek.
CAR CAMCORDER User’s manual EN 2.2 Installing in Vehicles 2.2.1 Mount to Windshield 1. Attach the device to the bracket base. Turn and tighten the car holder and the bracket base to make sure the device is securely locked in place. 2. With the suction-cup laying flat, position the suction-cup on the windshield. 3. Hold the base firmly on the windshield and press down the clamp to mount the car holder to the windshield. Make sure the base is securely locked in place. 2.2.
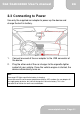
CAR CAMCORDER User’s manual EN 2.3 Connecting to Power Use only the supplied car adapter to power up the device and charge the built-in battery. 1. Connect one end of the car adapter to the USB connector of the device. 2. Plug the other end of the car charger to the cigarette lighter socket of your vehicle. Once the vehicle engine is started, the device automatically turns on. Note: The orange LED lights up while the battery is charging.
CAR CAMCORDER User’s manual EN 2.4 Powering the Device On / Off 2.4.1 Auto Power On/Off Once the vehicle engine is started, the device automatically turns on. If the Automatic Record function is enabled, the recording will automatically start right after the device turns on. See Set Automatic Recording (2.5.1). Once the vehicle engine shuts down, the device automatically saves the recording and turns off the power within 10 seconds. See Delay Shutdown (4.2). 2.4.
CAR CAMCORDER User’s manual EN 2.5 Initial Settings Before using the device, we recommend you to enable the Automatic Record function and set up the correct date and time. 2.5.2 Set Automatic Recording To enable the recording to start automatically after you turn on the power, do the following: 1. Press the 2. Press the / button to select Automatic Record and press the button. 3. Press the / and press the 4. Press the BACK button to exit the menu. 2.5.3 button to enter the OSD menu.
CAR CAMCORDER User’s manual EN 3. Press the / button to adjust the value and press the button to move to another field. 4. Repeat step 3 until the date and time setting is complete. 3. Using the Car Recorder 3.1 Recording Videos 3.1.1 Record videos while driving When the vehicle engine starts up and the Automatic Record function is enabled, the device automatically turns on and starts recording. Recording will automatically stop when the engine is switched off.
CAR CAMCORDER User’s manual EN 3.1.3 Emergency Recording During video recording, press the button to continuously record the video in one file until the memory card storage is full or the recording is manually stopped. To stop the recording, press the button. Note: If the Collision Detection function is enabled and a collision is detected, the device will automatically trigger the emergency recording. See Using the Menu (4.1). www.aiptek.
CAR CAMCORDER User’s manual EN 3.1.4 The Recording Screen No. 1 4 2 3 5 6 7 Description Item 1 Duration Indicates the recording duration. 2 Date and time Indicates the current recording date and time. 3 Guide icon (Menu) Press the menu. 4 Battery Indicates the remaining battery power. 5 Guide icon (Stop) Press the recording. 6 Guide icon (Emergency) Press the button to continuously record the video in one file until the recording is manually stopped.
CAR CAMCORDER User’s manual (Playback) EN Playback mode. 3.1.5 Using the LED Light You can use the LED light to provide extra light when the lighting is insufficient. To enable the LED light, do the following: button to enter the OSD menu. 1. Press the 2. Press the / button to select Auxiliary Light and press the button. 3. Press the / and press the 4. Press the menu. button to select On button. button to exit the Note: Turn off LED lights when the battery is low.
CAR CAMCORDER User’s manual EN Note: If recording is in progress, press the button to stop the recording. 3.2 Playback Videos and Photos 1. If recording is in progress, press the button to stop recording. The standby screen is displayed. 2. Press the 3. Press the / button to select the file category that you want to browse and press the button. 4. / button to view the Press the next or the previous file and press the button to view the file in full screen. button to enter the OSD menu.
CAR CAMCORDER User’s manual EN 3.2.1 Playing Videos To play videos, do the following: 1. If recording is in progress, press the recording. 2. Press the 3. Press the / button. 4. Press the press the 5. Press the / button to browse for the desired video file and press the button to play the video. 6. Press the button to pause the playback. Press it again to resume. button to stop button to enter the OSD menu.
CAR CAMCORDER User’s manual EN 5. Press the press the / button to browse for the desired photo file and button to view the file in full screen. 3.2.3 The Playback Screen Video Playback Screen Photo Playback Screen 7 7 1 6 3 2 No. 4 5 2 3 4 Description Item 1 Date and time Indicates the recorded date and time. 2 Guide icon (Back) Press the button to return to file selection display. 3 Guide icon (Previous) Press the button to view the previous video/photo.
CAR CAMCORDER User’s manual EN 3.2.4 Deleting Files To delete file(s), do the following: 1. If recording is in progress, press the recording. 2. Press the 3. Press the / button to select File Deletion and press the button. 4. / button to select the Press the file category and press the button. 5. / button to select the Press the file that you want to delete and press the button to enter the Delete menu. 6. Press the Item 7. button to enter the OSD menu. / button to select an option.
CAR CAMCORDER User’s manual EN Note: Deleted files cannot be recovered. Ensure the files have backup before deletion. 4. Adjusting the Settings 4.1 Using the Menu You can customize the video recording and other general settings via the on-screen display (OSD) menus. 1. If recording is in progress, press the Record button to stop recording. 2. Press the 3. Press the / button to select a menu option and press the button to enter the selected menu. 4.
CAR CAMCORDER User’s manual 5. Press the EN button to exit the menu. 4.2 Menu Tree Refer to the below table for details on menu items and available menu options. Menu option Description Available option Auxiliary Light Enable/Disable the LED light. On / Off File Playback Select the file category that you want to view. Video / Emergency / Picture Date / Time Set the date and time. Time Stamp Enable/Disable the date stamp. On / Off Resolution Set the video resolution.
CAR CAMCORDER User’s manual EN Menu option Description Available option it will automatically start the recording. Collision Detection Enable/Disable the collision detection. If this function is enabled and any collision is detected, the device will automatically trigger the emergency recording. High Sensitivity / Normal Sensitivity / Low Sensitivity / off Delay Shutdown Set the delay duration before turning off the power. 10 Sec. / Off Language Set the on-screen display menu language.
CAR CAMCORDER User’s manual EN 5. Installing the Software 1. Place the attached CD ROM into the CD player. 2. If the CD does not execute automatically, please use Windows File Manager to execute the Install_CD.exe file in the CD. The following screen will be shown up. 3. Press the [Menu] item to start the installation process according to the instructions on-screen. www.aiptek.
CAR CAMCORDER User’s manual EN 6. Specifications Item Description Image sensor 5 Megapixel(s) CMOS sensor Effective pixels 2592 (H) x 1944 (V) Storage media Support Micro SDHC, up to 32GB class 4 or above LCD display 2.4” LCD color TFT (112K pixels) Lens Wide Angle Fixed Focus lens F2.8, f=3.0mm Focus range 1.5m~Infinity Movie Clip Resolution: Full HD (1920 x 1080), 30fps HD (1280 x 720), 30fps Format: .mov Still image (Snapshot) Resolution: 5M (2592 x 1944) Format: DCF (JPEG, Exif: 2.
CAR CAMCORDER User’s manual Item Battery Power supply EN Description Built-in 470mAH Li-polymer rechargeable Cigar car charger (Inpugt:12V~24V/1.0A) 5V/1A adaptor (Input AC 100V~240V, 50/60Hz) Operating Temperature 0° ~ 60° C Storage Temperature -20° ~ 80° C Dimensions 65 x 62 x 27 mm Weight Approx. 85g www.aiptek.
CAR CAMCORDER User’s manual EN Copyright © 2012 All rights reserved. All other marks, products or company names mentioned in this guide are trademarks of their respective companies. www.aiptek.
User’s Manual CAR CAMCORDER -German-
CAR CAMCORDER User’s manual DE Über diese Anleitung Der Inhalt dieses Dokuments dient Informationszwecken und kann ohne Vorankündigung geändert werden. Wir haben alle Mühen unternommen, die Richtigkeit und Vollständigkeit dieser Bedienungsanleitung zu gewährleisten. Dennoch übernehmen wir keine Haftung für jegliche Fehler und Auslassungen. Der Hersteller behält sich das Recht vor, technische Daten ohne Vorankündigung zu ändern.
CAR CAMCORDER User’s manual DE WEEE-Hinweis Entsorgung elektrischer und elektronischer Altgeräte und/oder Batterien/Akkumulatoren durch Verbraucher in privaten Haushalten innerhalb der Europäischen Union Dieses Symbol am Produkt oder an der Verpackung weist darauf hin, dass es nicht mit dem Hausmüll entsorgt werden darf. Sie müssen Ihr Altgerät und/oder Batterien/Akkumulatoren an entsprechende Sammelstellen zum Recycling elektrischer und elektronischer Geräte und/oder Batterien/Akkumulatoren übergeben.
CAR CAMCORDER User’s manual DE Achtung Verwenden Sie nur das zugelassene Ladegerät. Niemals eigenhändig demontieren. Akku niemals kurzschließen. Akku sachgemäß entsorgen. Setzen Sie den Akku keinen offenen Flammen aus, es besteht Explosionsgefahr.
CAR CAMCORDER User’s manual DE Inhalt Über diese Anleitung...........................................................1 FCC-Erklärung ...................................................................1 WEEE-Hinweis ...................................................................2 CE-Richtlinienhinweis .........................................................2 Hinweise zur Installation .....................................................2 Achtung ........................................................
CAR CAMCORDER User’s manual 3.1 Videos aufnehmen .................................................13 3.1.1 3.1.2 3.1.3 3.1.4 3.1.5 3.1.6 3.2 Videos während der Fahrt aufnehmen .13 Sonstige Videotypen aufnehmen...........13 Notfallaufnahme......................................14 Der Aufnahmebildschirm.......................14 LED-Licht verwenden.............................16 Schnappschuss aufnehmen ....................16 Videos und Fotos wiedergeben ..............................17 3.2.1 3.2.2 3.2.3 3.
CAR CAMCORDER User’s manual DE 1. Einleitung Vielen Dank für den Kauf dieses fortschrittlichen Fahrzeugrekorders. Dieses Gerät ist spezifisch zur Echtzeitvideo- und Audioaufnahme während der Fahrt entwickelt. 1.1 • • • • • • • 1.
CAR CAMCORDER User’s manual 1.3 DE Produktübersicht Ansicht von oben und unten Ansicht von vorne 10 1 2 3 11 12 Ansicht von der Seite (links und rechts) 13 9 Ansicht von hinten 6 4 7 5 8 16 14 15 Nr. Element Nr.
DE CAR CAMCORDER User’s manual 2 Erste Schritte 2.1 SD-Karte einstecken Stecken Sie die Speicherkarte so ein, dass die goldenen Kontakte in Richtung Geräterückseite zeigen. Drücken Sie die Speicherkarte so weit hinein, dass sie einrastet. So entfernen Sie die Speicherkarte Drücken Sie sanft auf die Kante der Karte, die Speicherkarte wird ausgeworfen. Hinweis: Installieren und entfernen Sie die Speicherkarte nicht, während das Gerät eingeschaltet ist. Dies kann die Speicherkarte beschädigen.
CAR CAMCORDER User’s manual 2.2 DE Im Fahrzeug installieren 2.2.1 An der Windschutzscheibe montieren 1. Bringen Sie das Gerät an der Halterungsbasis an. Drehen und befestigen Sie Fahrzeughalterung und Halterungsbasis, damit das Gerät sicher an Ort und Stelle verbleibt. 2. Positionieren Sie den Saugnapf an der Windschutzscheibe, wobei der Saugnapf flach aufliegt. 3.
CAR CAMCORDER User’s manual DE 2.3 Netzanschluss Verwenden Sie zur Stromversorgung des Gerätes und zum Aufladen des integrierten Akkus ausschließlich das mitgelieferte Fahrzeug-Netzteil. 1. Verbinden Sie ein Ende des Fahrzeug-Netzteils mit dem USB-Anschluss des Gerätes. 2. Schließen Sie das andere Ende des Fahrzeug-Netzteils an den Zigarettenanzünder Ihres Fahrzeugs an. Sobald der Fahrzeugmotor gestartet wird, schaltet sich das Gerät automatisch ein.
CAR CAMCORDER User’s manual 2.4 2.4.1 DE Gerät ein- / ausschalten Automatisches Ein- / Ausschalten Sobald der Fahrzeugmotor gestartet wird, schaltet sich das Gerät automatisch ein. Falls die Automatische Aufnahme-Funktion aktiviert ist, startet die Aufnahme automatisch direkt nach dem Einschalten des Gerätes. Siehe Automatische Aufnahme einstellen (2.4.1). Sobald der Fahrzeugmotor ausgeschaltet wird, speichert das Gerät die Aufnahme und schaltet sich innerhalb von 10 Sekunden aus.
CAR CAMCORDER User’s manual DE 2.5 Grundeinstellungen Wir empfehlen Ihnen, vor dem Einsatz des Gerätes die Automatische Aufnahme-Funktion zu aktivieren und Datum und Uhrzeit richtig einzustellen. 2.5.1 Automatische Aufnahme einstellen So aktivieren Sie, dass die Aufnahme automatisch nach dem Einschalten des Gerätes startet: -Taste. 1. Drücken Sie zum Aufrufen des Bildschirmmenüs die 2. Wählen Sie mit den Tasten / die Option Automatische Aufnahme, -Taste. drücken Sie die 3.
CAR CAMCORDER User’s manual DE 3 Fahrzeugrekorder verwenden 3.1 Videos aufnehmen 3.1.1 Videos während der Fahrt aufnehmen Wenn der Fahrzeugmotor gestartet wird und die Automatische Aufnahme-Funktion aktiviert ist, schaltet sich das Gerät automatisch ein und die Aufnahme beginnt. Die Aufnahme stoppt automatisch, sobald der Motor abgeschaltet wird. Alternativ können Sie zum manuellen Beenden der Aufnahme die -Taste drücken.
CAR CAMCORDER User’s manual DE 3.1.3 Notfallaufnahme Drücken Sie während der Videoaufnahme die -Taste, wenn das Video fortlaufend in einer Datei gespeichert werden soll, bis die Kapazität der Speicherkarte erschöpft ist bzw. die Aufnahme manuell beendet wird. Drücken Sie zum Beenden der Aufnahme -Taste. die Hinweis: Falls die Kollisionserkennung-Funktion aktiviert ist und eine Kollision erkannt wird, löst das Gerät automatisch die Notfallaufnahme aus. Siehe Menü verwenden (4.1). 3.1.4 Nr.
CAR CAMCORDER User’s manual 3 Anweisungssymbol (Menü) Drücken Sie zum Aufrufen des Bildschirmmenüs die -Taste. 4 Akku Zeigt die verbleibende Akkuleistung. 5 Anweisungssymbol (Stopp) Drücken Sie zum Beenden der Aufnahme die -Taste. 6 Anweisungssymbol (Notfall) Drücken Sie die -Taste, wenn das Video fortlaufend in einer Datei aufgenommen werden soll, bis die Aufnahme manuell beendet wird. 7 Anweisungssymbol (Wiedergabe) Drücken Sie zum Umschalten in den Wiedergabemodus die -Taste.
CAR CAMCORDER User’s manual DE 3.1.5 LED-Licht verwenden Mit dem LED-Licht können Sie bei ungenügender Beleuchtung zusätzliches Licht bereitstellen. Gehen Sie zum Aktivieren des LED-Lichts wie folgt vor: 1. Drücken Sie zum Aufrufen des Bildschirmmenüs die 2. / Wählen Sie mit den Tasten die Option Zusatzleuchte, drücken Sie dann die -Taste. 3. Wählen Sie mit den Tasten / die Option Ein, drücken Sie die -Taste. 4. Drücken Sie zum Verlassen des Menüs die -Taste. -Taste.
CAR CAMCORDER User’s manual 3.2 DE Videos und Fotos wiedergeben 1. Falls gerade eine Aufnahme erfolgt, können Sie diese mit der -Taste beenden. Der Bereitschaftsbildschirm wird angezeigt. 2. Drücken Sie zum Aufrufen des Bildschirmmenüs die 3. Wählen Sie mit den Tasten / die Dateikategorie, die Sie durchsuchen möchten; drücken Sie . 4. Rufen Sie mit den Tasten / die nächste oder vorherige Datei -Taste können Sie auf; mit der die Datei im Vollbildmodus anzeigen. -Taste.
CAR CAMCORDER User’s manual DE 3.2.1 Videos wiedergeben So geben Sie Videos wieder: 1. Falls gerade eine Aufnahme erfolgt, können Sie diese mit der -Taste beenden. 2. Drücken Sie zum Aufrufen des Bildschirmmenüs die 3. Wählen Sie mit den Tasten / die Option Dateiwiedergabe, drücken Sie die -Taste. 4. Wählen Sie mit den Tasten / die Option Video oder Notfall, drücken Sie . dann 5. / die Suchen Sie mit den Tasten gewünschte Videodatei, drücken Sie zur Videowiedergabe . 6.
CAR CAMCORDER User’s manual 3.2.3 DE Der Wiedergabebildschirm Videowiedergabebildschirm Fotowiedergabebildschirm 7 7 1 6 3 2 Nr. 4 Element 5 2 3 4 Beschreibung 1 Datum und Zeit Zeigt das Aufnahmedatum und die Uhrzeit an. 2 Anweisungssymbol (Zurück) Mit der -Taste kehren Sie zum Dateiauswahlbildschirm zurück. 3 Anweisungssymbol (Vorheriges) Mit der -Taste rufen Sie das vorherige Video/Foto auf. 4 Anweisungssymbol (Nächstes) Mit der -Taste rufen Sie das nächste Video/Foto auf.
CAR CAMCORDER User’s manual DE 3.2.4 Dateien löschen So löschen Sie eine/mehrere Datei(en): 1. Falls gerade eine Aufnahme erfolgt, können Sie diese mit der -Taste beenden. 2. Drücken Sie zum Aufrufen des Bildschirmmenüs die 3. Wählen Sie mit den Tasten / die Option Dateilöschung, drücken Sie die -Taste. 4. Wählen Sie mit den Tasten / Dateikategorie, drücken Sie die -Taste. die 5. Wählen Sie mit den Tasten / Datei, die Sie löschen möchten; drücken Sie zum Aufrufen des Löschen-Menüs die -Taste.
CAR CAMCORDER User’s manual DE 4 Einstellungen anpassen 4.1 Menü verwenden Sie können Videoaufnahme- und andere allgemeine Einstellungen über die Bildschirmmenüs anpassen. 1. Falls gerade eine Aufnahme erfolgt, können Sie diese mit der Aufnahme taste beenden. 2. Drücken Sie zum Aufrufen des Bildschirmmenüs die 3. Wählen Sie mit den Tasten / eine Menüoption, drücken Sie zum Aufrufen des ausgewählten Menüs . -Taste. 4.
CAR CAMCORDER User’s manual DE 4.2 Menübaum Einzelheiten zu Menüelementen und verfügbaren Menüoptionen entnehmen Sie bitte der nachstehenden Tabelle. Menüoption Beschreibung Verfügbare Optionen Zusatzleuchte Zum De-/Aktivieren des LED-Lichts. Ein / Aus Dateiwiedergabe Wählen Sie die Dateikategorie, die Sie betrachten möchten. Video / Notfall / Bild Datum/Zeit Zum Einstellen von Datum und Uhrzeit. Aufdruck Zum De-/Aktivieren des Datumsaufdrucks.
CAR CAMCORDER User’s manual Menüoption Beschreibung DE Verfügbare Optionen Geräteeinschaltung. Aufnahmeintervall Zum Einstellen der Aufnahmedauer einzelner Videodateien. 3 min / 5 min Bewegungserkennung Zum De-/Aktivieren der Bewegungserkennu ng. Falls diese Funktion aktiviert ist und das Gerät jegliche bewegliche Objekte erkennt, startet die Aufnahme automatisch. Ein / Aus Kollisionserkennung Zum De-/Aktivieren der Kollisionserkennung .
CAR CAMCORDER User’s manual DE Menüoption Beschreibung Verfügbare Optionen TV-Norm Zum Einstellen des TV-Typs basierend auf Ihrer Region. NTSC/PAL Format Zum Formatieren der Speicherkarte. Ja / Nein Standard Zum Rücksetzen aller Einstellungen auf die werkseitigen Standardeinstellung en.
CAR CAMCORDER User’s manual DE 5 Software installieren 1. Legen Sie die mitgelieferte CD-ROM in das CD-Laufwerk ein. 2. Wenn das Programm auf der CD nicht automatisch ausgeführt wird, starten Sie die Datei Install_CD.exe auf dem Medium bitte über den Windows-Dateimanager. Der folgende Bildschirm wird angezeigt. 3. Wählen Sie zum Start der Installation gemäß den Anweisungen auf dem Bildschirm das [Menü]-Element.
CAR CAMCORDER User’s manual DE 6 Technische Daten Element Beschreibung Bildsensor 1/3,2-Zoll-CMOS-Sensor Effektive Pixel 2592 (H) x 1944 (V) Speichermedium Unterstützt Micro SDHC, bis 32 GB, Klasse 4 oder höher LCD-Bildschirm 2,4-Zoll-LCD-Farb-TFT (112.000 Pixel) Objektiv Weitwinkel-Fixfokus-Objektiv F2.8, f = 3,0 mm Fokusbereich 1,5 m bis unendlich Videoclip Auflösung: Full-HD (1920 x 1080), 30 Bilder/s HD (1280 x 720), 30 Bilder/s Format: .
CAR CAMCORDER User’s manual Element DE Beschreibung Lautsprecher Ja Schnittstelle Mini-USB, Mini-HDMI (Typ C) Akku Integrierter 470-mAh-Lithium-Polymer-Akku Betriebstemperatur 0 ° – 50 °C Aufbewahrungstemp -20° – 80 °C eratur Abmessungen 65 x 62 x 27 mm Gewicht Ca.
CAR CAMCORDER User’s manual DE Copyright © 2012 Alle Rechte vorbehalten.
User’s Manual CAR CAMCORDER -French-
CAR CAMCORDER User’s manual FR A propos de ce guide Ce guide a pour but de fournir des informations et est susceptible d’ être soumis à des modifications et sans préavis. Nous avons mis tout en œuvre pour nous assurer que le guide soit aussi complet et précis que possible. Cependant, il peut contenir des erreurs ou des omissions pour lesquelles nous ne saurions être tenus responsables. Le fabricant se réserve le droit de modifier les spécifications techniques sans préavis.
CAR CAMCORDER User’s manual FR Avis d'application de la réglementation CE Cet appareil est en conformité avec la directive du Conseil relative au rapprochement des législations des États membres concernant la Compatibilité Electromagnétique (2004/108/EC), la directive de Basse Tension (2006/95/EC), la directive relative à la limitation de l'utilisation de certaines substances dangereuses dans les équipements électriques et électroniques (2002/95/EC), la directive turque EEE, au règlement de la commission
CAR CAMCORDER User’s manual FR Table des matières A propos de ce guide ..........................................................1 Déclaration de conformité FCC...........................................1 Directive WEEE ..................................................................1 Avis d'application de la réglementation CE .........................2 Consignes pour l’installation ...............................................2 Avertissement............................................................
CAR CAMCORDER User’s manual FR 3.1 Enregistrement vidéo .............................................12 3.1.1 3.1.2 3.1.3 3.1.4 3.1.5 3.1.6 3.2 Lecture de vidéos et de photos ..............................16 3.2.1 3.2.2 3.2.3 3.2.4 4 Enregistrer des vidéos pendant la conduite ……………………………………………..12 Enregistrer tous les autres types de vidéos ……………………………………………..12 Enregistrement d’urgence ......................13 L’écran d’enregistrement ........................14 Utiliser l’éclairage LED ..............
CAR CAMCORDER User’s manual FR 1 Présentation Merci d’avoir choisi cet enregistreur vidéo pour véhicules. Cet appareil est spécialement conçu pour l’enregistrement vidéo et audio en temps réel pendant la conduite. 1.1 Caractéristiques • • • • • • • Appareil photo Full HD (1920 x 1080 @ 30fps) Ecran couleur LCD 2.
CAR CAMCORDER User’s manual FR 1.
CAR CAMCORDER User’s manual FR 2 Démarrage 2.1 Insertion de la carte mémoire Insérer la carte mémoire avec les contacts dorés dirigés vers le bas de l’appareil. Pousser à fond sur la carte mémoire jusqu’à ce qu’elle s’enclenche en position. Pour enlever la carte mémoire Pousser sur la carte mémoire pour l’éjecter hors de son logement. Remarque : Ne pas enlever ni insérer la carte mémoire lorsque l’appareil est en marche sous peine de détérioration de la carte.
CAR CAMCORDER User’s manual FR 2.2 Installation dans le véhicule 2.2.1 Fixer au pare-brise 1. Fixer l’appareil à la base du support. Tourner en resserrant le support et la base du support pour sécuriser l’appareil en place. 2. Positionner la ventouse plate sur le pare-brise. 3. Maintenir fermement la base sur le pare-brise et appuyer sur le loquet de fixation pour faire adhérer le support au pare-brise. S’assurer que la base est bien maintenue en place. 2.2.
CAR CAMCORDER User’s manual FR 2.3 Branchement à une source d’alimentation Utiliser uniquement l’adaptateur de voiture fourni pour mettre l’appareil en marche et charger la batterie intégrée. 1. Relier une extrémité de l’adaptateur de voiture au connecteur USB de l’appareil. 2. Brancher l’autre extrémité du chargeur dans la douille de l’allume-cigare de votre véhicule. Une fois que le contact est allumé, l’appareil se met automatiquement en marche.
FR CAR CAMCORDER User’s manual 2.4 Mise en marche de l’appareil 2.4.1 Marche/Arrêt automatique Une fois le contact du véhicule allumé, l’appareil se met automatiquement en marche. Si la fonction Enregistrement automatique est activée, l’enregistrement démarre automatiquement dès l’allumage de l’appareil. Consulter Configurer l’enregistrement automatique (2.5.1). Une fois le contact du véhicule éteint, l’appareil sauvegarde automatiquement l’enregistrement et se met hors tension après 10 secondes.
CAR CAMCORDER User’s manual FR 2.5 Réglages initiaux Avant d’utiliser l’appareil, nous vous recommandons d’activer la fonction Enregistrement automatique et de configurer correctement la date et l’heure. 2.5.1 Configurer l’enregistrement automatique Pour permettre le démarrage automatique de l’enregistrement dès l’allumage de l’appareil, suivre les indications suivantes : 1. Appuyer sur le bouton pour entrer dans le menu sur écran.
CAR CAMCORDER User’s manual FR 3 Utilisation de l’enregistreur de conduite 3.1 Enregistrement vidéo 3.1.1 Enregistrer des vidéos pendant la conduite Si la fonction Enregistrement automatique est activée, l’appareil s’allume automatiquement et commence à enregistrer dès que le véhicule est allumé. L’enregistrement s’arrête automatiquement quand le moteur est éteint. Vous pouvez également appuyer sur le bouton pour interrompre manuellement l’enregistrement.
CAR CAMCORDER User’s manual 3.1.3 FR Enregistrement d’urgence Pendant l’enregistrement vidéo, appuyez sur le bouton pour enregistrer la vidéo de façon continue dans un seul fichier jusqu’à ce que la carte mémoire soit pleine ou que l’enregistrement soit interrompu manuellement. Pour arrêter l’enregistrement, appuyer sur le bouton . Remarque : Lorsque la fonction Détection de collision est activée et qu’une collision est détectée, l’appareil déclenche automatiquement l’enregistrement d’urgence.
CAR CAMCORDER User’s manual FR 3.1.4 N° 14 L’écran d’enregistrement 1 4 2 3 5 6 7 Elément Description 1 Durée Indique le temps d’enregistrement. 2 Date et time Indique la date et l’heure actuelles d’enregistrement. 3 Icône guide (Menu) Appuyer sur le bouton dans le menu sur écran. 4 Batterie Indique le niveau de charge restant. 5 Icône guide (Stop) Appuyer sur le bouton pour interrompre l’enregistrement.
CAR CAMCORDER User’s manual 3.1.5 FR Utiliser l’éclairage LED L’éclairage LED permet de fournir une source de lumière supplémentaire quand la lumière ambiante est insuffisante. Pour activer l’éclairage LED, suivre les indications suivantes: 1. Appuyer sur le bouton pour aller dans le menu sur écran. Appuyer sur le bouton / pour sélectionner Éclairage auxiliaire, puis appuyer sur . Appuyer sur le bouton / pour sélectionner En service, puis appuyer sur . Appuyer sur le bouton menu.
FR CAR CAMCORDER User’s manual 3.2 Lecture de vidéos et de photos 1. Si un enregistrement est en cours, appuyer sur le bouton pour l’interrompre. L’écran de veille s’affiche. Appuyer sur le bouton pour aller dans le menu sur écran. Appuyer sur le bouton / pour sélectionner le type de fichiers que vous souhaitez visionner, puis appuyer sur . Appuyer sur le bouton / pour visionner le fichier précédent ou suivant, pour voir le fichier puis appuyer sur sur écran plein.
CAR CAMCORDER User’s manual 3.2.1 FR Lecture des vidéos Pour lire une vidéo, suivre les indications suivantes : 1. Si un enregistrement est en cours, appuyer sur le bouton pour l’interrompre. 2. Appuyer sur le bouton pour aller dans le menu sur écran. Appuyer sur le bouton . puis appuyer sur / pour sélectionner Lecture du fichier, Appuyer sur le bouton puis appuyer sur . / pour sélectionner Vidéo ou Urgence, / pour Appuyer sur le bouton trouver le fichier à visionner, puis pour lire la vidéo.
CAR CAMCORDER User’s manual FR 3.2.3 Ecran d’affichage Ecran d’affichage de vidéo Ecran d’affichage de photo 7 7 1 6 3 2 4 5 2 3 4 N° Item 1 Date et heure Indique la date et l’heure d’enregistrement. 2 Icône Guide (Retour) pour Appuyer sur le bouton revenir sur l’écran de sélection de fichier. 3 Icône Guide (Précédent) Appuyer sur le bouton pour visionner la vidéo/photo précédente. 4 Icône Guide (Suivant) Appuyer sur le bouton pour visionner la vidéo/photo suivante.
CAR CAMCORDER User’s manual 3.2.4 FR Effacer des fichiers Pour effacer des fichiers (s), suivre les indications suivantes : 1. Si un enregistrement est en cours, appuyer sur le bouton pour l’interrompre. 2. Appuyer sur le bouton dans le menu sur écran. 3. / pour Appuyer sur le bouton sélectionner Effacer, puis appuyer sur . 4. / pour Appuyer sur le bouton sélectionner le type de fichier, puis . appuyer sur 5.
FR CAR CAMCORDER User’s manual 4 Ajustement des réglages 4.1 Utilisation du Menu L’enregistrement vidéo et d’autres réglages généraux peuvent être personnalisés depuis les menus affichés sur écran. 1. Si un enregistrement est en cours, appuyer sur le bouton Enregistrement pour l’interrompre. Appuyer sur le bouton Appuyer sur le bouton / puis appuyer sur le bouton sélectionné. pour ouvrir le menu sur écran.
CAR CAMCORDER User’s manual FR 4.2 Arborescence du menu Consulter le tableau ci-dessous pour plus de détails sur les menus et les options de menu disponibles. Option de menu Description Option disponible Éclairage auxiliaire Active/Désactive l’éclairage LED. En service / Hors service Lecture du fichier Sélectionne la catégorie de fichier que vous souhaitez voir. Vidéo / Urgence / Image Date / Heure Règle la date et l’heure. Impression Active/Désactive l’impression de la date.
CAR CAMCORDER User’s manual FR Option de menu Description Option disponible mouvement détection de mouvement. Quand cette fonction est activée, l’enregistrement se déclenche automatiquement lorsque l’appareil détecte le mouvement d’un objet. service Détection de collision Activation/Désactivation de la détection de collision. Quand cette fonction est activée, l’appareil déclenche l’enregistrement d’urgence lorsqu’une collision est détectée.
CAR CAMCORDER User’s manual FR 5 Installation du logiciel 1. Placez le CD-Rom joint dans le lecteur de CD. 2. Si le CD ne démarre pas automatiquement, utilisez le Gestionnaire de fichiers de Windows pour exécuter le fichier Install_CD.exe sur le CD. L’écran illustré ci-dessous s’affichera. 3. Appuyez sur l'élément [Menu] pour lancer le processus d'installation en fonction des instructions affichées à l'écran.
CAR CAMCORDER User’s manual FR 6 Spécifications Elément Description Capteur d’image Capteur CMOS 1/3.2” Nombre de pixels 2592 (H) x 1944 (V) Stockage des médias Compatible avec cartes Micro SDHC, jusqu’à 32 Go classe 4 ou supérieur Ecran LCD Ecran LCD TFT couleur 2.4” (112K pixels) Objectif Objectif grand angle à mise au point fixe F2.8, f=3.0 mm Portée de la mise au point 1.
CAR CAMCORDER User’s manual Elément FR Description Lumière d’assistance Oui Microphone Oui Haut-parleur Oui Interface Mini USB, Mini C Type HDMI Batterie Batterie intégrée Li-polymère Température de fonctionnement 0° ~ 50°C Température de stockage -20° ~ 80° C Dimensions 65 x 62 x 27 mm Poids Environ 85g rechargeable 470mAH 25
Copyright © 2012 Tous droits réservés. Tous les autres marques, noms de produits et de sociétés figurant dans ce guide sont la propriété de leurs détenteurs respectif.
User’s Manual CAR CAMCORDER -Italian-
CAR CAMCORDER User’s manual IT Informazioni su questa Guida Il contenuto di questo documento è solo a scopo informativo ed è soggetto a modifiche senza preavviso. Noi abbiamo fatto tutto il possibile per garantire che questa Guida dell’utente fosse accurata e completa. Tuttavia non ci prendiamo alcuna responsabilità per eventuali errori e omissioni che ci possano essere. Il fabbricante si riserva il diritto di modificare le specificazioni tecniche senza preavviso.
CAR CAMCORDER User’s manual IT Notifica sui Regolamenti CE Questa apparecchiatura è conforme ai requisiti stabiliti nelle Direttive del Consiglio sul Ravvicinamento delle Leggi degli Stati Membri relative alla Compatibilità Elettromagnetica (2004/108/EC); la Direttiva per il Basso Voltaggio (2006/95/EC); la Direttiva sulla Restrizione nell’Uso di Certe Sostanze Pericolose nelle Apparecchiature Elettriche ed Elettroniche (2002/95/EC), la Direttiva EEE della Turchia; Il Regolamento della Commissione (EC) No
CAR CAMCORDER User’s manual IT Indice Informazioni su questa Guida .............................................1 Dichiarazione FCC .............................................................1 Notifica WEEE....................................................................1 Notifica sui Regolamenti CE ...............................................2 Note sull’istallazione ...........................................................2 Avvertenze ............................................................
CAR CAMCORDER User’s manual IT 3 Uso del Car Recorder................................................12 3.1 3.2 4 Registrazione dei video..........................................12 3.1.1 Registrazione dei video durante la guida .....12 3.1.2 Registrazione di ogni tipo di video ...............12 3.1.3 Registrazione di emergenza ........................13 3.1.4 Lo schermo della registrazione ....................14 3.1.5 Uso della Luce LED.....................................15 3.1.
CAR CAMCORDER User’s manual IT Introduzione Noi vi ringraziamo per l’acquisto di questo Car Recorder avanzato. Questo dispositivo è stato specificatamente progettato per la registrazione di video e audio in tempo reale durante la guida. 1.1 Caratteristiche • • • • • • • Videocamera Full HD (1920x1080 @ 30fps) Schermo LCD a colori 2.
CAR CAMCORDER User’s manual IT 1.3 Sguardo generale al prodotto Veduta Frontale Vedute dall’ALTO e da Sotto 10 1 2 3 Veduta Laterali (Sinistra e Destra) 11 12 13 9 Veduta Posteriore 6 4 7 5 8 16 14 15 N. Voce N.
CAR CAMCORDER User’s manual IT 2 Come cominciare 2.1 Come inserire la Scheda di memoria Inserire la Scheda di memoria con i contatti dorati rivolti al retro del dispositivo. Spingere la Scheda di memoria fino a quando fa clic al suo posto. Per rimuovere la Scheda di memoria Spingere per far uscire la Scheda di memoria dallo slot. Nota: Non rimuovere o inserire la Scheda di memoria quando il dispositivo è acceso. Questo potrebbe rovinare la Scheda di memoria.
CAR CAMCORDER User’s manual IT 2.2 Istallazione nei veicoli 2.2.1 Montaggio sul Parabrezza 1. Attaccare il dispositivo alla base del supporto. Girare e stringere il supporto veicolare e la base del supporto per assicurarsi che il dispositivo sia bloccato saldamente al suo posto. 2. Con la ventosa in piano, posizionare la ventosa sul parabrezza. 3. Tenere ben salda la base sul parabrezza e premere in giù il morsetto per montare il supporto veicolare sul parabrezza.
CAR CAMCORDER User’s manual IT 2.3 Collegamento alla corrente Usare solo l’adattatore per veicolo in dotazione per dare corrente al dispositivo e caricare la batteria incorporata. 1. Collegare un capo dell’adattatore per veicolo al connettore USB del dispositivo. 2. Inserire l’altro capo del caricatore per veicoli alla presa dell’accendisigari del veicolo. Quando si avvia ilmore del veicolo, il dispositivo si accende automaticamente.
CAR CAMCORDER User’s manual IT 2.4 Come accendere e spegnere il dispositivo 2.4.1 Accensione e spegnimento automatico Quando si avvia il motore del veicolo, il dispositivo si accende automaticamente. Se la funzione Registrazione automatica è attivata, la registazione parte automaticamente quando si accende il dispositivo. Vedere Imposta registrazione automatica (2.5.1). Quando si spegne il motore del veicolo, il dispositivo automaticamente salva le registrazioni e spegne la corrente entro 10 secondi.
CAR CAMCORDER User’s manual IT 2.5 Impostazioni iniziali Prima di usare il dispositivo, vi consigliamo di attivare la funzione Registrazione Automatica e impostare la data e ora esatta. 2.5.1 Imposta registrazione automatica Per attivare la registrazione che inizi automaticamente quando accendete la corrente, fare come segue: 1. Premere il pulsante 2. Premere il pulsante / per selezionare Registrazione Automatica e premere il pulsante . 3.
CAR CAMCORDER User’s manual IT 3 Uso del Car Recorder 3.1 Registrazione dei video 3.1.1 Registrazione dei video durante la guida Quando si avvia il motore del veicolo e la funzione Registrazione Automatica è attivata, il dispositivo si accende automaticamente e comincia a registrare. La registrazione si ferma automaticamente quando si spegne il motore. Oppure premere il pulsante per fermare la registrazione manualmente. Nota: In certi veicoli la registrazione continua quando si spegne il motore.
CAR CAMCORDER User’s manual 3.1.3 IT Registrazione di emergenza Durante la registrazione del video, premere il pulsante per registrare in continuazione il video in un file fino a che la capienza della scheda di memoria è piena o la registrazione viene fermata manualmente. Per fermare la registrazione, premere il pulsante . Nota: Se la funzione Rilevazione collisione è attivata e viene rilevata una collisione, il dispositivo automaticamente innesca la registrazione di emergenza. Vedere Uso del Menu (4.1).
CAR CAMCORDER User’s manual IT 3.1.4 N. 14 Lo schermo della registrazione 1 4 2 3 5 6 7 Voce Descrizione 1 Durata Indica la durata della registrazione. 2 Data e ora Indica la data e ora dell’attuale registrazione. 3 Icona guida (Menu) per Premere il pulsante accedere al menu OSD. 4 Batteria Indica la corrente della batteria restante. 5 Icona guida (Stop) Premere il pulsante la registrazione.
CAR CAMCORDER User’s manual 3.1.5 IT Uso della Luce LED Voi potete usare la luce LED per fornire altra luce quando l’illuminazione non è sufficiente. Per attivare la luce LED, fare quanto segue: 1. Premere il pulsante 2. Premere il pulsante premere il pulsante per accedere al menu OSD. / per selezionare Luce Ausiliaria e . 3. Premere il pulsante / per selezionare Attiva e premere il . pulsante 4. Premere il pulsante dal menu. per uscire Nota: Spegnere i LED luminosi quando la batteria è bassa.
CAR CAMCORDER User’s manual IT 3.2 Riproduzione di video e foto 1. Se la registrazione è in corso, premere il pulsante per fermare la registrazione. Viene mostrato lo schermo di standby. 2. Premere il pulsante 3. Premere il pulsante / per selezionare la categoria di file che desiderate sfogliare e premere il . pulsante per accedere al menu OSD. 4. Premere il pulsante / per visualizzare il file precedente o successivo e premere il pulsante per visualizzare il file a schermo pieno.
CAR CAMCORDER User’s manual 3.2.1 IT Riproduzione dei Video Per riprodurre i video, fare in questo modo: 1. Se la registrazione è in corso, premere il pulsante fermare la registrazione. per accedere al menu OSD. 2. Premere il pulsante 3. Premere il pulsante / e premere il pulsante per selezionare Riproduzione File . 4. Premere il pulsante / per selezionare Video o Emergenza e premere il pulsante . 5.
CAR CAMCORDER User’s manual IT 3.2.3 Lo schermo della Riproduzione Schermo Riproduzione Video Schermo Riproduzione Foto 7 7 1 6 3 2 4 5 2 3 4 N. Voce 1 Data e ora Indica la data e ora registrata. 2 Icona guida (Indietro) Premere il pulsante per ritornare al display della selezione dei file. 3 Icona guida (Precedente) Premere il pulsante per visualizzare il video/foto precedente. 4 Icona guida (Successiva) Premere il pulsante per visualizzare il video/foto successivo.
CAR CAMCORDER User’s manual 3.2.4 IT Eliminazione dei File Per eliminare i file, fare quanto segue: 1. Se la registrazione è in corso, premere il pulsante fermare la registrazione. 2. Premere il pulsante 3. Premere il pulsante / per selezionare Elimina selezioni e premere il pulsante . 4. Premere il pulsante / per selezionare la categoria del file e . premere il pulsante 5. Premere il pulsante / per selezionare il file che desiderate eliminare e premere il pulsante per accedere al menu Elimina.
CAR CAMCORDER User’s manual IT 4 Regolazione delle impostazioni 4.1 Uso del Menu Potete personalizzare la registrazione del video e altre impostazioni generali attraverso i menu del display sullo schermo (OSD). 1. Se la registrazione è in corso, premere il pulsante Registra per fermare la registrazione. 2. Premere il pulsante 3. Premere il pulsante / per selezionare un’opzione del menu e premere il pulsante per accedere al menu selezionato. 4.
CAR CAMCORDER User’s manual IT 4.2 Albero del menu Consultare la tavola qui sotto per i dettagli sulle voci del menu e le opzioni del menu disponibili. Opzione del Menu Descrizione Opzione disponibile Luce Ausiliaria Attiva/Disattiva la luce LED. Attiva / Disattiva Riproduzione File Seleziona la categoria di file che si vuole visualizzare. Video / Emergenza / Immagine Data / Ora Imposta la data e l’ora. Stampa Attiva/Disattiva stampa della data.
CAR CAMCORDER User’s manual IT Opzione del Menu Descrizione Opzione disponibile Rilevazione collisione Attiva/Disattiva la rilevazione collisione. Se questa funzione è attivata e viene rilevata una collisione, il dispositivo innesca automaticamente la registrazione di emergenza. Alta sensibilità / Normale sensibilità / Bassa sensibilità / Disattiva Spegnimento ritardato Imposta la durata del ritardo prima che si spenga la corrente. 10 Sec.
CAR CAMCORDER User’s manual IT 5 Installazione del software 1. Mettere il CD ROM allegato nel CD player. 2. Se il CD non viene eseguito automaticamente, usare Windows File Manager per eseguire il file Install_CD.exe del CD. Verrà mostrato ils eguente schermo. 3. Premere la voce [Menu] per iniziare il processo di installazione in base alle istruzioni sullo schermo.
CAR CAMCORDER User’s manual IT 6 Specificazioni Voce Descrizione Sensore d’immagine Sensore CMOS 1/3.2” Pixel effettivi 2592 (H) x 1944 (V) Media di Supporta Micro SDHC, fino a 32GB classe 4 o memorizzazione superiore Display LCD TFT LCD a colori 2.4” (112K pixel) Lente Lente Grandangolare a Fuoco Fisso F2.8, f=3.0mm Gamma fuoco 1.5m~Infinito Sequenza di Filmato Risoluzione: Full HD (1920 x 1080), 30fps HD (1280 x 720), 30fps Formato: .
CAR CAMCORDER User’s manual Voce IT Descrizione Microfono Sì Altoparlante Sì Interfaccia Mini USB, Mini C Tipo HDMI Batteria Incorporata Polimeri di Litio 470mAH ricaricabile Temperatura di Operazione 0° ~ 50° C Temperatura di Magazzino -20° ~ 80° C Dimensioni 65 x 62 x 27 mm Peso 85g circa 25
Copyright © 2012 Tutti i diritti riservati Tutti gli altri marchi, prodotti o nomi di società menzionati in questa guida sono marchi di proprietà delle rispettive società.
User’s Manual CAR CAMCORDER -Spanish-
CAR CAMCORDER User’s manual ES Acerca de esta guía El contenido en este documento tiene el propósito de informar y es sujeto a cambio sin aviso previo. Hemos hecho todo lo posible para asegurar que esta Guía de Usuario sea correcta y completa. Sin embargo, no se asume ninguna responsabilidad por errores y omisiones que puedan haber ocurrido. El fabricante reserva el derecho a cambiar las especificaciones técnicas sin aviso previo.
CAR CAMCORDER User’s manual ES Aviso Regulatorio CE Este equipo cumple con los requisitos establecidos en las Directrices Consejales en la Aproximación de las Leyes de los Estados Miembros relacionado a la Compatibilidad Eletromagnética (2004/108/EC); La Directriz de Voltaje Bajo (2006/95/EC); la Restricción del Uso de Ciertas Sustancias Peligrosas en la Directriz de Equipo Eléctrico y Electrónico (2002/95/EC), la Directriz EEE Turca ; La Regulación de Comisión (EC) No 1275/2008 que implementan la Directr
CAR CAMCORDER User’s manual ES Contenidos Acerca de esta guía............................................................3 Declaración FCC ................................................................3 Aviso WEEE .......................................................................3 Aviso Regulatorio CE..........................................................4 Notas sobre la Instalación...................................................4 Precaución ...................................................
CAR CAMCORDER User’s manual ES 3.2 4 3.1.1 Grabar vídeos mientras maneja...................14 3.1.2 Grabar todos otros tipos de vídeos ..............14 3.1.3 Grabación de Emergencia ...........................15 3.1.4 La Pantalla de grabación .............................16 3.1.5 Usar la Luz LED ..........................................17 3.1.6 Tomar imagen..............................................17 Reproducir Vídeos e Imágenes ..............................18 3.2.1 Reproducir Vídeos.
CAR CAMCORDER User’s manual ES 1 Introducción Gracias por comprar esta Grabadora de Auto avanzada. Este dispositivo está diseñado específicamente para la grabación de vídeo y audio en tiempo real cuando maneja. 1.1 Características • • • • • • • Cámara Full HD (1920x1080 @ 30fps) Pantalla de color 2.4” LCD Lente de ángulo ancho LED de alta luminosidad para ambiente con luz tenue Detección de movimiento Grabación de emergencia automática para la detección de colisiones Soporta SDHC hasta 32GB 1.
CAR CAMCORDER User’s manual ES 1.3 Panorama del Producto Vista frente Vistas arriba y abajo 10 1 2 Vistas laterales (izquierda y derecha) 3 11 12 9 13 Vista trasera 6 4 7 5 8 16 14 15 No. Ítem No.
CAR CAMCORDER User’s manual ES 2 Empezar 2.1 Insertar la Tarjeta de Memoria Inserte la tarjeta de memoria con los contactos dorados mirando el dorso del dispositivo. Empuje la tarjeta de memoria hasta oir el clic. Para quitar la tarjeta de memoria Empuje para expulsar la tarjeta de memoria de la ranura. Nota: No quite o inserte la tarjeta de memoria cuando el dispositivo está activado. Puede dañar la tarjeta de memoria. www.aiptek.
CAR CAMCORDER User’s manual ES 2.2 Insertar en Vehículos 2.2.1 Montar al parabrisas 1. Sujete el dispositivo a la base del brazo. Gire y apriete el sostenedor de auto y la base del brazo para asegurar el dispositivo firmemente bloqueado en el lugar. 2. Con la ventosa puesta horizontalmente, ubiquela en el parabrisas. 3. Sostenga la base firmemente en el parabrisas y oprima la grapa para montar el sostenedor al parabrisas. Asegúre de que la base esté bloqueada firmemente. 2.2.
CAR CAMCORDER User’s manual ES 2.3 Conectar a Energía Use solamente el adaptador de auto provisto para suministrar el dispositivo y cargar la batería incorporada. 1. Conecte una punta del adaptador al conector USB del dispositivo. 2. Conecte la otra punta del cargador al zócalo de encendedor de su vehículo. Una vez arrancado el motor, el dispositivo se activa automáticamente. Nota: El LED anaranjado se enciende mientras se carga la batería.
CAR CAMCORDER User’s manual ES 2.4 Activar/Desactivar el dispositivo 2.4.1 Activado/Desactivado Automático Una vez arrancado el motor, el dispositivo se activa automáticamente. Si la función Grabación Automática está activada, la grabación empezará automáticamente inmediatamente después de activarse el dispositivo. Vea Configurar Grabación Automática (2.5.1). Una vez apagado el motor, el dispositivo guarda la grabación automáticamente y se apaga dentro de 10 segundos. vea Retrasar cierre (4.2). 2.4.
CAR CAMCORDER User’s manual ES 2.5 Configuraciones iniciales Antes de usar el dispositivo, se le recomienda activar la función Grabación Automática y configure fecha y hora correctas. 2.5.1 Configurar Grabación Automática Para activar la grabación para iniciar automáticamente después de activar, haga lo sigte.: 1. Oprima el botón 2. Oprima el botón / para seleccionar Grabación . Automática y oprima el botón 3. / para Oprima el botón seleccionar Activado y oprima el botón . 4.
CAR CAMCORDER User’s manual ES 3 Usar la Grabadora de Auto 3.1 Grabar Vídeos 3.1.1 Grabar vídeos mientras maneja Cuando se arranca el motor y se activa la función Grabación Automática, el dispositivo se activa automáticamente y empieza a grabar. Se detendrá la grabación automáticamente cuando se apaga el motor. U, oprima el botón para detener la grabación manualmente. Nota: En algunos autos, la grabación continuará cuando se apaga el motor. Si ésto ocurre, haga lo sigte.
CAR CAMCORDER User’s manual 3.1.3 ES Grabación de Emergencia Durante la grabación de vídeo, oprima el botón para grabar el vídeo contínuamente en un archivo hasta llenar la tarjeta de memoria, o hasta la grabación manualmente detenida. Para dejar de grabar, oprima el botón . Nota: Si la función Detección de Colisiones está desactivada y se detecta una collision, el dispositivo activará automáticamente la grabación de emergencia. Vea Usar el menú (4.1). www.aiptek.
CAR CAMCORDER User’s manual ES 3.1.4 No. La Pantalla de grabación 1 4 2 3 5 6 7 Descripción Ítem 1 Duración Indica la duración de grabación. 2 Fecha y hora Indica la fecha y la hora de la grabación actual. 3 Ícono Guía (Menú) Oprima el botón menú OSD. 4 Batería Indica la energía restante. 5 Ícono Guía (Detener) Oprima el botón grabar. 6 Ícono Guía (Emergencia) Oprima el botón para grabar el vídeo contínuamente en un archivo hasta manualmente detenida.
CAR CAMCORDER User’s manual 3.1.5 ES Usar la Luz LED Puede usar la luz LED para proveer extra luz cuando no hay suficiente luz. Para activar la luz LED, haga lo sigte.: 1. Oprima el botón 2. Oprima el botón . el botón para ingresar al menú OSD. 3. Oprima el botón / para seleccionar Activado y oprima el . botón 4. Oprima el botón menú. / para seleccionar Luz Auxiliar y oprima para salir del Nota: Apague las luces LED cuando la batería está baja.
CAR CAMCORDER User’s manual ES 3.2 Reproducir Vídeos e Imágenes 1. Si la grabación está en progreso, oprima el botón dejar de grabar. La pantalla de espera aparece. 2. Oprima el botón 3. Oprima el botón / para seleccionar la categoría de archivo que desea examiner y oprima el . botón 4. Oprima el botón / para visualizar el archivo posterior o anterior y oprima el botón para visualizar el archivo en pantalla completa. para para ingresar al menú OSD.
CAR CAMCORDER User’s manual 3.2.1 ES Reproducir Vídeos Para reproducir vídeos, haga lo sigte.: 1. Si la grabación está en progreso, oprima el botón dejar de grabar. para 2. Oprima el botón 3. Oprima el botón / para seleccionar Reproducción de Archivos y oprima el botón . para ingresar al menú OSD. 4. Oprima el botón / y oprima el botón para seleccionar Vídeo o Emergencia . 5. Oprima el botón / para examiner el archivo de vídeo deseado y oprima el botón para reproducir el vídeo. 6.
CAR CAMCORDER User’s manual ES 3.2.3 La pantalla de reproducción Pantalla de reproducción de vídeo Pantalla de reproducción de imagen 7 7 1 6 3 2 4 5 2 3 4 No. Ítem Descripción 1 Fecha y hora Indica la fecha y la hora de grabación 2 Ícono Guía (Volver) Oprima el botón para volver a la muestra de selección de archivo. 3 Ícono Guía (Anterior) para visualizar Oprima el botón vídeo/imagen anterior. 4 Ícono Guía (Posterior) Oprima el botón para visualizar vídeo/imagen posterior.
CAR CAMCORDER User’s manual 3.2.4 ES Eliminar archivos Para eliminar archivo(s), haga lo sigte.: 1. Si la grabación está en progreso, oprima el botón dejar de grabar. 2. Oprima el botón 3. Oprima el botón / para seleccionar Eliminar y oprima el botón . 4. Oprima el botón / para seleccionar la categoría de archivo . y oprima el botón 5. Oprima el botón / para seleccionar el archivo que desea eliminar y oprima el botón para ingresar al menú Eliminar. 6. Oprima el botón Ítem 7.
CAR CAMCORDER User’s manual ES 4 Ajustar las configuraciones 4.1 Usar el menú Puede personalizar la grabación de vídeo y otras configuraciones generales vía los menus de muestra en pantalla (OSD). 1. Si la grabación está en progreso, oprima el botón Grabar para dejar de grabar. 2. Oprima el botón 3. Oprima el botón oprima el botón 4. Oprima el botón / para seleccionar la configuración deseada y oprima el botón para confirmarla. 5. Oprima el botón www.aiptek.com para abrir el menú OSD.
CAR CAMCORDER User’s manual ES 4.2 Árbol de menú Refiera a la tabla para detalles sobre los ítems de menú y las opciones disponibles. Opción de menú Descripción Opción disponible Luz Auxiliar Activar/Desactivar la luz LED. Activado / Desactivado Reproducción de archivos Seleccione la categoría de archivo que desea visualizar. Vídeo / Emergencia / Imagen Fecha / Hora Configura la fecha y la hora. Imprimir Activa/Desactiva el sello de fecha.
CAR CAMCORDER User’s manual ES Opción de menú Descripción Opción disponible automáticamente la grabación. Detección de colisiones Activa/Desactiva la detección de colisiones. Si esta función está activada y se detecta alguna colisión, el dispositivo activará automáticamente la grabación de emergencia. Alta sensibilidad / Sensibilidad Normal / Baja sensibilidad / Desactivado Retrasar cierre Configura la duración de demora antes del apagado. 10 Seg.
CAR CAMCORDER User’s manual ES 5 Instalar el software 1. Inserte el CD-ROM en el reproductor de CD. 2. Si el CD no se ejecuta automáticamente, utilice el Administrador de archivos de Windows para ejecutar el archivo Install_CD.exe. Aparecerá la pantalla siguiente. 3. Presione el elemento [Menú] para iniciar el proceso de instalación conforme a las instrucciones que aparecen en la pantalla. www.aiptek.
CAR CAMCORDER User’s manual ES 6 Especificaciones Ítem Descripción Sensor de Imagen Sensor CMOS 1/3.2” Pixeles efectivos 2592 (H) x 1944 (V) Medio de Soporta Micro SDHC, hasta 32GB clase 4 o almacenamiento superior. Muestra LCD 2.4” LCD color TFT (112K pixeles) Lente Lente de Enfoque Fijo de Ángulo Ancho F2.4, f=3.0mm Rango de enfoque 1.5m~Infinito Clip de película Resolución: Full HD (1920 x 1080), 30fps HD (1280 x 720), 30fps Formato: .
CAR CAMCORDER User’s manual Ítem ES Descripción Altavoces Sí Interfaz Mini USB, Mini C Tipo HDMI Batería 470mAH Li-polymer incorporada recargable Temperatura de 0° ~ 50° C operación Humedad de operación 20 ~ 70% RH Temperatura de -20° ~ 80° C almacenaje Dimensiones 65 x 62 x 27 mm Peso Aprox. 85g www.aiptek.
CAR CAMCORDER User’s manual ES Copyright © 2012 Todos los derechos reservados. Todas las otras marcas, productos o nombres de empresa mencionadas en esta guía son marcas comerciales de sus respectivas empresas. www.aiptek.
User’s Manual CAR CAMCORDER -Portuguese -
CAR CAMCORDER User’s manual PO Sobre este guia A proposta deste documento é informá-lo, porém está sujeito a mudanças sem aviso prévio. Nos esforçamos para garantir precisão e consistência, entretanto, não nos responsabilizamos por quaisquer erros e/ou omissões que tenham ocorrido. O fabricante se reserva ao direito de modificar especificações técnicas sem aviso prévio.
CAR CAMCORDER User’s manual PO Nota de regulamentação CE Este equipamento está de acordo com os requerimentos estabelecidos no Conselho de Diretivas na Aproximação de Leis dos Estados-membros relacionados à compatibilidade eletromagnética (2004/108/EC); a diretiva de baixa voltagem (2006/95/EC); a diretiva de restrição ao uso de certas substâncias perigosas em equipamentos elétricos e eletrônicos (2002/95/EC), diretiva EEE turca; a Comissão de Regulação (EC) No 1275/2008 implementando a diretiva 2005/32/E
CAR CAMCORDER User’s manual PO Conteúdo Sobre este guia ..................................................................3 Declaração FCC .................................................................3 Notas de WEEE..................................................................3 Nota de regulamentação CE...............................................4 Nota sobre a instalação ......................................................4 Precaução ...........................................................
PO CAR CAMCORDER User’s manual 3.1.5 Usando a luz LED........................................17 3.1.6 Tirando fotos ...............................................17 3.2 Reproduzindo vídeos e fotos..................................18 3.2.1 Reproduzindo vídeos...................................19 3.2.2 Ver fotos ......................................................19 3.2.3 A tela de reprodução ...................................20 3.2.4 Excluindo arquivos ......................................
CAR CAMCORDER User’s manual PO 1 ntrodução Obrigado por adquirir esta gravadora de vídeo veicular. Este equipamento é especialmente desenvolvido para gravação de vídeos e áudios quando dirigindo. 1.1 Características • • • • • • • Câmera de alta-definição (1920x1080 @ 30fps) Tela de LCD colorida de 2.4” Lente grande angular Luz LED para ambientes com baixa luminosidade Detecção de movimento Gravação automática de emergência com detecção de colisão Suporte de cartões SDHC até 32GB 1.
CAR CAMCORDER User’s manual PO 1.3 Visão geral Botões superiores e inferiores Visão frontal 10 1 2 Visão lateral (esquerda e direita) 3 11 12 9 13 Visão traseira 6 4 7 5 8 16 14 15 No. Item No.
CAR CAMCORDER User’s manual PO 2 Iniciando o uso 2.1 Inserindo o cartão de memória Insira o cartão de memória com o contato metálico apontando para a parte traseira do equipamento. Empurre o cartão de memória até ouvir o encaixe. Para remover o cartão de memória Para remover o cartão de memória, empurre-o para dentro para liberá-lo. Nota: não remova ou insira o cartão de memória quando a câmera estiver ligada, pois poderá danificá-la. www.aiptek.
CAR CAMCORDER User’s manual PO 2.2 Instalando em veículos 2.2.1 Instalando no pára-brisa 1. Atache o dispositivo à base do suporte. Gire e aperte-o, certificando-se que ele esteja firmemente atarraxado. 2. Posicione a ventosa paralelamente ao pára-brisa. 3. Segure a base firmemente junto ao pára-brisa e pressione a alavanca para baixo para fixá-la ao vidro. Certifique-se que a base esteja bem presa. 2.2.2 Ajustando a posição Regulador Regulador Gire o regulador para mover verticalmente. www.
CAR CAMCORDER User’s manual PO 2.3 Conectando à energia Use somente o adaptador fornecido para operar o equipamento e carregar a bateria embutida. 1. Conecte uma extremidade ao conector USB do equipamento. 2. Conecte a outra extremidade ao acendedor de cigarros do carro. Quando o veículo for ligado, a câmera será acionada automaticamente. Nota: A luz LED laranja indica que a bateria está sendo carregada.
CAR CAMCORDER User’s manual PO 2.4 Ligando e desligando 2.4.1 Desligamento automático Quando o motor for acionado, a câmera se ligará automaticamente. Se a função gravação automática estiver selecionada, a gravação iniciará automaticamente após o equipamento ser acionado. Veja Ajustar a gravação automática (2.5.1). Quando o motor é desligado, a câmera automaticamente salvará a gravação e se desligará em 10 segundos. Veja Atrasar desligamento (4.2). 2.4.
CAR CAMCORDER User’s manual PO 2.5 Configurações iniciais Antes de utilizar a câmera, nós recomendamos que você acione a função gravação automática e corrija a data e a hora. 2.5.1 Ajustar a gravação automática Para acionar a gravação automática, siga os seguintes passos: 1. Pressione o botão para acessar o menu OSD. 2. Pressione o botões / para selecionar Gravação Automática e pressione o botão . 3. / para Pressione os botões selecionar Lig e pressione o botão . 4.
CAR CAMCORDER User’s manual PO 3 Usando sua câmera de vídeo 3.1 Gravando vídeos 3.1.1 Grave vídeos quando dirigindo Quando o veículo é ligado e a função gravação automática está selecionada, a câmera automaticamente se liga e começa a gravar. A gravação parará automaticamente quando o motor for desligado. Ou, pressione o botão para parar de gravar manualmente. Nota: em alguns carros, a gravação continuará mesmo se o motor for desligado.
CAR CAMCORDER User’s manual 3.1.3 PO Gravação de emergência Durante a gravação de vídeo, pressione o botão para continuar gravando continuamente em um mesmo arquivo até que o cartão de memória esteja cheio ou que a gravação seja manualmente encerrada. Para parar de gravar, pressione o botão . Nota: se a função de detecção de colisão está ativada e a colisão é detectada, a câmera automaticamente iniciará a gravação. Veja em Usando o menu (4.1). www.aiptek.
CAR CAMCORDER User’s manual PO 3.1.4 No. A tela de gravação 1 4 2 3 5 6 7 Descrição Item 1 Duração Indica a duração da gravação. 2 Data e hora Indica a data e a hora. 3 Ícone guia (menu) Pressione o botão menu OSD. 4 Bateria Indica a energia restante da bateria. 5 Ícone guia (parar) Pressione o botão gravar. 6 Ícone guia (emergência) Pressione o botão continuamente para gravar em um mesmo arquivo até que a gravação seja encerrada manualmente.
CAR CAMCORDER User’s manual 3.1.5 PO Usando a luz LED Você pode usar a luz LED para fornecer iluminação extra quando a iluminação ambiente é insuficiente. Para ativar a luz LED, siga o seguinte: 3. Pressione o botão Pressione o botão . o botão / para acessar o menu OSD. para selecionar Luz auxiliar e pressione Pressione o botão / para selecionar Lig e pressione o botão . Pressione o botão menu. para sair do Nota: desligue a luz LED quando a bateria estiver baixa.
CAR CAMCORDER User’s manual PO 3.2 Reproduzindo vídeos e fotos 1. Se a gravação está em progresso, pressione o botão para encerrar a gravação. A tela de prontidão será apresentada. 2. Pressione o botão 3. Pressione o botão / para selecionar a categoria de arquivo que você deseja visualizar e . pressione o botão 4. Pressione o botão / para ver o próximo arquivo ou o anterior, e para pressione o botão visualizá-lo em tela cheia. para acessar o menu OSD.
CAR CAMCORDER User’s manual 3.2.1 PO Reproduzindo vídeos Para reproduzir vídeos, siga o seguinte: 1. Se a gravação está em progresso, pressione o botão encerrar a gravação. 2. Pressione o botão 3. Pressione o botão / para selecionar o Reprodução de arquivo e pressione o botão . 4. Pressione o botão / para selecionar Vídeo ou Emergência e pressione o botão . 5. / para selecionar o arquivo de vídeo Pressione o botão desejado e pressione o botão para reproduzi-lo. 6.
CAR CAMCORDER User’s manual PO 3.2.3 A tela de reprodução Tela de reprodução de vídeo Tela de reprodução de imagem 7 7 1 6 3 2 No. 4 5 3 2 4 Descrição Item 1 Data e hora Indica a data e a hora de gravação. 2 Ícone guia (voltar) Pressione o botão para retornar à tela de seleção de arquivos. 3 Ícone guia (anterior) para ver o Pressione o botão vídeo ou a imagem anterior. 4 Ícone guia (próximo) Pressione o botão para ver o próximo vídeo ou imagem.
CAR CAMCORDER User’s manual 3.2.4 PO Excluindo arquivos Para excluir arquivos, siga o seguinte: 1. Se gravando, pressione o botão 2. Pressione o botão 3. Pressione o botão / para selecionar Excluir seleções e . pressione o botão 4. Pressione o botão / para selecionar a categoria do arquivo e . pressione o botão 5. / para Pressione o botão selecionar o arquivo que você deseja excluir e pressione o botão para acessar o menu Excluir. 6. Pressione o botão Item 7. para parar a gravação.
CAR CAMCORDER User’s manual PO 4 Ajustando as configurações 4.1 Usando o menu Você pode customizar a gravação de vídeo e outras configurações gerais através do menu (OSD). 1. Se gravando, pressione o botão gravar para encerrar a gravação. 2. Pressione o botão 3. Pressione o botão pressione o botão 4. Pressione o botão / para selecionar a configuração desejada e pressione o botão para confirmar a configuração. 5. Pressione o botão www.aiptek.com Page 22 para abrir o menu OSD.
CAR CAMCORDER User’s manual PO 4.2 Funções do menu Refira a tabela abaixo para detalhes das opções dos itens disponíveis no menu. Opções do menu Descrição Opção disponível Luz auxiliar Liga/desliga a luz LED. Lig / Desl Reprodução de arquivo Selecione a categoria de arquivo que você deseja ver. Vídeo / Emergência / Imagem Data/Hora Ajusta a data e a hora. Data de recorde Liga e desliga a data de recorde. Lig / Desl Resolução Ajusta a resolução de vídeo.
CAR CAMCORDER User’s manual PO Opções do menu Descrição Opção disponível Detecção de colisão Liga/desliga a detecção de colisão. Se a função está ligada e qualquer colisão é detectada, a câmera automaticamente iniciará a gravação de emergência. Alta sensibilidade / Sensibilidade normal / Baixa sensibilidade / Desl Atrasar desligamento Ajusta o atraso de desligamento antes da câmera se desligar. 10 Seg. / Desl Idioma Ajusta o idioma exibido na tela. Excluir seleções Exclui arquivo(s).
CAR CAMCORDER User’s manual PO 5 Instalando o software 1. Coloque o CD de instalação na unidade de CD ROM. 2. Se o CD não for executado automaticamente, por favor, use o gerenciador de arquivos para executar o arquivo “Install_CD.exe”. A seguinte tela será exibida. 3. Pressione [Menu] para iniciar o processo de instalação de acordo com as instruções da tela. www.aiptek.
CAR CAMCORDER User’s manual PO 6 Especificações Item Descrição Sensor de imagem Sensor CMOS 1/3.2” Píxeis efetivos 2592 (H) x 1944 (V) Armazenamento Suporta Micro SDHC, até 32GB da classe 4 ou superior Tela de LCD TFT colorida de 2.4” (112K píxeis) Lente Lente grande angular F2.4, f=3.0mm Campo de foco 1.5m~Infinito Filme Resolução: FHD (1920 x 1080), 30fps HD (1280 x 720), 30fps Formato: .mov Imagem estática Resolução: 5M (2592 x 1944) Formato: DCF (JPEG, Exif: 2.
CAR CAMCORDER User’s manual Item PO Descrição Alto-falante Sim Interface Mini USB, HDMI do tipo mini C Bateria Embutida e recarregável de polímero de lítio com capacidade de 470mAH Temperatura de 0° ~ 50° C operação Umidade aceitável 20 ~ 70% RH Temperatura de -20° ~ 80° C armazenamento Dimensões 65 x 62 x 27 mm Peso Aprox. 85g www.aiptek.
CAR CAMCORDER User’s manual PO Direitos autorais © 2012 Todos os direitos reservados. Todas as outras marcas, produtos ou companhias mencionadas neste guia são marcas registradas pelos respectivos proprietários. www.aiptek.
User’s Manual CAR CAMCORDER -Russian-
CAR CAMCORDER User’s manual RU О данном руководстве Содержание данного руководства предназначено для информации и может изменяться без предварительного уведомления. Мы приложили все усилия, чтобы данное "Руководство пользователя" содержало точную и полную информацию. Однако, в случае обнаружения ошибок и пропусков, не предполагается какая-либо ответственность. Изготовитель оставляет за собой право на изменение технических характеристик без предварительного уведомления.
CAR CAMCORDER User’s manual RU Уведомление WEEE Утилизация использованного электро- и электронного оборудования и/или батарей пользователями в частных домохозяйствах Европейского Союза Данный знак на продукте или упаковке указывает, что его нельзя утилизировать как бытовой мусор. Использованное устройство и/или батарею следует утилизировать по схеме возврата в специальные пункты сбора для переработки электро- и электронного оборудования и/или батарей.
CAR CAMCORDER User’s manual RU Внимание! Используйте только рекомендованное зарядное устройство. Не разбирайте устройство самостоятельно. Не допускайте перемыкания полюсов батареи. Утилизируйте батарею надлежащим образом. Выбрасывание батареи в огонь может привести к взрыву. www.aiptek.
CAR CAMCORDER User’s manual RU Содержание О данном руководстве......................................................3 Соответствие требованиям Федеральной комиссии связи США (FCC) ........................................................................3 Уведомление WEEE..........................................................4 Уведомление о соответствии требованиям CE ...............4 Замечания по установке ...................................................4 Внимание! ...................................
CAR CAMCORDER User’s manual 2.5.2 RU Установка даты и времени ..................14 Использование автомобильного регистратора ..15 3 3.1 Видеозапись .........................................................15 3.1.1 3.1.2 3.1.3 3.1.4 3.1.5 3.1.6 3.2 Видеозапись во время движения........15 Видеозапись в других режимах ..........15 Экстренная запись.................................16 Экран записи ..........................................17 Использование светодиода подсветки18 Фотосъемка ................
CAR CAMCORDER User’s manual RU 1 Введение Благодарим вас за покупку данного современного автомобильного регистратора. Данное устройство специально предназначено для видео- и аудиозаписи в реальном времени во время вождения автомобиля. 1.
CAR CAMCORDER User’s manual RU 1.
RU CAR CAMCORDER User’s manual 2 Подготовка к работе 2.1 Установка карты памяти Установите карту памяти позолоченными контактами по направлению к устройству. Нажмите на карту памяти до ее фиксации на месте. Извлечение карты памяти Нажмите на карту памяти для ее извлечения из гнезда. Примечание. Не извлекайте и не устанавливайте карту памяти при включенном устройстве. Карту при этом можно повредить. www.aiptek.
CAR CAMCORDER User’s manual RU 2.2 Установка в автомобиле 2.2.1 Установка на ветровое стекло 1. Установите устройство на основание кронштейна. Поверните и затяните автодержатель и основание кронштейна, чтобы прочно зафиксировать устройство на месте. 2. Ровно удерживая присоску, поместите ее на ветровое стекло. 3. Плотно прижмите основание к ветровому стеклу и нажмите на ручку фиксатора для закрепления автодержателя на ветровом стекле. Проверьте надежность крепления. 2.2.
CAR CAMCORDER User’s manual RU 2.3 Подключение питания Для питания устройства и зарядки встроенной батареи используйте только прилагаемый в комплекте автомобильный переходник. 1. Подключите один разъем автомобильного переходника в гнездо USB устройства. 2. Другой разъем подключите в гнездо прикуривателя автомобиля. После запуска двигателя автомобиля устройство автоматически включается. Примечание. В процессе зарядки батареи горит оранжевый индикатор.
CAR CAMCORDER User’s manual RU 2.4 Включение и выключение устройства 2.4.1 Автоматическое включение/выключение После запуска двигателя автомобиля устройство автоматически включается. Если включена функция Автостарт записи, сразу после включения устройства автоматически запускается режим записи. См. раздел Установка режима автоматической записи (2.5.1). После выключения двигателя автомобиля устройство автоматически сохраняет запись и в течение 10 секунд выключается. См. раздел Задержка отключения (4.2).
CAR CAMCORDER User’s manual RU 2.5 Первоначальная настройка Перед использованием данного устройства мы рекомендуем включить функцию Автостарт записи и установить правильное время и дату. 2.5.1 Установка режима автоматической записи Для автоматического запуска режима записи после включения: 1. Нажмите кнопку 2. Кнопками / выберите пункт Автостарт записи и нажмите . кнопку 4. Кнопками / выберите пункт Вкл. и нажмите кнопку . 5. Нажмите кнопку НАЗАД для выхода из меню. 2.5.
CAR CAMCORDER User’s manual RU 3 Использование автомобильного регистратора 3.1 Видеозапись 3.1.1 Видеозапись во время движения После запуска двигателя при включенной функции Автостарт записи устройство автоматически включается и запускается режим записи. Запись автоматически прекращается при выключении двигателя. Для ручной остановки записи нажмите кнопку . Примечание. В некоторых автомобилях запись продолжается после выключения двигателя. В этом случае: - Вручную отключите прикуриватель.
CAR CAMCORDER User’s manual RU 3.1.3 Экстренная запись В процессе видеозаписи нажмите кнопку для непрерывной видеозаписи в один файл до заполнения карты памяти или ручной остановки записи. Для прекращения записи нажмите кнопку . Примечание. Если включена функция Датчик удара и столкновение произошло, устройство автоматически переключается в режим экстренной записи. См. раздел Использование меню (4.1). www.aiptek.
CAR CAMCORDER User’s manual 3.1.4 № п/п RU Экран записи 1 4 2 3 5 Элемент 6 7 Описание 1 Длительность Индикация длительности записи. 2 Дата и время Индикация текущей даты и времени записи. 3 Значок гида (Меню) Нажмите кнопку экранное меню. 4 Батарея Индикация заряда батареи. 5 Значок гида (Стоп) для Нажмите кнопку прекращения записи. 6 Значок гида (Экстренная запись) Нажмите кнопку для непрерывной видеозаписи в один файл до ручного выключения режима записи.
CAR CAMCORDER User’s manual RU 3.1.5 Использование светодиода подсветки В условиях недостаточной освещенности можно использовать светодиод подсветки для дополнительного освещения. Для включения светодиода подсветки: 1. Нажмите кнопку для входа в экранное меню. 2. / выберите пункт Кнопками Доп. освещение и нажмите кнопку . 3. Кнопками / выберите пункт . Вкл. и нажмите кнопку 4. Нажмите кнопку меню. для выхода из Примечание. Выключите светодиод подсветки при низком заряде батареи.
CAR CAMCORDER User’s manual RU 3.2 Воспроизведение видеозаписей и снимков 1. Если выполняется запись, нажмите кнопку для останова видеозаписи. Отображается экран ожидания. 2. Нажмите кнопку 3. Кнопками / выберите тип файла для просмотра и нажмите . кнопку 4. Кнопками / перейдите к следующему или предыдущему для файлу и нажмите кнопку просмотра файла в полный экран. для входа в экранное меню. Примечание. Из экрана ожидания можно прямо перейти в режим воспроизведения, нажав кнопку .
CAR CAMCORDER User’s manual RU 3.2.1 Воспроизведение видеозаписи Для просмотра видеозаписи: 1. Если выполняется запись, нажмите кнопку останова видеозаписи. для для входа в экранное меню. 2. Нажмите кнопку 3. Кнопками / . кнопку 4. Кнопками / выберите пункт Видео или Аварийная ситуация и нажмите кнопку . 5. / выберите Кнопками нужный видеофайл и нажмите для его кнопку воспроизведения. 6. Нажмите кнопку для временной остановки воспроизведения.
CAR CAMCORDER User’s manual RU Экран воспроизведения 3.2.3 Экран воспроизведения видео Экран просмотра фото 7 7 1 6 2 № п/п 3 4 Элемент 5 2 3 4 Описание 1 Дата и время Индикация даты и времени записи. 2 Значок гида (Назад) для возврата Нажмите кнопку в меню выбора файла. 3 Значок гида (Предыдущий) Нажмите кнопку для просмотра предыдущей видеозаписи/фотоснимка. 4 Значок гида (Следующий) Нажмите кнопку для просмотра следующей видеозаписи/фотоснимка.
CAR CAMCORDER User’s manual RU 3.2.4 Удаление файлов Для удаления файлов: 1. Если выполняется запись, нажмите кнопку останова видеозаписи. 2. Нажмите кнопку 3. Кнопками / выберите пункт Удаление файлов и нажмите кнопку . 4. Кнопками / выберите тип . файла и нажмите кнопку 5. / выберите файл Кнопками для удаления и нажмите кнопку для входа в меню удаления файлов. 6. Кнопками для входа в экранное меню. выберите режим. / Элемент 7. для Описание Удалить один Удалить текущий файл.
CAR CAMCORDER User’s manual RU 4 Настройка параметров 4.1 Использование меню Вы можете настроить параметры видеозаписи и другие общие параметры с помощью экранных меню. 1. Если выполняется запись, нажмите кнопку Запись для останова видеозаписи. 2. Нажмите кнопку 3. Кнопками / выберите пункт меню и нажмите кнопку для входа в выбранное меню. 4. Кнопками / выберите нужное значение параметра и нажмите кнопку для подтверждения. 5. Нажмите кнопку для входа в экранное меню. для выхода из меню. www.
CAR CAMCORDER User’s manual RU 4.2 Структура меню Подробное описание пунктов меню и доступных параметров см. в таблице ниже. Пункт меню Описание Доступный параметр Доп. освещение Включение/выключение светодиода подсветки. Вкл. / Выкл. Просмотр Выбор типа файла для просмотра.. Видео / Аварийная ситуация / Фото Дата / Время Установка даты и времени. Отметка времени Включение/выключение метки даты и времени. Вкл. / Выкл. Разрешение Установка разрешения видеоизображения.
CAR CAMCORDER User’s manual Пункт меню Описание RU Доступный параметр функция включена и обнаружено движение какого-либо объекта, автоматически запускается видеозапись. Датчик удара Включение/выключение режима регистрации столкновения. Если данная функция включена и обнаружено какое-либо столкновение, устройство автоматически переключается в режим экстренной записи. Выс чувст / Сред чувств / Низ чувств / Выкл. Задержка отключения Установка задержки перед выключением питания. 10 с / Выкл.
CAR CAMCORDER User’s manual RU 5 Установка программного обеспечения 1. Вставьте прилагаемый CD-ROM в проигрыватель компакт-дисков. 2. Если загрузка CD не выполняется автоматически, пожалуйста, кликните на файл Install_CD.exe компакт диска в категории Windows File Manager для выполнения инсталляции. Появится следующий экран. 3. Нажмите на опцию [Меню] для начала процесса установки в соответствии с инструкциями на экране. www.aiptek.
CAR CAMCORDER User’s manual 6 RU Технические характеристики Элемент Описание Датчик изображения 1/3,2-дюймовая КМОП-матрица Эффективные пиксели 2592 (Г) x 1944 (В) Носитель данных Поддержка карт памяти Micro SDHC до 32 ГБ, класс 4 и выше ЖК-дисплей Цветной ЖК TFT-экран 2,4 дюйма (112 Кпикс) Объектив Широкоугольный с фиксированной фокусировкой F2.4, f=3,0 мм Диапазон фокусировки От 1,5 м до ~ Видеоклип Разрешение: Full HD (1920 x 1080), 30 кадр./с HD (1280 x 720), 30 кадр./с Формат: .
CAR CAMCORDER User’s manual RU Элемент Дополнительн ое освещение Описание Да Микрофон Да Динамик Да Интерфейс Mini USB, Mini C Type HDMI Батарея Встроенная литий-полимерная перезаряжаемая 470 мА-ч Рабочая температура 0° ~ 50° C Рабочая влажность 20 ~ 70% (относительная) Температура хранения -20° ~ 80° C Размеры 65x 62 x 27 мм Масса Около 85 г www.aiptek.
CAR CAMCORDER User’s manual RU Copyright © 2012 Все права защищены. Все прочие маркировочные знаки, наименования продуктов и компаний, упомянутые в настоящем руководстве, являются товарными знаками соответствующих компаний. www.aiptek.