
User Manual


MN-957
8
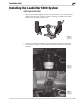
7. Index the brake line/ABS bracket alignment tabs through the lower bracket on the
back of the spring perch, and reattach using the M8 flange bolt (Q) provided (fig. 11).
Also, attach the emergency brake line bracket on the front of the passenger-side
spring perch in the same manner. Finish by installing the 5/16” bolt previously used to
tap the forward spring perch hole and LEAVE ALL HARDWARE LOOSE AT THIS TIME.
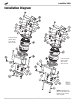
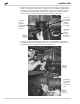
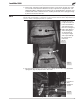
8. For the 4WD models, insert the long 3/8” carriage bolts (N) through the lower bracket
(fig. 12).
Due to the tight clearance for the U-bolt to be positioned into place, it may be necessary to
“rotate” or “screw” the carriage bolt into the square hole in the bracket.
Slide the clamp bar (A) over the carriage bolts and cap with a 3/8” flat washer (L) and
nylon lock nut (R) (fig. 12). Snug the nylon lock nuts down evenly until the clamp bar
just makes contact with the axle. Leave loose at this time.
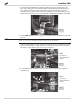
9. For the 2WD models it will be necessary to invert the carriage bolt (run it upside
down) (fig. 13).
Note:
Four-wheel
drive installation
shown.
g. 12
g. 11
LoadLifter 5000
Q
N
A
L
R
NOTE
Note:
Two-wheel
drive installation
shown.
g. 13
N
L
R
A