
Instructions / Assembly


Page 2 of 6
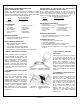
Illustration – 1 Ventilator Location
Ilustración
–
1 Ubicación del ventilador
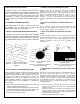
Illustration – 2 Drilling Guide Hole
Ilustración – 2 Taladrado del orificio de
guía
ROOF-MOUNT SOLAR POWER VENTILATOR
INSTALLATION INSTRUCTIONS
NOTE: Air intake openings must be installed for proper
exhaust operation. Best results will be obtained if these
openings are located around the eaves. Rectangular soffit
vents or continuous soffit vents are suggested.
Sq. Ft. of Air Intake
Model
Opening Needed
NPSP8WW 2.7
TOOLS NEEDED:
x electric drill x phillips screw driver
x 1/2” drill bit x utility knife
x jig or sabre saw x 1/4” nut driver
x tape measure x caulk gun
x pencil or marker x work gloves
x hammer x safety glasses
MATERIALS NEEDED:
x roofing nails (ring shank recommended)
x caulk and/or roofing cement
WHAT COMES IN THE CARTON:
x roof-mount fan and motor assembly
x pre-wired solar panel
x four (4) solar panel mounting brackets
x eight (8) #8 x 1/2” sheet metal screws
x four (4) #10 x 1” hex head screws with rubber washer
1. SELECT VENTILATOR LOCATION
Select a location close to the ridgeline
on the backside of the house. The
ventilator should be installed near the
center of the roof for optimum airflow.
Refer to Illustration – 1. If installing
multiple fans, space them evenly across
the roof. From the roof, measure the
distance to the ridgeline and to one end
of the roof. Note these dimensions for
use in Step 2.
2. DETERMINE EXACT VENTILATOR
POSITION
Using the dimensions obtained on the
roof in Step 1, locate the same position
inside the attic. Select the closest
centered location between two rafters to
establish the center of the roof mount
powered attic ventilator. From the attic,
drill a guide hole through the roof at the
location centered between rafters.
Refer to Illustration – 2. Place an object
through the hole for quick identification
from the roof.
INSTRUCCIONES DE INSTALACIÓN DEL VENTILADOR A
ENERGÍA SOLAR DE MONTAJE EN EL TECHO
NOTA: Deben instalarse aberturas de toma de aire para el
correcto funcionamiento del ventilador. Los mejores resultados se
logran si estas aberturas se encuentran alrededor del alero. Se
sugieren respiraderos rectangulares o continuos en el sofito.
Pies cuadrados de abertura necesaria
Modelo
para toma de aire
NPSP8WW 2.7
HERRAMIENTAS NECESARIAS:
x taladro eléctrico x destornillador Phillips
x broca de taladro de 1/2 pulg. x cuchillo utilitario
x sierra de vaivén o caladora x llave para tuercas de 1/4 pulg.
x cinta métrica x pistola calafateadora
x lápiz o marcador x guantes de trabajo
x martillo x anteojos de protección
MATERIALES NECESARIOS:
x clavos para techo (se recomienda de cuerpo estriado)
x calafate o cemento para techar
CONTENIDO DE LA CAJA:
x ventilador de techo y conjunto del motor
x panel solar precableado
x cuatro (4) ménsulas de montaje para el panel solar
x ocho (8) tornillos para chapa n.° 8 x 1/2 pulg.
x cuatro (4) tornillos hexagonales n.°10 x 1 pulg. con arandela
de goma
1. SELECCIONE EL LUGAR DEL
VENTILADOR
Seleccione un lugar cerca de la cumbrera
en la parte de atrás de la casa. El
ventilador debe instalarse cerca del centro
del techo para lograr un flujo de aire
óptimo. Vea la ilustración – 1. Si va a
instalar varios ventiladores, distribúyalos
de manera uniforme a lo ancho del techo.
Desde el techo, mida la distancia hasta la
cumbrera y hasta un extremo del techo.
Anote estas dimensiones para usarlas en
el Paso 2.
2. DETERMINE LA POSICIÓN EXACTA
DEL VENTILADOR
Usando las dimensiones obtenidas en el
techo en el Paso 1, ubique la misma
posición dentro del ático. Seleccione el
lugar más cerca del centro entre dos vigas
para establecer el centro del ventilador de
ático a energía solar de montaje en el
techo. Desde el ático, taladre un orificio
de guía a través del techo en el lugar
centrado entre dos vigas. Vea la
ilustración – 2. Pase algún objeto por el
orificio para poder ubicarlo fácilmente
desde el techo.