
Instructions / Assembly


Page 3 of 6
Illustration – 3 Hole in Roof for Ventilator
Ilustración – 3 Orificio en el techo para el
ventilador
Illustration – 4 Trimming Roof Covering
Materials
Ilustración – 4 Recorte de los materiales
de revestimiento del techo
Illustration – 5 Solar Panel Mounting
Bracket Assembly
Ilustración – 5 Conjunto de ménsulas de
montaje del panel sola
r
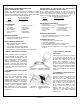
3. MARK AND CUT HOLE IN ROOF
From the roof, draw a 14-1/2” diameter circle centered on
the guide hole created in Step 2 using the template on the
carton. Cut and remove all roof shingles (and deck) inside
the 14-1/2” diameter circle using a jig or sabre saw. Refer
to Illustration – 3. NOTE: Do not cut through any rafters.
Cutting a rafter may jeopardize the structural integrity of
the roof.
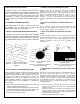
4. TRIM ROOF COVERING MATERIALS
Using a utility knife, cut an extra 1” off the top half of the
hole (shingles only) to allow room for placing and
positioning the flange. Refer to Illustration – 4.
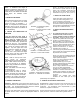
5. INSTALL SOLAR PANEL MOUNTING BRACKETS
Locate the four (4) sets of two (2) holes on the underside
of the solar panel frame. Using a phillips screw driver and
the eight (8) included #8 sheet metal screws, secure the
four included brackets to the frame as shown in Illustration
– 5.
6. SELECT PANEL LOCATION AND ROUTE WIRE
Select a location for the solar panel with a southern exposure
for optimal solar collection. NOTE: Avoid locations that
experience afternoon shade. Next, determine the routing for
the wire from the panel to the fan location. NOTE: It is
acceptable for the wire to be installed on top of the roof
covering material. However, if routing the wire through the
attic is preferred as shown in Illustration – 6, complete the
following steps:
x Drill a hole in the roof deck near the top of the solar panel
location, preferably under a shingle.
x Insert terminated wire ends through the hole into the attic.
Leave only enough wire on top of the roof so that the wire
is not under tension at the selected panel location.
x Caulk around the wire in the hole.
3. MARQUE Y CORTE UN ORIFICIO EN EL TECHO
Desde el techo, trace un círculo de 14-1/2 pulg. de diámetro
centrado en el orificio de guía creado en el Paso 2 usando la
plantilla que viene en la caja. Corte y retire todas las tejas del
techo (y el revestimiento) dentro del círculo de 14-1/2 pulg. de
diámetro usando una sierra de vaivén o caladora. Vea la
ilustración – 3. NOTA: Tenga cuidado de no cortar ninguna viga.
Si corta una viga podría poner en juego la integridad estructural del
techo.
4. RECORTE LOS MATERIALES DE REVESTIMIENTO DEL
TECHO
Con un cuchillo de utilería, corte una pulgada extra de la parte
superior del orificio (solamente las tejas) para hacer lugar para
colocar y ubicar la pestaña. Vea la ilustración – 4.
5. INSTALE LAS MÉNSULAS DE MONTAJE DEL PANEL
SOLAR
Localice los cuatro (4) grupos de dos (2) orificios en la parte de
abajo del marco del panel solar. Con un destornillador Phillips y
los ocho (8) tornillos n.° para metal incluidos, fije las cuatro
ménsulas (incluidas) al marco, tal como se muestra en la
ilustración – 5.
6. SELECCIONE EL LUGAR PARA EL PANEL Y HAGA PASAR
EL CABLE
Seleccione un lugar para el panel solar con orientación hacia el sur
para lograr una exposición óptima al sol. NOTA: Evite las
ubicaciones donde haya sombra por la tarde. A continuación,
determine por dónde pasará el cable desde el panel hasta el
ventilador. NOTA: El cable se puede instalar encima del material
de revestimiento del techo. Sin embargo, si se prefiere pasar el
cable por el ático como se muestra en la ilustración – 6, complete
los siguientes pasos:
x Taladre un orificio en la base del techo cerca de la parte
superior de la ubicación del panel solar, preferentemente
debajo de una teja.
x Inserte los extremos de los cables con terminaciones por el
orificio en dirección al ático. Solamente deje cable suficiente
encima del techo como para que el cable no esté tenso en el
lugar que se eligió para el panel.
x Calafatee alrededor del cable en el orificio.