
Instructions / Assembly


Page 4 of 6
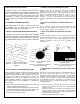
Illustration – 7 Installed Solar Panel
Ilustración – 7 Panel solar instalado
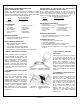
Illustration – 6 Wire Routing Option
Through Attic
Ilustración – 6 Opción de pasar el cable
por el ático
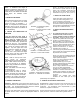
Illustration – 8 Mounting the Ventilator
Ilustración – 8 Instalación del ventilador
NOTE: If additional wire length is
needed to position the solar panel in its
optimum location use the following: UL
Listed SPT-W, 18/C Black with extruded
white stripe, UV resistant, 105ºC
(221ºF).
7. MOUNT SOLAR PANEL
Secure the solar panel to the roof using
the four (4) included #10 hex head
screws as shown in Illustration – 7.
NOTE: It is important to ensure that the
fasteners used to secure the panel to
the roof fully penetrate the underside of
the roof sheathing.
8. MOUNT THE VENTILATOR TO
THE ROOF
If the wire from the solar panel is
installed on top of the roof, perform
Step 9 first by routing the wire
beneath the flange. Make sure the top
edge of the base flange parallels the
ridgeline of the roof. The embossed
arrow, with the adjacent embossed word
“UP”, should be pointing toward the
ridgeline. Slip the upper half of the
flange under the shingles as shown in
Illustration – 8. Center the ventilator
over the hole. Next, attach the flange
securely to the roof using roofing nails
around the perimeter of the unit.
NOTE: Nails on the top half of the
flange should be positioned
underneath the top layers of shingles.
NOTE: Nails used to secure the unit
to the roof should be of sufficient
length to fully penetrate the underside
of the decking material.
NOTE: Be careful not to nail through
any electrical wire.
A non-hardening caulk or roofing
cement should be used as a seal
between the flange and shingles and
also to seal the exposed nail heads.
In addition, use caulk to seal around
any wiring routed beneath the flange.
9. CONNECT FAN MOTOR
WARNING: Depending on the panel’s sun exposure, it may
be likely that the fan will start spinning once the connections
are made. It is recommended that the panel be covered
temporarily while completing the installation.
Using the male and female quick connect terminations from
the panel and the motor, connect the appropriate leads as
follows:
NOTA: Si necesita más largo de cable
para colocar el panel solar en el lugar
óptimo, use lo siguiente: cable negro UL
SPT-W, 18/C con raya blanca en resalto,
resistente a los rayos UV, 105 °C (221 °F).
7. INSTALE EL PANEL SOLAR
Fije el panel solar al techo usando los
cuatro (4) tornillos hexagonales n.°10
como se muestra en la ilustración – 7.
NOTA: Es importante asegurarse de que
los tornillos usados para fijar el panel al
techo penetren completamente en la parte
de abajo de la cubierta del techo.
8. INSTALE EN VENTILADOR EN EL
TECHO
Si el cable del panel solar se instala
encima del techo, realice el Paso 9
primero pasando el cable por debajo de
la pestaña. Asegúrese de que el borde
superior de la pestaña de la base esté
paralelo a la cumbrera del techo. La
flecha en relieve, con la inscripción “UP”,
debe estar apuntando hacia la cumbrera
del techo. Deslice la mitad superior de la
pestaña debajo de las tejas como se
muestra en la ilustración – 8. Centre el
ventilador sobre el orificio. A
continuación, fije la pestaña firmemente al
techo usando clavos para techar alrededor
del perímetro de la unidad.
NOTA: Los clavos en la mitad superior de
la pestaña deben colocarse debajo de las
capas superiores de tejas.
NOTA: Los clavos usados para fijar la
unidad al techo deben ser lo
suficientemente largos como para
penetrar completamente la parte de abajo
del material de revestimiento.
NOTA: Tenga cuidado de no clavar un
clavo en un cable de electricidad.
Se debe usar un calafate que no se
endurezca o cemento de techado como
sellador entre la pestaña y las tejas y para
sellar también las cabezas expuestas de
los clavos.
Además, use calafate para sellar
alrededor de todo cable que se haya
pasado debajo de la pestaña.
9. CONECTE EL MOTOR DEL VENTILADOR
ADVERTENCIA: Según la exposición solar que tenga el panel, es
posible que el ventilador comience a girar una vez hechas las
conexiones. Se recomienda cubrir temporalmente el panel
mientras se completa la instalación.
Usando las terminaciones de conexión rápida macho y hembra del
panel y del motor, conecte los cables de la siguiente manera: