User’s Manual
R00 Trademarks All brand and product names are trademarks or registered trademarks of their respective companies. Note The information in this manual is subject to change without notice.
Table of Contents Precautions and Notices....................................................................... iii 1 Getting Started ................................................................................. 1 1.1 1.2 1.3 1.4 2 Basic Skills ..................................................................................... 11 2.1 2.2 2.3 3 Performing the Initial Start Up .............................................................. 1 Connecting to AC Power and Charging the Battery........
MP3 Player.......................................................................................23 4.1 4.2 4.3 4.4 5 Using the Application CD...............................................................29 5.1 5.2 6 6.3 Resetting Your System....................................................................... 33 Troubleshooting.................................................................................. 34 Power Problems .....................................................................
Precautions and Notices z For your own safety, do not operate the controls of the product while driving. z Use this product prudently. The product is intended for use solely as a navigation aid. It is not for precise measurement of direction, distance, location or topography. z The calculated route is for reference only. It is the user’s responsibility to follow the traffic signs and local regulations along the roads.
z A car holder is needed when using the device in a car. Be sure that you place the device in an appropriate place, so as not to obstruct the driver’s view, or deployment of airbags. Do not mount where the driver’s field of vision is blocked. Do not mount in front of airbag panels. iv Do not place unsecured on the dashboard. Do not mount in front of an airbag field of deployment.
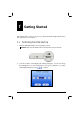
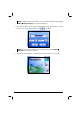
1 Getting Started This chapter tells you step by step how to perform the initial startup and introduces the components of your device. 1.1 Performing the Initial Start Up 1. Slide the ON/OFF switch to the ON (right) position. CAUTION: Always leave the ON/OFF switch in the ON position for normal operation. 2. Your device turns on and displays the “Change Language” screen. You can tap the left/right arrow to select a language if your region of purchase is a country with multiple languages.
NOTE: If multiple languages are available, you can change the language later on by tapping Setting Æ Change Language. (See section 3.6 for details.) 3. The “Date & Time” screen appears. Tap the appropriate arrow button to select the time zone, date, and time. Then tap to continue. NOTE: You can change the time zone, date, and time later on by tapping Setting Æ Date&Time. (See section 3.5 for details.) 4. The Home screen appears as shown below. You can now use your device.
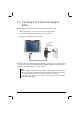
1.2 Connecting to AC Power and Charging the Battery Fully charge the battery before using your device for the first time. 1. Slide and click the connector converter onto the AC adapter. 2. Connect the adapter cable to the bottom of your device. 3. Plug the AC adapter into a wall outlet. Converter The charge indicator glows amber when charging is in progress. Do not disconnect your device from AC power until the battery is fully charged, the charge indicator will turn green.
1.3 Using Your Device in a Vehicle A car holder and a car charger are supplied with your device. Using the Car Holder CAUTION: z Select an appropriate location for the car holder. Never place the holder where the driver’s field of vision is blocked. z If the car’s windshield is tinted with a reflective coating, an external antenna (optional) may be needed to route the antenna to the top of the car through a window. When closing the car window, be careful not to pinch the antenna cable.
Connecting the Car Charger The car charger supplies power to your device when you are using the device in a car. CAUTION: To protect your device against sudden surges in current, connect the car charger only after the car engine has been started. 1. Connect one end of the car charger to the power connector of your device. 2. Connect the other end to the cigarette lighter in the car to power and charge your device.
1.4 Understanding Hardware Features NOTE: Depending upon the specific model purchased, the color of your device may not exactly match the device shown in this manual. Front Components Ref Component Description n Charge Indicator Glows bright amber to indicate that the battery is charging, and turns green when the battery is fully charged. o Touch Screen Displays the output of your device. Tap the screen with the stylus to select menu commands or enter information. 6 See Also Section 1.
Back Components Ref Component Description See Also Section 2.2 n Stylus Tap the touch screen to make selections and enter information. Pull the stylus out of its slot to use it, and store it in the slot when not in use. o External Antenna Connector This connector (under rubber dust cover) allows use of an optional external antenna with magnetic mount, which may be positioned on top of the car for better signal reception in areas with poor reception.
Left-Side Components Ref n Component Headphone Connector Description See Also Connects to stereo headphones. Right-Side Components Ref n 8 Component Power Button Description Turns the device on and off. See Also Section 2.
Top Components Ref Component Description n GPS Antenna Receives signals from the GPS satellites overhead. o SD/MMC Slot Accepts an SD (Secure Digital) or MMC (MultiMediaCard) card for accessing data such as map data and MP3 music. See Also Section 2.3 Bottom Components Ref Component Description See Also n o Reset Button Restarts your device (soft reset). Section 6.1 Mini-USB Connector Connects to the AC adapter or USB cable. Section 5.
2 Basic Skills This chapter familiarizes you with the basic operations of your device such as using the Home screen and the hardware components. 2.1 Turning Your Device On and Off Use the power button on the side of your device to turn on and off your device. When you press the power button to turn off the unit, your device actually enters into a suspend state and the system stops operating. Once you turn on the system again, it resumes.
Enables you to play MP3 files. Chapter 4 Allows you to customize system settings. Chapter 3 Whenever you quit an application, you are back to the Home screen. 2.2 Using the Stylus The stylus is your input device. You use it to navigate and select objects on the screen. Pull the stylus out of the slot and extend it for ease of use. Store it in the slot when not in use. You can use the stylus for the following actions: z Tap Touch the screen once with the stylus to open items or select options.
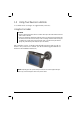
2.3 Using a SD/MMC Card Your device has a SD/MMC slot where you can insert an optional Secure Digital or MultiMediaCard storage card. NOTE: z Make sure that no foreign objects enter the slot. z Keep a SD or MMC card in a well-protected box to avoid dust and humidity when you are not using it. To use a SD/MMC card, insert it into the slot, with the connector pointing to the slot and its label facing the front of the device.
3 System Settings Your device has default system settings. You can customize the settings to suit your own personal needs. Once you change the settings, your new settings will remain until you change them again. 3.1 Using System Settings To open the Settings screen, tap the Setting button on the Home screen. The Settings screen contains seven buttons as shown below. The following sections describe these buttons and their functions.
3.2 Backlight 1. Tap the Setting button on the Home screen to open the Settings screen. 2. Tap the Backlight button on the Settings screen. 3. Tap the left or right arrow to darken or brighten the screen. 4. Tap the button to save the changes and go back to the Settings screen. 3.3 Volume 1. Tap the Setting button on the Home screen.
2. Tap the Volume button on the Settings screen. 3. Tap the left or right arrow to decrease or increase the volume. 4. Tap the button to save the changes and go back to the Settings screen. 3.4 Screen You can calibrate the touch screen if it is not responding accurately to your stylus taps. 1. Tap the Setting button on the Home screen. 2. Tap the Screen button.
3. Tap to start the calibration. 4. Tap and hold the centre of the target. 5. When the target moves to another position, tap and hold the centre of the new target. Repeat each time to complete the calibration process. 6. When completed, tap 18 button to return to the Settings screen.
3.5 Power To check the remaining power level of your battery and/or set up the power saving feature: 1. Tap the Setting button on the Home screen. 2. Tap the Power button. 3. The Power screen appears showing the remaining power of your battery. NOTE: If the level of power is too low, be sure to charge the battery with the AC adapter or the car charger. You can set a timer to automatically turn off your device when it is idle for a set period of time.
3.6 Date&Time To set the date and time: 1. Tap the Setting button on the Home screen. 2. Tap to go to the next page. 3. Tap the Date&Time button. 4. To change the time zone, tap the left/right arrow in the Time Zone item. 5. To change the date, tap the down arrow in the Date item. A calendar pops up. Tap the left arrow on the calendar to go to the earlier month and year or the right arrow to the later month and year.
6. To set the time, first tap the hour, minute, or second in the Time item and then tap the up arrow to increase or down arrow to decrease the value. 7. Tap the button to save the changes and go back to the Settings screen. 3.7 Change Language To change the system and voice language: 1. Tap the Setting button on the Home screen. 2. Tap to go to the next page. 3. Tap the Change Language button. 4. If your device supports multi-languages, tap the left or right arrow to select the system language.
NOTE: The available language options depend on your region of purchase. 5. Tap the button to save the changes and go back to the Settings screen. 3.8 Back The Back button brings you back to the Home screen.
4 MP3 Player This chapter tells you how to play MP3 files on your device. 4.1 Starting and Exiting the MP3 Player The MP3 Player program turns your device into an MP3 player. It features: z Playback of MP3 files z Basic playback controls such as play, pause, stop, next and previous z Graphic equalizer settings with 17 presets z Playback includes single selection playback, repeat, single repeat, sampling playback, normal sequence and random sequence.
To exit the program, tap on the lower right of the screen. 4.2 Playing MP3 Files 1. To play MP3 files on your device, you must have the files ready in any of the two locations: • The \MP3 folder on a storage card • The \My Flash Disk\MP3 folder on your device Create a folder named “MP3” in either location and copy the files to this folder. 2. Tap the Music button on the Home screen to start the MP3 Player program. 3. The program will search for all the MP3 files on your device and in your storage card.
5. To exit the program, tap the Home screen. on the lower right of the screen. You will return to MP3 Playback Control You can control the MP3 Player via the control buttons. See the table below for details: Control Button Name Description Play/Pause Play or pause the playback. Stop Stop the playback. Previous/ Next Move to the previous or next file. Volume Increase or decrease the volume. The indicator on the upper right corner of the panel shows the current volume level.
Sequence* Normal sequence (Default) Random sequence Open Play List Open play list. (See Section 4.3 for more information.) Equalizer Open or close the equalizer panel. (See Section 4.4 for more information.) Help Introduce the function and operation of each icon. Tap an icon to see a description line at the bottom of the screen. Close MP3 Player Close the program and return to the Home screen.
2. To add a song in the play list, tap the Add Song button at the bottom of the screen. A screen appears displaying all the MP3 files. Tap the song you wish to add and then tap Add Song. 3. Repeat the same procedure for the other songs to be added. 4. To save the play list, tap the Save Playlist button screen and then Yes. 5. To return to the control panel, tap at the bottom of the on the right toolbar. Opening a Play List To open one of the play lists that you have created: 1.
Managing Your Play Lists When you have opened a play list, you can edit or remove the list. z To remove a song from the list: Tap the song and then tap the Delete Song button screen. at the bottom of the z To remove all songs from the list: Tap the Delete All button on the right toolbar. z To delete a play list: at the bottom of the screen. Tap the play list you wish Tap the Load button to delete and then tap Delete. 4.4 Equalizer The MP3 Player provides 17 presets for various music effects.
5 Using the Application CD This chapter tells you how to install ActiveSync for transferring data between your device and a computer. 5.1 About the Application CD The Application CD provides two function items: z ActiveSync Installs Microsoft® ActiveSync® with which you can copy data such as MP3 or map files to your storage card. z Manual Allows you to read this User’s Manual. To use the CD, insert it into the CD-ROM drive of your computer. The auto run screen appears as shown below.
5.2 About ActiveSync ActiveSync allows you to establish the connection between your device and computer. CAUTION: Do not connect your device to your computer before ActiveSync is installed. Installing ActiveSync 1. Turn on your computer and your device. 2. Insert the Application CD into the CD-ROM drive of your computer. The auto run screen appears. 3. Click the Install button in the ActiveSync section. The installation wizard will start automatically. 4.
Using ActiveSync Once ActiveSync is installed on your computer, you can use it to transfer files (i.e. MP3 files) between your device and your computer. CAUTION: Be discreet when you delete files from your device. Deleting files of which the function is unknown can cause programs or features to malfunction. Whenever you connect your device to your computer with the ActiveSync cable, the New Partnership wizard screen appears. Always select Guest Partnership to connect as a guest device.
6 Troubleshooting and Troubleshooting and Maintenance Maintenance This chapter gives solutions to common problems you may encounter. It also provides guidelines on how to take care of your device. NOTE: If you encounter a problem you cannot solve, contact an authorized service center for assistance. 6.1 Resetting Your System Occasionally, you may need to reset your device. For example, you should reset your system when it stops responding; or appears to be “frozen” or “locked up.
Wait for 1 minute. 4. Your device turns on and displays the initial start up screen. Complete the settings as described in section 1.1. 6.2 Troubleshooting Power Problems Power does not turn on when using battery power z The remaining battery power may be too low to run your device. Connect the AC adapter to your device and to AC power. Then, turn on your device.
Screen responds slowly z Make sure that your device is not running out of battery power. If the problem still exists, reset your system. Screen freezes z Reset your system. Screen is hard to read z Make sure that the backlight of the display is on and if necessary adjust the brightness. Inaccurate response to stylus taps z Recalibrate the touch screen. (See section 3.4 for instructions.
6.3 Maintaining Your Device Taking good care of your device will ensure trouble-free operation and reduce the risk of damage to your device. z Keep your device away from excessive moisture and extreme temperatures. z Avoid exposing your device to direct sunlight or strong ultraviolet light for extended periods of time. z Do not place anything on top of your device or drop objects on your device. z Do not drop your device or subject it to severe shock.
7 Regulatory Information NOTE: Marking labels located on the exterior of your device indicate the regulations that your model complies with. Please check the marking labels on your device and refer to the corresponding statements in this chapter. Some notices apply to specific models only. 7.
The manufacturer cannot be held responsible for modifications made by the User and the consequences thereof, which may alter the conformity of the product with the CE Marking. 7.2 Safety Precautions About Charging z Use only the AC adapter (PHIHONG, PSC05R-050) supplied with your device. Use of another type of AC adapter will result in malfunction and/or danger. z This product is intended to be supplied by a LISTED Power Unit marked with “LPS”, “Limited Power Source” and output rated + 5 V dc / 1.0 A”.
z Important instructions (for service personnel only) Caution: Risk of explosion if battery is replaced by an incorrect type. Dispose of used batteries according to the instructions. 9 Replace only with the same or equivalent type recommended by the manufacturer. 9 The battery must be recycled or disposed of properly. 9 Use the battery only in the specified equipment.