
Specifications
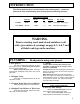

8
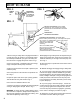
AIRLESSCO 007 SPRAY GUN
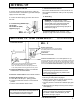
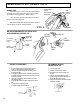
MAJOR COMPONENTS OF SPRAY GUN
AND REVERSIBLE SPRAY TIP
Attach spray gun to airless unit and tighten fittings
securely. Set the gun safety latch.(Also may be called
gun safety lock or trigger lock) * Refer to Fig. A.
* The gun safety latch should always be set when
the gun is not being triggered.
Read all warnings and safety precautions supplied
with the spray gun and in product manual.
FIG. A
RELEASED
GUN SAFETY
LATCH
IN LOCKED
POSITION
GUN
SAFETY
LATCH
SPRAY GUN
REV-TIP
REV
GUARD
O-RING
GASKET
METAL
SEAT
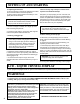
SPRAY TIP ASSEMBLY
1. Besurethepressurereliefprocedureisfollowed
beforeassemblingtipandhousingtothegun.
2. InsertRev-TipcylinderintoREV-GUARD(guard
housingassembly).
3. GuidethemetalseatintoREV-GUARD(guardhousing
assembly)throughtheretainingnutandturnuntilitseats
againstthecylinder.
4. InserttheOringgasketontothemetalseatsothatit
fitsintothegrooves.
5. FingertightentheREV-GUARDretainingnutontothe
gun.
6. Turnguardinthedesiredposition.
7. Completelytightentheretainingnut.
O-Ring Gasket
Metal Seat
Rev-Tip
Cylinder
Retaining Nut
Spray PositionShown
Reverse to
Unplug
REV-GUARD
Guard Housing Assembly
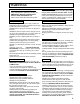
TO REMOVE CLOGS
FROM SPRAY TIP
Handle
(filter inside)
Reversible
Spray Tip
Tip Guard
Gun Safety
Latch (or
Lock)
Trigger
Guard
1. Lockgunsafetylatch.
2. TurnRev-Tiphandle180degrees.
3. Disengagetriggerlockandtriggergun
intopail.
4. IftheRev-Tiphandleappearslocked
(resiststurning),loosentheretainingnut.
Thehandlewillnowturneasily.
5. Engagegunsafetylatchandreturnhandle
tothesprayposition.