
Specifications

2
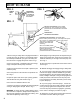
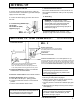
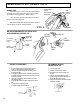
REMOVE
SPRAY
TIP
metal pail
ENGAGE GUN
SAFETY LATCH
(LOCK GUN) as
per gun instruc-
tion manual.
FIG. 1
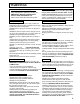
FIG. 3
1. Be sure the gun safety latch is engaged and there is
no spray tip in the gun. Refer to your separate instruc-
tion manual provided with your gun on its safety fea-
tures and how to engage safety latch. Refer to Fig. 1
2. Pour enough clean, compatible solvent into a large,
empty metal pail to fill the pump and hoses.
3. Place the suction tube into the pail or place the pail
under the pump.
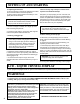
4. Turn the pressure control knob to low pressure. Re-
fer to Fig. 2.
5. Open the prime valve to the open- priming position.
This will allow an easy start. Refer to Fig. 2.
6. Turn the motor ON/OFF switch to ON.
7. Point the gun into the metal pail and hold a metal part
of the gun firmly against the pail. Refer to Fig. 3.
WARNING: To reduce the risk of static sparking, which
can cause fire or explosion, always hold a metal part of
the gun firmly against the metal pail when flushing. This
also reduces splashing. Refer to Fig. 3.
8. Disengage the gun safety latch and squeeze the gun
trigger. At the same time, slowly turn the pressure con-
trol knob clockwise, just enough to start the pump. Re-
fer to Fig. 2.
9. Allow the pump to operate until clean solvent comes
from the gun.
10. Release the trigger and engage the gun safety latch.
11. If you are going to start spraying, place the suction
tube into the supply container. Release the gun safety
latch and trigger the gun into another empty, metal con-
tainer, holding a metal part of the gun firmly against the
metal pail, and force the solvent from the pump and
hose. Engage the gun safety latch until you are ready
to prime the pump.
12. If you are going to store the sprayer , remove the
suction tube from the solvent pail, holding a metal part
of the gun firmly against the metal pail, force the sol-
vent from the pump and hose, Engage the gun safety
latch. Refer to "Storage" procedure on page 1.
13. Whenever you shut off the sprayer follow the Pres-
sure Relief Procedure Warning on Page 6.
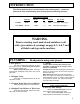
Pressure Control Knob: used to adjust
pressure only. Turn clockwise to increase
pressure and counterclockwise to decrease
pressure.
On/Off Switch
Thermal Overload Switch
Prime/Pressure Relief Valve (Prime/PR Valve)
Used to relieve pressure from gun, hose & tip and to prime
the unit when in OPEN position. (It is in open position
when there is a wider gap
between valve handle and
cam body)
When in CLOSED position,
there is only a very slight gap
between handle & body.
When closed the system is
pressurized. Handle as a loaded firearm!
FIG. 2
HOW TO FLUSH