
Specifications
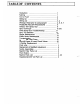

3
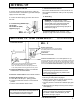
1. Connect the Hose and Gun
4. Grounding
WARNING: To reduce the risk of static
sparking, fire or explosion which can result in
serious bodily injury and property damage,
always ground the sprayer and system
components and the object being sprayed as
instructed on page 6.
5. Flush the sprayer as per "Flushing" - New
Sprayer on page 1 and "How to Flush" on page 2.
a. Remove the plastic cap plug from the outlet con-
nector and screw a conductive or grounded 3000 psi
spray hose onto fluid outlet.
b. Connect an airless spray gun to the other end of
the hose.
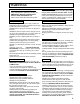
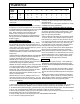
2. Fill the Packing Nut/Wet Cup
1/3 full with
Throat Seal Oil (TSO)
supplied. (Fig. 4)
FIG. 4
3. Check the Electrical Service
Be sure the electrical service is 120 V, 60 HZ AC 15
amp minimum and that the outlet you use is properly
grounded.
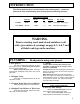
Read Safety Warnings on page
4, 5, 6 and 7 before starting.
WARNING: If you spray into the paint bucket,
always use lowest spray pressure and maintain
firm metal to metal contact between gun and
container. See Fig.3. page 2.
CONTINUED NEXT PAGE
WARNING: To stop the unit in an emergency,
turn motor off. Then relieve the fluid pressure in
the pump and hose as instructed in the
Pressure Relief Procedure on Page 6.
2. Prepare the Material according to the material
manufacturer's recommendations.
3. Place the suction tube into the material container.
4. Starting the Sprayer (See Fig. 5 above)
a. Prime Valve must be open - priming position.
b. Pressure control knob must be in Low Pressure
position.
c. Turn the motor ON/OFF switch to ON.
5. Prime the pump.
a. Be sure gun safety latch is engaged.
b. After the pump is primed, close the prime valve by
turning it all the way to "closed" position.
c. Turn the pressure control knob to desired spray pres
sure.
d. Disengage the gun safety lock and you are ready to
start spraying.
CAUTION: Do not turn motor on without fluid
pump having enough fluid so that it can be
primed. Running fluid pump dry will decrease
life of pumps packings.
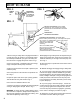
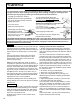
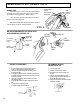
1. Learn the Controls
FIG. 5
Pressure Control Knob
On/Off Switch
Thermal Overload Switch
Prime/Pressure Relief Valve- used to relieve pressure from gun,
hose & tip AND to Prime machine when in open position (a wider gap
shows between between valve handle and cam body.) When in closed
position (very slight gap) the system is pressurized and ready to spray.
Learn and follow Pressure Relief Procedure on page 6 of this manual.
When you turn the valve handle and the gap between
the valve handle and the cam body becomes
wider - this means the valve is in the open position. It is
in the closed position when the gap becomes very small.
-used to adjust pressure only. Turn clockwise
to increase pressure and counterclockwise to
decrease pressure.
SETTING UP
SETTING UP AND STARTING -