
Specifications
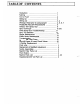

4
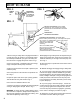
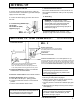
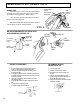
6. Adjusting the Pressure
a. Turn the pressure control knob clockwise to increase
and counterclockwise to decrease pressure.
b. Always use the lowest pressure necessary to com-
pletely atomize the material.
CAUTION: Operating the sprayer at higher
pressure than needed wastes material, causes
early tip wear and shortens sprayer life.
c. If more coverage is needed use a larger tip rather
than increasing the pressure.
d. Check the spray pattern. The tip size and angle de-
termines the pattern width and flow rate.
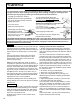
7. Cleaning a Clogged Tip
WARNING: To reduce the risk of injection,
never hold your hand, body, fingers or hand in
a rag, in front of the spray tip when cleaning or
checking for cleared tip. Always point the gun
toward the ground or into a waste container
when checking to see if the tip is cleared or
when using a self-cleaning tip.
a. Follow the Pressure Relief Procedure on page 6.
b. Clean the front of the tip frequently (with toothbrush
only) during the day to keep material from building up
and clogging the tip.
c. To clean and clear a tip if it clogs, refer to the
separate instruction manual received with your gun or
nozzle.
There is an easy way to keep the outside of the
tip clean from material build-up:
Everytime you stop spraying for even a minute, lock
the gun and submerge the gun into a small bucket of
thinner compatible with the material sprayed. Thinner
will dissolve the build up of paint on the outside of tip,
tip guard and gun much more effectively if the paint
did not have time to dry out completely.
WARNING: Clogged standard (flat) tip - clean
only after the tip is removed from the gun.
Follow the Pressure Relief Procedure on Page
6.
8. When shutting off the sprayer
a. Whenever you stop spraying, even for a short
break, follow the Pressure Relief Procedure Warning
on page 6.
b. Clean the tip and gun as recommended by your
separate gun instruction manual.
c. Flush the sprayer at the end of each work day if
the material you are spraying is waterbased, or if it
could harden in the sprayer overnight. See "Flushing"
page 1 & 2. Use a compatible solvent to flush, then fill
the pump and hoses with an oil-based solvent such as
mineral spirits.
WARNING: Be sure to relieve pressure in the
pump after filling with mineral spirits.
d. For long term shutdown or storage, refer to page 1.
WARNINGS CONTINUED ON NEXT PAGE............
DO NOT USE halogenated solvents in this sytem. The
prime valve, 2 gun manifold and most airless guns have
aluminum parts and may explode. Cleaning agents,
coatings, paints or adhesives may contain halogenated
hydrocarbon solvents. DON'T TAKE
CHANCES! Consult your material suppliers to be sure.
Some of the most common of these solvents are:
Carbontetrachloride, Chlorobenzene, Dichloroethane,
Dichloroethyl Ether, Ethylbromide, Ethylchloride,
Tethrachloethane. Alternate valves and guns are
available if you need to use these solvents.
Important: United States Government safety stan-
dards have been adopted under the Occupational
Safety & Health Act. These standards, particularly
the General Standards, Part 1910 & and Construc-
tion Standards, Part 1926 should be consulted.
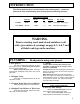
HIGH PRESSURE SPRAY CAN CAUSE EXTREMELY SERIOUS INJURY. Handle as you would a
loaded firearm. Learn and follow the PRESSURE RELIEF PROCEDURE ON PAGE 6. Observe all
warnings. This sprayer is for professional use only.
SETTING UP AND STARTING
WARNINGS
If your sprayer is equipped with an optional LCD Readout, the system pressure will be displayed.
LCD - LIQUID CRYSTAL DISPLAY