
Instructions / Assembly


TRAMPOLINE AND ENCLOSURE ASSEMBLY
WARNING: 2-3 adults in good physical condition are required for the following assembly. Wear proper
shoes and maintain balance to prevent a fall. Failure to follow all instructions and warnings exactly may
result in serious injury. Do not use your trampoline and/or enclosure until you have thoroughly read and
understand all instructions and warnings provided.
REFER TO PARTS LIST FOR IDENTIFICATION OF PARTS
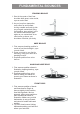
7. Example of leg assembly fixed
into the “T” connector of top
rail, secured with button lock.
Please make sure the button
lock face inside.
8. Continue with all the legs, after
which the trampoline should
look like this.
9. With stitching portion facing
downward and labels + logo
facing upwards, lay jump mat
(B) inside the frame and attach
a spring(G) to a “D” ring on the
mat. Always attach “closed”
end of hooks to the jump mat
“D” rings and “open” end of
hooks to the top rail.
10. Attach initial spring into a slot
on the top rail. WARNING:
Trampoline is under tension
and effort may be required to
attach springs to frame. Be
careful not to pinch fingers or
slip. Serious injury may occur!
11. Repeat this step directly
across from where you
attached the first spring. You
will have to count to make
sure that the correct “D” ring is
the same number of slots
away from the starting point.
12. Attach four more springs equal
the distance from each other.
Count to make sure “D” rings
and slots are aligned.
“Open” end
“Closed” end
6
5
3
4
1
2