
Instructions / Assembly


TRAMPOLINE AND ENCLOSURE ASSEMBLY
WARNING: 2-3 adults in good physical condition are required for the following assembly. Wear proper
shoes and maintain balance to prevent a fall. Failure to follow all instructions and warnings exactly may
result in serious injury. Do not use your trampoline and/or enclosure until you have thoroughly read and
understand all instructions and warnings provided.
REFER TO PARTS LIST FOR IDENTIFICATION OF PARTS
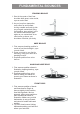
13. As you add springs the tension
will increase. Use the spring
tool(H) to safely hook the
ends of each spring into the
rail as shown.
14. Repeat the process of placing
the springs half the distance
among the already placed
springs. To even out tension,
attach a spring opposite the
one just attached.
15. With all springs attached,
lay frame cover(A) in place.
16. Position the frame cover(A)
over the top rail and springs,
whilst making sure that each
gap in the padding aligns with
the “T” connector on the top
rail, in which the enclosure
pole will be placed (See step
22). Do NOT fasten the frame
cover to the frame at this
moment.
17. Spread out the Enclosure
Mesh Net(O) on the
trampoline and guide the
steel rods(M) through the
“tunnel” stitched in the top
of the net.
18. While guiding the steel rods
(M) through the “tunnel”,
connect each of the steel rods
with Connection Nut(N) until
a full circle has formed.
Attention: Side with “groove”
in nut needs to be connected
with “notch” side in steel rod.
The metal nut can be fastened
by hand or with help of a
wrench (P).
6
5
7
8
3
4
10
9
1
2
Groove
Notch