CSD-ES770LH,U CSD=ES570LH CSD-ES370LH,U COMPACT DISC STEREO RADIO CASSETTE RECORDER RADIO-CASSETTE ESTEREOFONICO DISCO COMPACTO OWNER’S CON RECORD For your convenience, record the model number (you will find it at the bottom of the unit) and serial number (you will find it in the battery compartment) in the space provided below. Please refer to them when you contact your AIWA dealer in case of difficulty.
TABLEOFCONTENTS PRECAUTIONS POWER REMOTE SOUND .......................................................................4 SUPPLY ....................................................................6 CONTROL ...............................................................6 ADJUSTMENT ..........................................................8 LISTENING TO A COMPACT DISC ................................... 10 PROGRAMMED PLAY OF A DISC .................................... 14 LISTENING TO THE RADIO .......
iNDICE PRECAUCIONES FUENTE ....................................................................5 DE ALIMENTACION CONTROL AJUSTE iNDICE REMOTO DEL ................................................7 ..............................................................7 SONIDO ...........................................................9 PRECAU&OES ........................................................................5 SUPRIMENTO DE ENERGIA CONTROLE AJUSTE REMOTO REPRODUCTION DE CDS .................
PRECAUTIONS Read the Operating Instructions carefully and completely before operating the unit. Be sure to keep the Operating Instructions for future reference. All warnings and cautions In the Operating instructions and on the unit should be strictly followed, as well as the safety suggestions below. Installation 1 Water and moisfure — Do not use this unit near water, such as near a bathtub, washbowl, swimming pool, or the like.
PRECAUCIONES PRECAUCOES Lea detenidamente todas Ias instrucciones que se descnben en el Manual de Instrucclones antes de proceder a utllizar el aparato y guarde el manual para posibles consultas posterlores. Siga al pie de la Ietra todas [as advertencias y precauciones indicadas en este Manual de Instrucciones, al igual que Ias sugerencias de segurldad que se Indican a continuation. Leia atentamente todas as instru@5es de uso antes de utili,zar o aparelho.
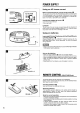
POWERSUPPLY Using on AC house current Before connecting the AC cord (LH model only) * ❑ The LH model has an AC VOLTAGE selector. Make sure that the AC VOLTAGE selector is set to the position matching your local voltage. If it is not correctly set, change it with a screwdriver or a similar tool. Either 110-120V or 220-240V can be selected. Connect the supplied AC cord.
FUENTE DEALIMENTACION SUPRIMENTO DEENERGIA Alirnentacion Por meio de corrente tics Antes *W por CA de la red de conectar el cable de CA (modelo LH solamente) El modelo LH tiene un selector de corriente (AC VOLTAGE). Cerciorese de que el selector AC VOLTAGE este en la position correspondiente a la tension de la red del Iugar donde vaya a utilizar ei aparato.
SOUNDADJUSTMENT To adjust the volume Turn the VOLUME + ❑ control, QSOUND system ● ❑ This system provides a rich, three dimensional sound area. You can enjoy a more enhanced sound. Press the QSOUND button and’the QSOUND indicator lights. s At higher volume, turning QSOUND on may cause the sound distortion. In this case, turn the volume down. To obtain powerful bass + Press the BASS button. The BASS indicator To select an equalization For greater listening pleasure, ization modes.
AJUSTEDELSOhllDO AJUSTEDOSOM Ajuste del volumen Para ajustar El volumen se ajusta girando el control VOLUME, Sistema QSOUND + H Gire o controle + H Sistema Este sistema brinda un area de sonido tridimensional de gran amplitud. Este sistema permite disfrutar de un sonido mejorado. Para activarlo, pulse et boton QSOUND, tras 10 cual se ilumina et indicador QSOUND. . Si activa el sistema QSOUND cuando se esta escuchando con el volumen alto, es posible que el sonido se distorsione.
LISTENING TOA COMPACT DISC 1 Set the FUNCTION The OPE/BATT switch indicator to CD. lights. 2 Press OPEN to open the disc compartment. 3 Place a disc in the center the disc compartment. with the label side up and close You can also place a smaller 3-inch (8 cm) disc, @ Total number of tracks on the disc @ Total playing time CSD-ES7701ES570 4 Press the 011 PLAY/PAUSE button to start CD play.
AUDl($iODECD REPRODUCC16N DECDs 1 Ponga el conmutada~r Se ilumina el indicador FUNCTION en la position 1 Coloque CD. 2 Pulse OPEN para abrir el compartimiento 3 Coloque impress del CD. 2 un disco en el centro de la bandeja con la cara hacia arriba y cierre ei compartimiento. Tambien se puede ponelr un disco mas pequeho Pulse el boton la reproduction 011 lPLAY/PAUSE del CD. @ Ntimero de pista @ Tiempo de reproduction Operaciones de 8 cm. ● CD.
LISTENING play ● Repeat W/w SKIPLSEARCH REPEAT B . “a= HI = ?[ CSD-ES7701ES570 to select the desired play mode. 1 track repeat play ( C 1 ie displayed) ‘“ -., DISC ❑ Press the REPEAT button repeatedly REPEAT w/wlSKIP/SEARCH TO A COMPACT When the track finishes play, it is played again from the start. J All track repeat play ( G ALL is displayed) When the last track on the disc finishes play, the entire disc is played again from the first track.
/?EPRODUCC/OIV Repetition AUDl~AO DE CDs de reproduction Pulse el boton REPEAT en secuencia de reproduction deseada. ● ❑ para seleccionar , la modalidad + Repetition de 1 pista (la indication G 1 se ilumina) Cuando la pista se termina, se reproduce nuevamente desde el principio, J Repetition de todas Ias pilas (la indication C ALL se ilumina) Cuando se termina la tiltima pista, se reproduce nuevamente el disco entero empezando por la primera pista. .
1 2 PROGRAMMED PLAYOFA DISC 3“5 4 7 4 You can choose up to 20 tracks in any desired order for programmed play. 1 Set the FUNCTION The OPE/BATT CANCEL 3“5 4 7 CSD-ES7701ES570 1 ti!!7’FUNCTION CD - RADIO 0 TAPE &s~*NDBy tzmzn 2 3 switch indicator to CD. lights. Place a disc in the center ■ STOP/MEMORY Press the “M” flashes with the label side up. button. in the display. or WI 4 Press the W the track number.
REPRODUCCIOIU PROGRAMADA DECD Se pueden seleccionar deseado. 1 Ponga hasta 20 pistas para reproducirlas el conmutador Se ilumina el indicador 2 Coloque el boton Parpadea Na reprodugzlo programada, qualquer ordem desejada. CD, 1 Coloque la cara 2 Coloque etiqueta a chave de la bandeja con (W 4 Pulse et boton SKIPR3EARCH que corresponds W ) para seleccionar la pista que desea programar. o na posiq~o em CD. do compartimento, com a ■ STOP/MEMORY.
LISTENING TOTHERADIO 1 Set the FUNCTION The OPE/BATT 2 Set the BAND switch 3 Turn the TUNING FUNC770N 1 After + TAPE &STANDBY Lmlm ‘B mm to RADIO. lights. to select control a band. to tune in to a station. listening Set the FUNCTION CD 0 - RADIO ‘2 . switch indicator For better switch to POWER reception + (!) STANDBY/TAPE. ❑ FM Extend the FM antenna and place it in the position that sounds best. AM Turn the unit to find the position which gives the best reception.
RECEPCION DERADIO 1 Ponga el conmutador FUNCTION AUDIChODORADIO en la position RADIO. 1 Coloque Se ilumina el indicador OPE/BATT. 2 Seleccione 3 Sintonice ING. una banda la emisora de radio deseada a chave O indicador con el selector girando BAND. el control TUN- 2 FUNCTION OPE/BATT Mova a chave na posigi%o RADIO. ilumina-se. BAND para selecionar 3 Gire o controle TUNING a faixa. para sintonizar uma emissora. Apes a audi@o Cuando termine Ponga el conmutador BYITAPE.
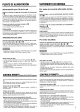
PLAYINGBACKA TAPE The unit plays back both sides of the tape. The side facing the cassette holder is the front side. The side facing inside of the unit is the reverse side. CSD-ES5701ES370 [ The unit plays back the side facing the cassette 1 Set the TAPE. 2 Insert FUNCTION switch holder. to POWER (!) STANDBY/ a cassette. @ Press the ■ /= holder. @ Insert a cassette.
REPRODUCTION DECINTAS TOCANDO UMAFITA ~ I CSD-ES770 Puede reproducer Ias dos caras del cassette. La cara anterior es la que queda del Iado de la tapa del compartimiento. La cara opuesta es la que queda mirando hacia el interior del aparato. O aparelho reproduz os dois Iados da fita. O Iado voltado para o exterior do ports-cassete O Iado voltado para o interior do ports-cassete I csD-Es570/Es370 I Puede reproducer solamente la tapa del compartimiento.
PLAYING Cassette BACK A TAPE tapes A ● ❑ Take up any slack in the tape with a pencil or similar tool before use. Slack tape may break or jam in the mechanism. Tape slack 120-minute or longer These are extremely not recommended. To prevent tapes thin and easily deformed accidental erasure* on a cassette Cover the tab openings @ Cellophane tape 20 without with cellophane They are ❑ Break off the plastic tabs on the cassette screwdriver or other pointed tool.
REPRODUCTION TOCANDO DE CINTAS Fitas cassete Cintas de cassette Tension de la cinta + (JMA FITA ❑ ●❑ Fita com folga Tense Iacinta usando un Iapicero u otro objeto similar antes de usarla. Si la cinta no esta tensa puede romperse o atascarse en el mecanismo. Remova qualquer folga da fita com urn lapis ou instrument semeIhante antes de usa-la. Fitas com folga podem se romper ou obstruir o mecanismo.
RECORDING FROMA COMPACT DISC 2 Recording is done on the side facing the cassette Use type I (normal) tapes. 1 1 Insert a cassette. B a @ @ The side to be recorded on CSD-.ES77O 2 Set the FUNCTION 4 A,J,&, WW4D ,, l+El 1 II PAUSE DIR switch to CD. For CSD-ES770, make sure that the 4 light of the OPE/BATT/DIR indicator is on. If it is not on, press the DIR button to turn it on. 3 Place a disc with the label facing CSD-ES7701ES570 CSD-ES5701ES370 II PAUSE k 4 I A U=IHW4 up.
GRABACION DECD GRAVA@iO DECDEMCASSETE Siempre se graba en la cara de la cintaque esta mirando hacia la tapa del compartimiento de cassette. Para grabar, utlllce cintas tipo I (normales). A gravag~o e feita no Iado voltado cassete. Use fitas tlpo I (normal). 1 Coloque 1 Coloque un cassette. FUNCTION en la position En el caso del CSD-ES770, asegurese piloto U del indicador OPE/BATT/DIR. boton DIR para iluminarlo. 3 Coloque boton 2 Coloque CD. hacia arriba. ● REC para darcomienzo a la grabacion.
RECORDING FROMTHERADIO Recording is done on the side facing the cassette Use type I (normal) tapes. holder. 1 Insert a cassette. @ The side to be recorded on N % 2 Set the FUNCTION CSD-ES770 5 AJ,4, **4P,, J-je II F’NJSE DIR indicator 1 3 Set the BAND switch 4 ■ /= To stop 1 To pause After CD 0 TAPE &sTAIvDBY mum OPEIBATTIDIR $B < ‘@g 11 PAUSE button Press again to resume recording.
GRABACION DELARADIO GRAVACfiO DORADIO Siempre se graba en la cara de la cinta que esta mirando hacia Iatapa del compartimiento de cassette. Para grabar, utilice cintas tipo I (normales). A gravarj~o e feita no Iado voltado cassete. Use fitas tipo I (normal). 1 Coloque 1 Coloque un cassette. @ Cara en la que habra de grabarse 2 Ponga e! conmutador 4 Sintonice ING. 5 Pulseel en la position RADIO.
MAINTENANCE To clean the cabinet CSD-ES770 Use a soft cloth lightly moistened with a mild detergent solution. use strong solvents such as alcohol, benzine or thinner. Do not To clean the heads and the tape paths +H After every 10 hours of use, clean the heads and tape paths with a head cleaning cassette or cotton swab moistened with cleaning fluid or denatured alcohol. (These cleaning kits are commercially available.
MANTENIMIENTO MANUTENGAO Limpieza Limpeza del aparato Para Iimpiar el aparato por fuera, use un pafio suave humedecido con una solution de detergence neutro. solventesfuertes (alcohol, bencina, disolvente, etc.). Limpieza de Ias cabezas paso de la cinta + ❑ y puntos Iigeramente Jamas use de Despues de cada 10 horas de USO,Iimpie Ias cabezas y Ios puntos de paso de la cinta con un cassette Iimpiador o un bastoncilio de algodon humedecido con Ifquido Iimpiador o alcohol desnaturalizado.
SPECIFICATIONS Tuner section Frequency range Common FM: 87.5–108.
ESPECIFICACIONES Seccion Bandas Seccion FM: 87,5-108,0 MHz Antena: Antena de la vara AM: 530-1.710 kHz Antena: Barra de ferrita del cassette Formato Margen de frecuencia Sistema de grabacion Sistema de borrado Cabezas Seccion Dates generales del sintonizador de frecuencia No.
ESPECIFICACOES Se@io do sintonizador Se@o comum Amp~tude Alto-~alante de freqi.ii3ncia FM: 87,5-108,0 MHz Antena de haste AM: 530-1.710 kHz Antena de barra de ferrita Saida Pot&cia de saida Alimentag%io Se@o do deck 4 pistas, 2 canais Formato de pista Amplitude de frequi%cia Fita normal: 50-12.
AIWA C0.5LTD.