
Installation Instructions


10
Installation (Cont.)
After Sales Support
1300 886 649 | info@tempo.org
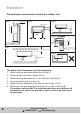
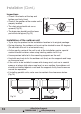
Inspections
• Check if the hooks at the top and
bottom are firmly fixed.
• Check if the position of the master unit is
properly levelled.
• The drain pipe should not curve
upward (Fig.13).
• The drain pipe should be at the lower
part of the wall pipes (Fig.13).
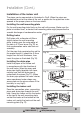
Installation of the outdoor unit
• Try to ship the product to the installation location in its original package.
• During shipping, the outdoor unit must not be slanted to over 45 degrees.
(Do not store the unit in a horizontal way.)
• As the gravity centre of the unit is not at the installation centre, special
caution should be taken when using hoisting cables to lift it up.
• Use expansion bolts to fix the mounting supports on the wall.
• Use bolts and nuts to fix the outdoor unit firmly on the supports and keep
on the same level.
• If the unit is to be installed in areas with strong wind, such as in coastal
areas or at places high above sea level, or on a rooftop, the outdoor unit
should be installed against a wall and the supports firmly fixed to ensure
normal fan operation.
• If installing parellel units, make sure to maintain the clearances below
(Fig.14).
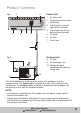
Drain pipe
Connecting wires
Connecting pipe
Wall pipe
Drain pipe
Fig.13
300mm(1')min
Fig.14