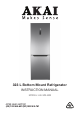
323 L Bottom Mount Refrigerator INSTRUCTION MANUAL MODEL: AK-323-BM AFTER SALES SUPPORT (AU) 1300 886 649 (NZ) 0800 836 761 E209
Contents Page 2 Important Safety Instructions 03 Product Overview 06 Getting Started 07 Operating Instructions 09 FAQs & Troubleshooting Guide 16 Other Useful Information 18 After Sales Support (AU) 1300 886 649 (NZ) 0800 836 761 | tempo.
Important Safety Instructions READ CAREFULLY AND KEEP FOR FUTURE REFERENCE Read this manual thoroughly before first use, even if you are familiar with this type of product. The safety precautions enclosed herein reduce the risk of fire, electric shock and injury when correctly adhered to. Keep the manual in a safe place for future reference, along with the completed warranty card, purchase receipt and carton. If applicable, pass these instructions on to the next owner of the appliance.
Important Safety Instructions (Cont.) To reduce the risk of fire, electric shock or injury, always follow basic safety precautions and accident prevention measures when using this appliance, including the following: Electrical safety • V oltage: Plug the appliance in a 220-240 V, 50 Hz, properly earthed power outlet, which must be in good working order. Make sure your outlet voltage and circuit frequency correspond to the voltage stated on the appliance rating label.
Important Safety Instructions (Cont.) Cleaning and maintenance • Disconnect: Switch off and unplug the appliance from the mains socket before cleaning, maintenance or servicing. Failure to do so can result in electric shock, injury or death. Do not connect or disconnect the plug when your hands are wet. • Flames: Do not let open flames or ignition sources enter the appliance. • Flammable/explosive substances: Never clean this appliance with flammable fluids.
Product Overview Scope of delivery 7 1 2 3 4 5 6 Bottom mount refrigerator 1 2 3 4 5 Adjustable fridge shelves Crisper cover Crisper Chiller zone (fresh converter box) Freezer drawers 6 7 Levelling feet Fridge door balconies Other inclusions (not shown) Door reversal hardware bag Instruction manual Warranty certificate NOTE: Due to continued product improvement, images and illustrations in this manual may vary slightly from the product purchased.
Getting Started Unpacking • Packaging materials: This product has been packaged to protect it against transportation damage. Remove all packaging materials from around and inside the appliance and keep the original packaging carton and materials in a safe place. It will help prevent any damage if the product needs to be transported in the future, and you can use it to store the appliance when it is not in use.
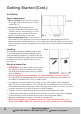
Getting Started (Cont.) Installation Space requirements • D oor opening: Place the unit so there is enough space for the doors to open easily (Fig. 1). • Clearances: Ensure that air can circulate freely around the back of the cabinet, which is necessary to cool the compressor and condenser. Allow at Fig. 1 least 5 cm at the sides of the unit.
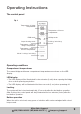
Operating Instructions The control panel Fig. 3 Temperature of fridge compartment Temperature of freezer compartment ECO mode Super freezing mode Holiday mode Locking / unlocking Temperature control of fridge compartment Temperature control of freezer compartment Mode / locking / unlocking Operating conditions Compartment temperatures The current fridge and freezer compartment temperatures are shown on the LED display.
Operating Instructions (Cont.) Using the controls Temperature control of the fridge compartment • Press the FRIDGE button, repeatedly, to adjust the temperature in the fridge compartment in one degree steps from 2 °C to 8 °C. • After setting the temperature, the FRIDGE button flashes for five seconds (5 sec), indicating that the temperature has been set. NOTE: You can adjust the fridge compartment temperature in a user defined mode as well as in Super mode.
Operating Instructions (Cont.) Holiday mode • Press the MODE button, repeatedly, until the Holiday mode icon flashes. After 5 seconds (5 sec), the unit has entered Holiday mode and the Holiday mode icon is lit steadily on the display. • In Holiday mode, the temperature of the fridge compartment will be set at 17 °C. You can still use the MODE button to exit Holiday mode, but the FRIDGE button is now ineffective. • Press the MODE button to exit Holiday mode.
Operating Instructions (Cont.) Fresh food storage The fridge compartment is suitable for short-term storage of all your fresh food (Fig. 4). The temperature inside the fridge compartment varies depending on the amount of food stored and the frequency of door opening. It is low enough to limit some bacterial growth, but it is not suitable for long-term storage of perishable foods.
Operating Instructions (Cont.) d) The chiller zone (fresh converter box) at the bottom of the refrigerator compartment features a temperature control (Fig. 5), which allows you to adjust the temperature of the chiller zone according to the type of food stored. Fig. 5 – Push the control upwards from the bottom to gradually lower the temperature in the chiller zone.
Operating Instructions (Cont.) The freezer compartment The freezer compartment, located at the bottom of the appliance, is equipped with three transparent drawers for convenient access and organised storage. It is designed to operate in ambient temperatures between 16 °C and 43 °C and is suitable for freezing domestic quantities of fresh food and long-term storage of frozen food. Freezing fresh food • Only freeze fresh food that is suitable for freezing. • Do not store food uncovered in the freezer.
Operating Instructions (Cont.) Energy saving tips • Locate the appliance in the coolest area of the room, away from heat-producing appliances and out of direct sunlight. • Let hot foods cool to room temperature before placing them in the freezer. Overloading the compartments forces the compressor to run longer. • Wrap foods properly, and wipe containers dry before placing them in the freezer compartment. This cuts down on frost build-up inside the unit.
FAQs & Troubleshooting Guide If you experience a problem with the appliance, check in the following table for solutions to help you solve the problem. If none of the solutions offered help you solve the problem, please contact our after sales support centre for advice. 1616 Problem Possible cause The appliance does not operate. • It is not plugged in. Ensure it is properly plugged in and there is power at the socket (plug another appliance into the outlet to check).
FAQs & Troubleshooting Guide (Cont.) Problem Possible cause The appliance freezes or cools too much. • The temperature is set too cold. Turn it to a warmer setting temporarily. • The appliance is set to Super mode. Exit Super mode and set it to a warmer temperature. Food in the freezer compartment is not properly frozen. • The freezer temperature is set too warm; set it to a colder setting. • The freezer door was opened for too long or too frequently.
Other Useful Information WARNING! To reduce the risk of electric shock or injury, always switch off the appliance and disconnect it from the power supply before cleaning or maintenance. Cleaning the appliance For hygienic reasons the appliance interior, including the interior accessories, should be cleaned regularly. • Set both temperature controls to the minimum positions and unplug the appliance. • Remove your frozen and refrigerated food from the compartments.
Other Useful Information (Cont.) Door reversal This appliance has the capability of opening the door from either the left or right side. If your set-up requires changing the opening direction, proceed as follow: IMPORTANT! You will need: • Make sure you have someone there to help you, do not try to do this on your own. • It will be necessary to tilt the unit back when taking the door off. You should rest the unit on something solid so that it will not slip during the door reversal process.
Other Useful Information (Cont.) 3. Remove the pin with a screwdriver and flip the hinge bracket. Then refit the pin to the hinge bracket. Fig. 9 4. Move the door switch from the right hinge cover to the left hinge cover from the hardware accessories bag. Fig. 11 5. Fig. 12 Detach the cover of the upper door and move the harness from the right side to the left side, then replace the cover. Fig. 13 2020 Fig. 10 Fig. 14 After Sales Support (AU) 1300 886 649 (NZ) 0800 836 761 | tempo.
Other Useful Information (Cont.) 6. Move the top left cover to the right side. Fig. 15 7. Fig. 16 Take off the upper door. Remove the screw from the middle hinge using a Phillips head screwdriver. Then take off the lower door. Move the hinge hole covers from the left to the right side. Fig. 18 8. Fig. 17 Fig. 19 Unscrew the bottom hinge. Then remove the adjustable feet from both sides. Fig. 20 Fig. 21 After Sales Support (AU) 1300 886 649 (NZ) 0800 836 761 | tempo.
Other Useful Information (Cont.) 9. Unscrew and remove the bottom hinge pin, turn the bracket over and replace it. Fig. 22 Fig. 23 10. Refit the bracket fitting the bottom hinge pin. Replace both adjustable feet. Fig. 24 Fig. 25 11. Remove the aid-closers from the bottom of the upper and lower doors. Then take the new aid-closers from the hardware accessories bag and install them to the left side. Fig. 26 2222 Fig. 27 After Sales Support (AU) 1300 886 649 (NZ) 0800 836 761 | tempo.
Other Useful Information (Cont.) 12. Detach the fridge and freezer door gaskets, rotate them and then reattach them. 13. Install the lower door, adjust and fix the middle hinge onto the cabinet. Fig. 28 Fig. 29 14. When replacing the upper door, make sure to align it with the cabinet to ensure the door gasket seals the cabinet tightly. Then connect the door with the cabinet by tightly fixing the top hinge. Fig. 30 15. Connect the harnesses from the door and cabinet. Then replace the top hinge cover.
Other Useful Information (Cont.) Storage If the fridge is not going to be used for an extended period of time, store the unplugged, cleaned appliance safely in the original packaging in a dry location, out of children’s reach. Lamp replacement The appliance has an internal LED type lamp, which can only be replaced by a qualified technician. If a lamp replacement is required, please contact our after sales support centre for advice.
Other Useful Information (Cont.) Technical specifications Model AK-323-BM Rated voltage 220-240 V~ Rated frequency 50 Hz Rated current 1.3 A Climate class T Electrical protection class I Refrigerant R600a (52 g) Insulation blowing agent Cyclopentane Fridge compartment volume 219 L Freezer compartment volume 104 L Total volume 323 L Dimensions 1850 (H) x 685 (D) x 600 (W) mm Net weight (approx.
Other Useful Information (Cont.) Responsible disposal At the end of its working life, do not throw this appliance out with your household rubbish. Electrical and electronic products contain substances that can have a detrimental effect on the environment and human health if disposed of inappropriately. Observe any local regulations regarding the disposal of electrical consumer goods and dispose of it appropriately for recycling and recovery of the refrigerant and blowing agent.
This page has been left blank intentionally. After Sales Support (AU) 1300 886 649 (NZ) 0800 836 761 | tempo.
Warranty returns Should you for any reason need to return this product for a warranty claim, make sure to include all accessories with the product. Product does not work? If you encounter problems with this product, or if it fails to perform to your expectations, make sure to contact our After Sales Support Centre on (AU) 1300 886 649 or (NZ) 0800 836 761 for advice. For an electronic copy of this manual, please contact our after sales support centre.