PROTECT YOUR WARRANTY This unit must be installed by a registered, licensed installer as required by Government regulations.
Contents 2 Important Safety Instructions 3 Product Overview 6 Getting Started 10 Instructions 12 Cleaning and Maintenance 15 Troubleshooting Guide 17 After Sales Support 1300 886 649 | info@tempo.
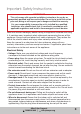
Important Safety Instructions IMPORTANT! This unit comes with separate installation instructions for use by an appropriately qualified and licensed installer. Do not try to install the unit on your own; doing so will expose you to danger and void the warranty. It is your responsibility to ensure the unit is installed by a qualified technician, who should check that it is earthed in accordance with applicable regulations and install a thermomagnetic circuit breaker.
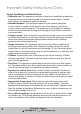
Important Safety Instructions (Cont.) Usage Conditions and Restrictions • Domestic use: This appliance has been made for air conditioning domestic environments and may also be used by expert or trained users in shops, light industry environments and farm houses. • Intended purpose: This appliance should only be used as described in this manual. It should not be used for any other purpose, such as for drying clothes, cooling food etc.
Important Safety Instructions (Cont.) • Keep clear: Do not climb onto or place any objects on top of the outdoor unit. Supervise children to ensure they do not sit on the outdoor unit. • Air inlet/outlet: Never insert a finger, stick or similar object into these openings. As a fan is rotating at a high speed, it will cause injury and/or damage to the appliance. • Wind vanes: Do not touch the swinging wind vanes. Doing so may trap your finger(s) and damage the driving parts of the wind vanes.
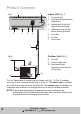
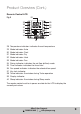
Product Overview 1 Fig. 1 2 Indoor Unit (Fig. 1) 1 2 3 d 3 4 5 6 4 5 6 7 Air return grid Operational performance indications Adjustment fin for left/ right airflow direction Adjustment flap for up/ down airflow direction Air outlet Air filter Drain tube 7 Outdoor Unit (Fig. 2) Fig. 2 8 Air inlet 9 Air discharge vent 10 Refrigerant pipe connection and electric wiring cord 8 9 10 This Air Conditioner is made up of an indoor unit (Fig. 1 & Fig. 3), outdoor unit (Fig.
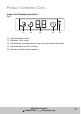
Product Overview (Cont.) Indoor Unit Display Indications Fig. 3 11 11 12 13 14 15 12 13 14 15 Indicates Sleep mode Indicates Timer mode Indicates the set temperature, timer time and malfunction code Indicates that the unit is running Remote controller signal receiver After Sales Support 1300 886 649 | info@tempo.
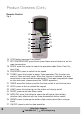
Product Overview (Cont.) Remote Control Fig. 4 16 17 18 19 20 21 27 26 25 24 23 22 16 LCD Display (see page 9 for details) 17 SET TEMPERATURE: press these up and down arrow buttons to set the room temperature 18 MODE: press this button to select the operation mode (Auto, Cool, Dry, Heat, Fan) 19 FAN SPEED: press to select the fan speed 20 TURBO: press this button to select Turbo operation (This function only works in Cool and Heat mode.
Product Overview (Cont.) Remote Control LCD Fig.
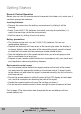
Getting Started Remote Control Operation Before you can use the remote control to operate the indoor unit, make sure it contains appropriate batteries. Inserting batteries • Remove the cover from the battery compartment by sliding it off the housing. • Insert 2 new AAA (1.5V) batteries (included), ensuring the polarities (+/-) match the markings inside the compartment. • Refit the cover by sliding it back into place. Battery precautions • The remote control unit runs on 2 AAA (1.5V) batteries.
Getting Started (Cont.) Manual Operation When the remote control does not work or cannot be found, please follow the steps below to start or stop operation. • To open the unit, lightly push both sides of the air inlet grid at the bottom of the indoor unit (Fig. 6) and pull it to the side until you feel a slight resistance. Fig. 6 • To switch the unit on or off, press the manual operation button, which is visible when you have opened the unit (Fig. 7). Fig.
Instructions Remote Control Operation of the Indoor Unit • Point the remote controller at the unit and press the ON/OFF button. • Press the MODE button, repeatedly, to select the desired mode from the following options: Auto, Cool, Dry, Heat, Fan. • Press the SET TEMPERATURE buttons to increase or decrease the readings until the desired temperature is displayed. The available temperature range is from 16°C-32°C.
Instructions (Cont.) Timer Operation The TIMER button allows you to program the timer for automatic switch on/off. Setting the turning OFF time (automatic stop) Set the time for the unit to turn off and when it is time, the air conditioner will automatically stop operating. • During the operation of the air conditioner, press the TIMER button and the air conditioner will enter the timed switch-off mode.
Instructions (Cont.) Sleep Operation The Sleep function is designed for use at night when you want to sleep. It reduces the unit’s operation sound. The Sleep function also enables the set temperature to rise or drop gradually, so the unit will consume less power at night-time, running at an adjusted temperature. • Press the SLEEP button to activate Sleep mode. The air conditioner will run with a lowered airflow sound from the indoor unit.
Cleaning and Maintenance Periodic cleaning and maintenance is essential for keeping your air conditioner in good condition and working efficiently. CAUTION! Before carrying out any maintenance, make sure the air conditioner is turned off at the power socket outlet. Start of Season Maintenance • • • • • • Check and ensure nothing is blocking the intake and outlet vents of the indoor and outdoor units. Check and ensure the installation stand is not corroded or rusty.
Cleaning and Maintenance (Cont.) End of Season Maintenance • • • • • • 16 Set the temperature to 30°C and operate the unit in Fan mode for about half a day so that the inside of the unit can dry completely. Then stop the operation and turn off the power switch. The air conditioner will consume about 5W of electric power after the machine is turned off. For the purpose of energy saving and safety, it is advisable to pull the plug out during the non-operational seasons.
Troubleshooting Guide If you experience problems with your air conditioner, check for solutions in the table below. If the problem cannot be solved by simple adjustments, call the after sales support line, or contact a licensed air conditioner technician. Problem Possible cause and solution The air conditioner does not work at all. Check and ensure there is no power failure or blown fuse. Also check the timer and ensure the unit is not set to start operating at a later time.
Troubleshooting Guide (Cont.) Problem Possible cause and solution A cracking noise can be heard after a power stoppage or after disconnecting the power supply plug. This noise is caused by heat expansion or contraction of plastics. It is no cause for concern. After a power outage, operation cannot be restarted. The memory circuit of the microcomputer is cleared. Operate the remote controller again to restart the operation.
Troubleshooting Guide (Cont.) Self-diagnosis function This air conditioner is equipped with a self-diagnosis function to help you identify potential problems. Should you encounter problems with your air conditioner, contact our after sales support centre using the details on the bottom of the page. However, before calling for service, consult the selfdiagnosis information below.
Warranty returns Should you for any reason need to return this product for a warranty claim, make sure to include all accessories with the product. Product does not work? If you encounter problems with this product, or if it fails to perform to your expectations, make sure to contact our After Sales Support Centre on 1300 886 649 before returning it to the store for a refund. After Sales Support 1300 886 649 | info@tempo.