Stainless Steel Dishwasher INSTRUCTION MANUAL MODEL: AK-DW12P
Contents 2 03 General Safety Instructions 06 Product Overview 10 Installation 14 Features 16 Instructions 28 FAQs and Troubleshooting Guide 32 Other Useful Information After Sales Support (AU) 1300 886 649 (NZ) 0800 836 761 | info@tempo.
General Safety Instructions IMPORTANT SAFETY INSTRUCTIONS READ CAREFULLY AND KEEP FOR FUTURE REFERENCE Read this manual thoroughly before first use, even if you are familiar with this type of product. The safety precautions enclosed herein reduce the risk of fire, electric shock and injury when correctly adhered to. Keep the manual in a safe place for future reference, along with the completed warranty card and purchase receipt. If applicable, pass these instructions on to the next owner of the appliance.
General Safety Instructions (Cont.) • Inserting/removing the plug: Before you insert or remove the plug, make sure the appliance is switched off and the power is switched off at the electrical outlet. Remove by grasping the plug, do not pull on the cord. • CAUTION! To reduce the risk of electric shock, do not immerse the unit, cord or plug in water or other liquid. Do not expose it to rain or moisture.
General Safety Instructions (Cont.) • Children should be supervised to ensure they do not play with the appliance. Close supervision is necessary when any appliance is used by or near children. • WARNING! Never leave the appliance unattended while in use. • Dishwasher door: Do not abuse, sit on or stand on the door or dish rack of the dishwasher, or use it for anything other than its intended purpose. Do not place any heavy objects on the dishwasher door when it is open. The appliance could tip forward.
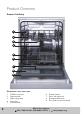
Product Overview Scope of delivery 1 2 3 4 5 6 7 8 9 Dishwasher: front view, open 1 Foldable cup rack 2 Upper basket 3 Upper spray arm 4 Inner pipe 5 Lower basket 6 6 7 8 9 Cutlery basket Rinse aid dispenser Detergent dispenser Door (with recessed handle) After Sales Support (AU) 1300 886 649 (NZ) 0800 836 761 | info@tempo.
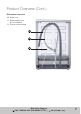
Product Overview (Cont.) Dishwasher: rear view 10 Drain hose 11 Water supply hose (to be installed) 12 Power cord and plug 10 11 12 After Sales Support (AU) 1300 886 649 (NZ) 0800 836 761 | info@tempo.
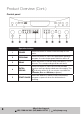
Product Overview (Cont.) Control panel || || 1 2 6 7 8 3 4 5 Operation buttons 8 1 POWER Press this button to enter or exit the ready-to-use state. 2 PROGRAM Press this button to select the appropriate washing program, the selected program indicator will be lit. 3 DELAY Press this button to set the delay start time to 3, 6 or 9 hours. The corresponding indicator will be lit. 4 EXTRA DRYING Press this button to select the EXTRA DRYING function and have dishes dried more thoroughly.
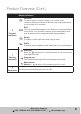
Product Overview (Cont.) Display indicators Intensive For most heavily soiled crockery, such as pots, pans, casserole dishes and dishes that have been sitting with dried food on them for some time. 6 Program indicators ECO This is the standard program. It is suitable for cleaning normally soiled loads, such as plates, glasses, bowls and lightly soiled pots and pans: the recommended daily wash program. 90 min For lightly soiled loads that need a quick wash.
Installation DANGER! Make sure your electrical power is disconnected before installing the dishwasher. Failure to do so can result in death or electric shock. IMPORTANT! A ll relevant pipes and electrical equipment should be installed by licensed plumbers, electricians or dishwasher installers. Make sure to use new water supply and drain hoses; do not use old hoses. IMPORTANT! Read this manual to familiarise yourself with all parts and operating principles.
Installation (Cont.) Levelling the appliance • osition the dishwasher on a level and sturdy P floor. • I f the floor is uneven, adjust the adjustable feet until it reaches a horizontal position; just screw the feet in or out a little (Fig. 1). • he appliance should not be inclined more T than 2°. • orrectly levelled, the appliance will be more C stable and much less likely to move or cause vibrations and noise during operation.
Installation (Cont.) Cold water connection • Connect the cold water supply hose to a threaded 3/4” connector. During use, the dishwasher will heat up the water to the required temperature. Make sure the hose is not kinked or squashed and is fastened tightly in place (Fig. 4). Fig. 4 • If the water pipes are new or have not been used for an extended period of time, let the water run to make sure it is clear and free of impurities.
Installation (Cont.) Electrical connection Make sure that the electrical voltage and circuit frequency in your home correspond to those indicated on the appliance rating label and that the electrical system is sized for the maximum voltage on the rating plate. This appliance requires a 10A fused, copperwired electrical supply. A time delay fuse or circuit breaker is recommended, as well as provision of a separate circuit serving only this appliance.
Features Wash programs and cycles Program Suitability Cycles Intensive For most heavily soiled crockery, such as pots, pans, casserole dishes and dishes that have been sitting with dried food on them for some time. Prewash (50ºC) Wash (60ºC) Rinse Rinse Rinse (65ºC) Drying For normally soiled loads, such as plates, glasses, bowls and lightly soiled pots and pans: the recommended daily wash program. Wash (45ºC) Rinse Rinse (45ºC) Drying For lightly soiled loads that need a quick wash.
Features (Cont.) Detergent (pre / main) Running Time (min.) Energy (kWh) Water (L) 5 / 25g (or all-in-1) 170 1.6 18.5 5 / 25g (or all-in-1) 185 0.75 11 30g (or all-in-1) 90 1.2 11.5 25g 30 0.6 11.5 After Sales Support (AU) 1300 886 649 (NZ) 0800 836 761 | info@tempo.
Instructions Loading the dishwasher For best performance of your dishwasher, follow the loading guidelines in this manual. ATTENTION: Before loading the dishwasher baskets: It is not necessary to rinse the dishes under running water before you put them into the dishwasher. However, we recommend you scrape off any large amounts of leftover food and soften remnants of burnt food in pots and pans. Place objects in the dishwasher in the following way: • Hollow items such as cups, glasses, pots, pans, etc.
Instructions (Cont.) Adjusting the upper basket height The height of the upper basket can easily be adjusted in order to accommodate taller dishes in either the upper or lower basket. To adjust the height of the upper basket, please follow the steps below (Fig. 6): Fig. 6 Folding down the spike rows If you need more space for pots and pans in the lower basket, you can fold down the spike rows at the back so that larger or more pots and pans can be loaded (Fig. 7). Fig.
Instructions (Cont.) The upper basket The upper basket is designed to hold more delicate and lighter tableware such as glasses, cups, small plates, bowls and shallow pans (as long as they are not too dirty). Position these items securely so they do not get moved by the spray of water (Fig. 8). Fig. 8 Fig. 9 shows the upper basket loaded to fit 12 place settings according to the standard. Fig.
Instructions (Cont.) The lower basket The lower basket is designed to hold dinner plates, larger items and the cutlery basket. To ensure the detergent dispenser lid can open freely, the maximum diameter for plates in front of the detergent dispenser is 19cm (Fig. 10). Fig. 10 Pots, pans, serving dishes and bowls are often the most difficult to clean and fit best into the lower basket. Always place these items upside down into the basket or at a slant so the water can flow out.
Instructions (Cont.) Cup rack The cup rack is designed to hold smaller cups or similar lightweight items. It is also useful for washing serving cutlery, salad servers and similar utensils so that they do not obstruct the rotation of the spray arms. To make room for taller items in the upper basket, you can raise the cup rack upwards (Fig. 12). You can also remove it when it is not required for use. Fig. 12 20 After Sales Support (AU) 1300 886 649 (NZ) 0800 836 761 | info@tempo.
Instructions (Cont.) The cutlery basket Your new dishwasher is equipped with a removable cutlery basket with anti-nesting grid (Fig. 13). You can use it with the anti-nesting grid up or down, as convenient, anywhere in the back section of the lower basket. Fig. 13 1: Forks - 2: Soup spoons - 3: Dessert spoons - 4: Teaspoons - 5: Knives For personal safety and top quality cleaning, place your dishwasher-safe standard size cutlery in the basket, making sure that: • Cutlery is placed with the handles down.
Instructions (Cont.) Dishwasher detergent WARNING! • Only use detergent specifically made for use in dishwashers. • Always add detergent just before starting the dishwasher, otherwise it could get damp and will not dissolve properly. It is also a hazard to leave detergent in the dispenser where children can reach it when the door is open. • Dishwasher detergent is corrosive! Take care to keep it out of reach of children.
Instructions (Cont.) The detergent dispenser Fig. 15: Push latch to open Fig. 16 C A D B Adding detergent The table on page 15 lists the recommended amounts of detergent, generally one heaped tablespoonful, or 25–30g. However, water hardness and soiling levels affect the amount of detergent required, and there are various types of detergent tablet on the market, so always follow the detergent manufacturer’s recommendations on dosage.
Instructions (Cont.) Rinse aid Rinse aid is automatically released during the last rinse to prevent water from forming droplets on your dishes, which can leave spots and streaks. It also improves drying by allowing water to roll off the dishes. Your dishwasher is designed to use liquid rinse aid. CAUTION! Only use specific, branded rinse aid for your dishwasher. Never fill the rinse aid dispenser with any other substances (e.g.
Instructions (Cont.) When to refill the rinse aid dispenser Fill the rinse aid dispenser when the warning light on the control panel comes on. Alternatively, you can estimate the amount of rinse aid left in the dispenser by the colour of the optical level indicator, which is located next to the cap (see Fig. 16-C on page 23). When the rinse aid container is full, the whole indicator will be dark. As the rinse aid diminishes, the size of the dark dot decreases, as indicated below.
Instructions (Cont.) Running the dishwasher Starting a wash program • Open the door and draw out the lower basket. Load your dishes and push the basket back into place. Then load the upper basket the same way (see pages 1621 for details). • Add dishwasher detergent according to the instructions (see pages 22-23). • Unless you use dishwasher detergent tablets that contain a rinse aid, make sure there is sufficient liquid rinse aid in the rinse aid dispenser (see pages 24-25).
Instructions (Cont.) Forgot to add a dish? Additional dishes can be added any time before the detergent dispenser opens. • Press the START/PAUSE button to pause the washing. • Wait for 5 seconds, then open the door. • Add additional dishes. • Close the door. • Press the START/PAUSE button to restart the dishwasher. It will start running again after 10 seconds. WARNING! It is dangerous to open the door mid-cycle as hot water or steam may escape and scald you. Open the door very carefully. Fig.
FAQs and Troubleshooting Guide The table below lists possible causes and solutions for common problems you may encounter with the dishwasher. If you follow all the instructions below but still cannot solve a problem, please contact our after sales support centre. Technical problems Problem Possible cause Solution The fuse is blown or the circuit breaker is activated. Replace the fuse or reset the circuit breaker. Unplug any other appliances on the same circuit with the dishwasher.
FAQs and Troubleshooting Guide (Cont.) Problem Possible cause Solution Inappropriate detergent Use only specific dishwasher detergent to avoid suds. If this occurs, open the dishwasher and let the suds evaporate. Add 3–4 litres of cold water to the tub, close the door securely, then run any program. The dishwasher will drain out the water at the first step. Open the door after draining has stopped and check if the suds have disappeared. Repeat, if necessary.
FAQs and Troubleshooting Guide (Cont.) Unsatisfactory drying result Problem Dishes are not dried. Possible cause Solution Improper loading Load the dishwasher as suggested in this manual. Too little rinse aid Increase the amount of rinse aid. Remove the cap from the rinse aid dispenser and set the dosage dial to a higher number. No rinse aid Refill the rinse aid dispenser. Dishes are removed too soon after the program has finished. Do not empty your dishwasher immediately after washing.
FAQs and Troubleshooting Guide (Cont.) Error codes When there is a malfunction, some of the indicator lights on the control panel will start flickering in order to warn you that something is wrong. Code Meaning Possible Cause The “Rapid” indicator flashes frequently. Longer inlet time Faucet is not opened, or water intake is restricted, or water pressure is too low — check and ensure the faucet is open and your water pressure is normal. The “90 mins”and “Rapid” indicators flash frequently.
Other Useful Information Cleaning the filter system The filter system in the base of the wash cabinet efficiently removes food particles from the wash water, allowing it to be recycled during the wash. It prevents larger remnants of food or other objects from getting inside the pump. The filter system consists of three filters: a coarse filter, main filter and fine filter. To remove and clean the filter system, proceed as follows (Fig. 23): Fig.
Other Useful Information (Cont.) WARNING! • When cleaning the filters take care not to contort their shape, which could compromise the washing performance. • Do not overtighten the filters. Put the filters back in sequence securely, otherwise coarse debris could get into the system and cause a blockage. • Never use the dishwasher without the filters. Improper replacement of the filters may reduce the washing performance and damage dishes and utensils.
Other Useful Information (Cont.) Looking after your dishwasher • After every wash, turn off the water supply to the appliance and leave the door slightly ajar so moisture and odours are not trapped inside. • Before cleaning or performing maintenance, always unplug the dishwasher from the socket. No solvents or abrasive cleaning • To clean the exterior and rubber parts of the dishwasher, do not use solvents or abrasive cleaning products. Only use a cloth with warm, soapy water.
Other Useful Information (Cont.) Service, repair and spare parts If the appliance is damaged, do not attempt to repair it yourself. Do not disassemble or modify the appliance. If it requires repair or service, please contact our after sales support centre to arrange for a service. Our after sales support centre stocks a wide range of spare parts for the dishwasher. To purchase a part, call the centre on 1300 886 649 or email us at info@tempo.
Other Useful Information (Cont.) Technical specifications Model Number AK-DW12P Capacity 12 place settings Rated voltage/frequency 220-240V~ 50Hz Power consumption 1760–2100W Standard cleaning cycle ECO Energy consumption of the standard cleaning cycle 0.75kWh Water consumption of the standard cleaning cycle 11L Water pressure (flow pressure) 0.04–1.00 MPa = 0.4–10 bar Height 845mm Width 598mm Depth with door closed: 600mm with door open 90°: 1175mm Weight approx.
Other Useful Information (Cont.) Responsible disposal At the end of its working life, do not throw this appliance out with your household rubbish. Electrical and electronic products contain substances that can have a detrimental effect on the environment and human health if disposed of inappropriately. When removing an old dishwasher from service or discarding it, remove the door to the washing compartment. Cut off the power supply cord and make the door closing mechanism unusable.
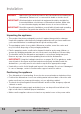
Warranty returns Should you for any reason need to return this product for a warranty claim, make sure to include all accessories with the product. Product does not work? If you encounter problems with this product, or if it fails to perform to your expectations, make sure to contact our After Sales Support Centre on 1300 886 649 for advice. Instruction Manual Revision Index V1.0 After Sales Support (AU) 1300 886 649 (NZ) 0800 836 761 | August 2020 info@tempo.