8kg Front Load Washing Machine with Wi-Fi Function INSTRUCTION MANUAL MODEL: AK-FL8S
Contents 2 03 General Safety Instructions 07 Unpacking 08 Product Overview 10 Installation 16 Instructions 24 Wi-Fi Control 28 FAQs and Troubleshooting Guide 30 Other Useful Information After Sales Support (AU) 1300 886 649 (NZ) 0800 836 761 | info@tempo.
General Safety Instructions IMPORTANT SAFETY INSTRUCTIONS READ CAREFULLY AND KEEP FOR FUTURE REFERENCE Read this manual thoroughly before first use, even if you are familiar with this type of product. The safety precautions enclosed herein reduce the risk of fire, electric shock and injury when correctly adhered to. Keep the manual in a safe place for future reference, along with any warranty information and your purchase receipt. If applicable, pass these instructions on to the next owner of the appliance.
General Safety Instructions (Cont.) • C AUTION! Do not connect the appliance to the power supply using a power adaptor or extension cord. Use of an extension cord does not guarantee the required safety. • After use: Always unplug the appliance and turn off the water after use. • D isconnect: Unplug the washing machine from the power supply before cleaning, servicing, maintenance or moving the appliance. Pull by the plug, not by the cord.
General Safety Instructions (Cont.) • E lectrical connection: During installation, the power cord must not be excessively or dangerously bent or flattened. The plug must be accessible after installation. • M isuse: Improper installation or faulty use may result in the risk of fire, electric shock and/or injury. We accept no liability for any eventual damages or injury caused by improper installation, misuse or noncompliance with these instructions.
General Safety Instructions (Cont.) - Clothes that have any residues of flammable materials, as this may result in fire or explosion. For example, articles that have been cleaned in, washed in, soaked in, or dabbed with industrial chemicals, or combustible or explosive substances (such as wax, oil, paint, petrol, alcohol, degreasers, dry-cleaning solvents, kerosene, etc.). Items containing such substances must be washed by hand or rinsed thoroughly before they may be machine-washed.
Unpacking Unpacking the washing machine CAUTION: EXTREMELY HEAVY! • A team lift or mechanical aid is required when moving this appliance. • Keep the washing machine as upright as possible during transportation. • his product has been packaged to T protect it against transportation damage. Remove all packaging materials from around the appliance and inside the drum, including the foam base (Fig. 1). • eep the original packaging carton K and materials in a safe place.
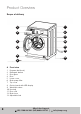
Product Overview Scope of delivery 1 7 2 8 9 3 10 4 11 12 5 6 13 A Front view 1 2 3 4 5 6 7 8 9 10 11 12 13 8 Program dial (knob) Detergent drawer Door glass Door Lower cover Drain pump filter Top cover Control panel with LED display Wash/spin drum Housing Door seal Drain hose Adjustable feet After Sales Support (AU) 1300 886 649 (NZ) 0800 836 761 | info@tempo.
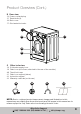
Product Overview (Cont.) B Rear view 14 15 16 17 Power cord and plug Transit bolts (4) Back cover Cold water inlet valve 17 14 15 16 C Other inclusions 18 19 20 21 22 23 Cold water supply hose Drain hose (not shown, attached to the rear of the machine) Transit bolt caps Drain hose support (elbow) Instruction manual Warranty certificate (not shown) 18 20 21 22 NOTE: Due to continued product improvement, images and illustrations in this manual may vary slightly from the product purchased.
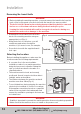
Installation Removing the transit bolts WARNING! • Before installing the washing machine, you must remove the transit bolts from the back of the housing and cover the holes with the transit hole caps provided. • The bolts hold the drum in place during transport but they must be removed before use so the drum can move during the wash and spin cycles. Leaving the bolts installed will result in strong shock and noise during use, malfunction and serious damage to the machine.
Installation (Cont.) Levelling the machine WARNING! It is very important to level the washing machine carefully, especially if your floor is uneven. Failure to do so may result in the machine shaking and moving during the spin cycle, or out-of-balance problems. Place the machine on solid, dry and level ground. The machine must stand perfectly level on all four feet to ensure safe and proper operation. Incorrect installation may cause vibrations and noise and may cause the machine to move about.
Installation (Cont.) Installing the drain hose WARNING! • Do not kink or protract the drain hose. • Position the drain hose properly in order to prevent water spillage onto the floor and potential damage. • Never immerse the end of the drain hose in water. The drain hose is installed at the back of the machine. For drainage of the washing water, you can install the other end of the hose two different ways: either directly into a laundry sink or into a standpipe. Drain hose connection into a sink (Fig.
Installation (Cont.) Drain hose connection into a standpipe (Fig. 6) Fig. 6 • Firstly, form a hook in the end of the drain hose using the supplied drain hose elbow. • Place the drain hose into your standpipe, which should have an internal diameter of approximately 30mm, thus ensuring there is an air break between the drain hose and standpipe. • When discharging into a standpipe, ensure that the top of the standpipe is no more than 90cm and no less than 60cm above floor level.
Installation (Cont.) Connecting the water supply hose WARNING! • To prevent leakage or water damage, make sure to follow the instructions in this section when connecting the washing machine to your water supply. • Do not kink, crush, modify or sever the water inlet hose. • Connect the supplied cold water supply hose to an ordinary laundry tap with a 3/4” thread (Fig. 7). Installation should comply with all requirements and regulations of your local water and building authorities. Fig.
Installation (Cont.) Electrical connection WARNING! This appliance must be earthed. In the event of a malfunction or breakdown, earthing will reduce the risk of an electric shock by providing a path of least resistance for the electric current. This appliance is equipped with a cord having an equipment-earthing conductor and an earthing plug. The plug must be plugged into an appropriate outlet that is installed and earthed in accordance with all local standards and requirements.
Instructions Control panel (Fig. 9) 8.0kg 1 16 2 3 4 5 6 7 8 1 Program dial Turn the program dial (knob) clockwise or anticlockwise to switch on the machine and select the required wash program (see page 18 for details of the programs). Once you press the Start/Pause button and the machine is running, the program cannot be changed. 2 OFF [ O ] position At the end of a program, turn the knob to the [ O ] position to switch the machine off.
Instructions (Cont.) Display icons (Fig. 10) Daily otton 40℃ 60℃ ergy Table 1: Display icons Icon Meaning Digital display Wi-Fi Description Shows the time, speed, rinse times, error codes. – Flashes rapidly (several times per second) when the unit is ready for configuration with your mobile device. – Illuminates steadily when the Wi-Fi function is working. Delay time Illuminates when the display shows the delay time. Child lock Illuminates when the child lock has been set.
Instructions (Cont.) Table 2: Default wash programs Program Max. Load (kg) Time (hr:min) (A) Temp. (°C) (B) Rinse Times Spin Speed (rpm) (C) 40°C Daily 8 1:20 40 2 0/400/600/800/1000/1200 20°C Cotton 8 1:14 20 2 0/400/600/800/1000/1200 (D) 8 3:17 40 3 0/400/600/800/1000/1200 (D), (E) 8 3:10 60 3 0/400/600/800/1000/1200 Cool Wash 6 0:57 Cold 2 0/400/600/800/1000/1200 Anti-Allergy 4.
Instructions (Cont.) Wash program details 40°C Daily: This program is suitable for cottons, linens or cotton mix fabrics, e.g. table linen, towelling, underwear, T-shirts etc. The default washing temperature is 40°C. 20°C Cotton: This program is suitable for washing cottons or linens at a 20°C. / : These programs are suitable for cottons, linens or cotton mix fabrics, e.g. table linen, towelling, underwear, T-shirts etc, at 40°C or 60°C. Cool Wash: This program uses cold water for the wash and two rinses.
Instructions (Cont.) Before first use CAUTION! • Make sure the washing machine is properly and securely installed before using it. • Before using the washing machine for washing clothes, run a complete washing cycle without clothes, using the drum clean program. Before using the washing machine for the first time, please review the following important points and make sure that: • All transit bolts are removed. • he washing machine is stable and level.
Instructions (Cont.) Detergent recommendations WARNING! • Do not use flammable and explosive or toxic solvents, petrol, alcohol or other chemicals in the machine. • Keep detergents and clothing care preparations out of reach of children. • O nly use low-sudsing detergent and clothing care preparations that are suitable for use in a front load washing machine, or in a top and front load machine.
Instructions (Cont.) Before each wash • B efore loading the washing machine - Ensure that the washer is stable, level and properly connected to the power supply. - Check that no young child or pet has climbed into the drum. - Ensure that the water inlet hose and the drain hose are properly connected. - Ensure that the drain hose is securely connected into the drain spout or sink. • W hen loading the machine - Empty all pockets of clothing to be washed.
Instructions (Cont.) Step-by-step washing instructions 1. Connect: Plug the machine in, switch on power to the outlet and open the water tap. 2. Load: Open the door of the washer and load the machine following the guidelines on the previous page. Mixing both large and small items gives better wash results and also helps distribute the load evenly during spinning. You will achieve the most efficient energy and water use when washing a full load.
Wi-Fi Control This AKAI Home 8kg Front Load Washing Machine features Wi-Fi technology, which enables you to control the appliance remotely from wherever you are—at work, at play or on the go—so that on your arrival at home your washing is done, ready for drying. How it works Before you leave your home, get your washing ready, load it in the machine, add detergent and close the door.
Wi-Fi Control (Cont.) On the main device list page you can add the washing machine from the product list. You may have to confirm your Wi-Fi name and password, then follow the prompts to add the machine. While the washing machine is being added, the progress will be displayed. On completion, when your device has been successfully added, follow the prompts to name the device. You can then enter the device’s main control page.
Wi-Fi Control (Cont.) Adding the AKAI Home app to your Google Home app * • Open your Google Home app. (Before you can link your AKAI Home app to your Google Home app you will have to have a Google Home account set up.) • From the home screen of the Google Home app, tap [ Add ]. • Tap [ Set up device ], then tap [ Have something already set up? ] under the “Works with Google” banner. • Using the magnifying glass icon, search for AKAI.
Wi-Fi Control (Cont.) Wi-Fi troubleshooting Problem Possible cause and solution Check and ensure you have internet reception and your mobile phone and the washing machine are connected to the same Wi-Fi network. During the set-up, the washing machine cannot be configured successfully. Check and ensure your Wi-Fi password is correct. Check and ensure that no firewalls or other restrictions are set. Check and ensure that the router works normally — check the network requirements.
FAQs and Troubleshooting Guide When the following problems occur, the microcomputer inside the washer will detect the abnormal condition, display an error message and the washer will stop operating. If after your remedial action the problem persists, please contact our after sales support centre for advice or to book a service. Table 3: Error messages Error message Possible cause No water • Ensure the tap is open. • Check the water inlet valve filter and ensure it is clean, unblocked and undamaged.
FAQs and Troubleshooting Guide (Cont.) Not all unusual incidents you may encounter with your washing machine are faults, or cause for concern. Check in the list below what issues may arise and why. Also check in the table on the previous page for solutions to problems that may be resolved without the need for a service call. If none of the solutions offered below and on the previous page help you solve the problem, please contact our after sales support centre.
Other Useful Information Garment care symbols When choosing a wash program, check for any labels in your clothes and follow the instructions. Below are some commonly used symbols and explanations what they mean. Fig. 13 Normal wash Hand ash w Handwash Bleach Do not w ash Do not bleach Dry clean Chlorine bleach may be used 40 Warm wash (max 40 C ) Gentle wash Iron Cool iron(max 110 C ) C Do not iron Dr y clean normal cycle with any solvent Warm iron.
Other Useful Information (Cont.) Cleaning and care To prolong the service life of the washing machine, keep it in good condition and perform regular maintenance. WARNING! For any type of cleaning and maintenance, make sure the washing machine is disconnected from the mains power supply and the water tap is closed. Cleaning the cabinet (when required) • Use a soft cloth to wipe any water or dirt off the washer housing. • T o remove dirt and stains, use a mild detergent solution and a damp cloth.
Other Useful Information (Cont.) Cleaning the detergent drawer (when required) Remove detergent residues regularly. The detergent dispenser may be removed for cleaning. • Pull open the dispenser drawer until you feel a resistance. Press down the release catch and at the same time pull the drawer right out of the machine (Fig. 14). • Remove the siphon from the compartment and clean it. • Clean the drawer using a brush and warm water (Fig. 15).
Other Useful Information (Cont.) Cleaning the water inlet filter To avoid blockage of the mesh filters at the water tap or hose after long time use, we recommend you clean these filters every 6 months, or more often if there are frequent interruptions to the water supply. CAUTION! Before cleaning the water inlet filter, make sure you have turned off the water supply at the tap. • Use pointed nose pliers to withdraw the plastic filter from the water inlet valve at the back of the washing machine (Fig. 18).
Other Useful Information (Cont.) WARNING! • For any type of cleaning and maintenance, make sure the washing machine is disconnected from the mains power supply and the water tap is closed. • Do not open the pump filter cover during the course of a wash program. • If you are checking the drain pump after a hot water wash, take particular care as any residual water in the machine may be hot. Wait until the water has cooled down to avoid burns.
Other Useful Information (Cont.) Storage If the appliance is not going to be used for an extended period of time, please unplug the machine from the power supply and disconnect all hoses. Clean the machine and filters as described on the previous pages. Let the machine air-dry thoroughly, then store it in the original packaging in a dry location, out of reach of children. Service and repair If the appliance is damaged, do not attempt to repair it yourself.
Warranty returns Should you for any reason need to return this product for a warranty claim, make sure to include all accessories with the product. Product does not work? If you encounter problems with this product, or if it fails to perform to your expectations, make sure to contact our After Sales Support Centre on 1300 886 649 for advice. Instruction Manual Revision Index IM-V2.