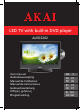
LED TV with built-in DVD player ALED2202 User manual Gebruiksaanwijzing Manuel de l’utilisateur Manual de instrucciones Gebrauchsanleitung Οδηγίες χρήσεως Brugsanvisning GB 2 NL 25 FR 49 ES 73 DE 97 EL 122 DA146
Table of contents 1. 2. 3. 4. 5. 6. Safety............................................................................ 3 1.1 1.2 1.3 Intended use.....................................................................3 Labels in this manual........................................................3 General safety instructions...............................................3 2.1 2.2 Unpacking.........................................................................4 Package contents.........................
ALED2202 1. Safety 1.1 Intended use The LED TV/DVD Combi plays film and photos from DVD. The appliance also plays music from CD. The appliance can also be used as a TV and as a monitor for a personal computer. Read the manual carefully before first use. 2 DVDs and DVD appliances are manufactured under the worldwide agreed DVD regional code system that the appliance will operate only with corresponding disc of the same regional code.
! CAUTION Do not spill any liquid on the appliance. ! WARNING Do not insert any objects in the ventilation holes. ! CAUTION Do not block the ventilation holes. i This appliance is double insulated; therefore no earth wire is required. Always check that the mains voltage corresponds to the voltage on the rating plate. Never attempt to replace the adaptor plug with a regular mains plug. L This appliance employs a laser system. To prevent direct exposure to the laser beam, do not open the appliance.
ALED2202 2.2 Package contents The following items are included in the received package: 1 LED TV/DVD Combi 1 Foot 1 Mains cable 1 Remote control 2 Batteries (AA) 1 Operator manual 3. Installation ● Place the appliance on the stand. Read the paragraph "Mounting the stand". ● Connect the random equipment to the appliance. Read the paragraph "Connecting random equipment". ● Connect the appliance to the mains. Read the paragraph "Connecting to the mains". ● Install the batteries in the remote control.
3.1 Mounting the stand ● Put the appliance on a horizontal flat surface, with the screen upside down. ● Insert the appliance (A) into the stand (B). ● Turn the stand (B) into the direction of the arrow until the stand clicks into place. ● Put the appliance straight up. Put the appliance on a horizontal flat surface.
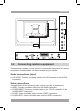
ALED2202 3.2 Connecting random equipment The appliance includes various options for permanent connection of random equipment. Suitable cables can be purchased at your reseller. Audio connections (input) ● L/R AUDIO: Connect a suitable cable to the L/R channels of the AUDIO connection. Video connections The appliance has the following video outputs (in order of preference): ● HDMI: Connect a suitable cable into the HDMI connection.
PC connections The appliance has the following inputs to connect to your personal computer. ● Audio connection: Connect a suitable cable into the PC IN connection. ● Video connection: Connect a suitable cable into the VGA connection. Cable connection ● Insert a suitable cable into the RF OUT connection. Headphone jack ● To connect a headphone, insert the cable plug in the headphone jack. To prevent hearing damage, remember to adjust the volume to a comfortable level. 3.
ALED2202 4. Functions 4.
4.
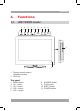
ALED2202 Teletext functions 30 31 32 33 34 35 36 37 CANCEL button TV/TXT button SIZE button HOLD button Coloured buttons INDEX button SUBPAGE button REVEAL button SOURCE POWER OPEN PLAY /PAUSE STOP DISPLAY NICAM/A2 30 31 32 33 ZOOM ASPECT 37 36 35 34 11
DVD functions 38 39 40 41 42 43 44 45 46 47 48 49 50 51 52 53 54 55 56 57 12 ZOOM button LANGUAGE button MENU button SETUP button FWD button REW button SLOW button PROGRAM button A-B button REPEAT button NEXT button PREV button TITLE button ANGLE button SEARCH button SUBTITLE button DISPLAY button STOP button PLAY/PAUSE button OPEN button SOURCE POWER OPEN PLAY /PAUSE STOP DISPLAY 38 39 40 41 42 43 44 45 NICAM/A2 ZOOM ASPECT 57 56 55 54 53 52 51 50 49 48 47 46
ALED2202 5. Operation All functions of the appliance are accessible using the remote control. All instructions refer to operation with the remote control, unless indicated otherwise. 5.1 Quick start General functions ● To switch on the appliance, press the POWER button (12). To switch back to the standby mode, press the POWER button (12) again. ● To select the source mode (TV/AV/Y-Pb-Pr/DVD/SCART/VGA/HDMI), press the SOURCE button (29).
DVD/CD functions ● ● ● ● ● Switch on the appliance. Select the DVD mode. Insert a disc in the slot (2) with the label backwards. To start playback, press the PLAY/PAUSE button (56) once. For extended instructions, read the paragraph "DVD/CD functions" further on in this manual. 5.2 TV setup menu operation To change the initial settings The following actions must be carried out with the remote control: ● Press the SYS MENU button (18). ● Press the arrow buttons (up and down) (25) to select a menu.
ALED2202 ● BASS: to adjust the bass. ● TREBLE: to adjust the treble. ● BALANCE: to adjust the balance. i The sound menu can also be entered by pressing the SOUND button (19). Channel menu (TV mode only) ● ● ● ● ● ● AUTO TUNE: to tune for channels automatically. MANUAL TUNE: to tune for channels manually. FINE TUNE: to fine-tune weak channels. SKIP: to switch automatic skipping of weak channels ON or OFF. SOUND SYS: to select the sound system. PROGRAM EDIT: to edit the program.
PC menu (PC mode only) ● H-POSITION: to adjust the horizontal position of the screen. ● V-POSITION: to adjust the vertical position of the screen. ● CLOCK: to adjust the pixel clock frequency until the image size is maximised for the screen. ● PHASE: to adjust the phase of the ADC sampling clock relative to the sync signal until a stable image is obtained. ● AUTO ADJUST: to adjust the parameters of the screen automatically. 5.
ALED2202 ● To pause playback, press the PLAY/PAUSE button (56) once. To resume playback, press the PLAY/PAUSE button (56) again. ● To stop playback temporarily, press the STOP button (55) once. To stop playback permanently, press the STOP button (55) again or press the PLAY/PAUSE button (56). ● To playback in slow-motion, either forward or backward, press the SLOW button (44) repeatedly. The available speeds are: 1/2, 1/3, 1/4, 1/5, 1/6, 1/7.
● To confirm the selection, press the ENTER button (26). ● Repeat the last 2 steps to add additional titles or chapters. ● Press the PLAY/PAUSE button (56) to start the program. Using the A-B REPEAT function The A-B REPEAT function can be used to repeat a specific section of a DVD. ● Press the A-B button (46) once to select the starting point (A). ● Press the A-B button (46) again to select the ending point (B). The appliance plays the section repeatedly.
ALED2202 5.5 DVD setup menu operation i This menu only works in DVD mode. To change the initial settings The following actions must be carried out with the remote control: ● Press the SETUP button (41) to select the setup menu. ● Press the arrow buttons to select an item and change the settings. ● Press the SETUP button (41) to store the settings and exit. System setup page i This menu only works with an empty DVD player. TV SYSTEM ● To select the colour system (NTSC/PAL/AUTO).
Audio setup page AUDIO OUT ● Select SPDIF OFF to switch off the digital audio signal output. ● Select SPDIF RAW to set the digital audio signal output to its raw format (DTS/Dolby Digital 5.1). ● Select SPDIF PCM to set the digital audio signal output to PCM format. Digital setup page DYNAMIC ● Select the value for the dynamic range compression to avoid losing sound details resulting from a low volume. DUAL MONO ● Stereo: both channels as is. STEREO is the default setting. ● L-Mono: left channel only.
ALED2202 ● Do not apply thinner, alcohol, chemical solvent, or sprays when cleaning. Such cleaning fluids will permanently damage the disc surface. 7. Troubleshooting Trouble Action No sound or incomplete audio Check if the random equipment are switched on and set correctly. Check cables for connection problems. Check if the correct source is selected. Check volume or mute setting. No picture Check if the TV is switched on and set to the correct A/V input. Check cables for connection problems.
No sound or incomplete audio Select another audio track. During SCAN, SLOW MOTION or SINGLE STEP the sound is muted. Check if the disc is in fast forward or fast rewind mode. Press the PLAY/PAUSE button (56). No scan or skip possible Some discs are programmed to refuse user action at certain sections. This is no malfunction. Single chapter or track discs do not allow skip function. Picture distorted or noisy Disc may be damaged or dirty, clean the disc or try another disc.
ALED2202 8.
9. isposal of used electrical D and electronic equipment Z The meaning of the symbol on the material, its accessory or packaging indicates that this product shall not be treated as household waste. Please, dispose of this equipment at your applicable collection point for the recycling of electrical and electronic equipments waste. In the European Union and Other European countries which there are separate collection systems for used electrical and electronic product.
Heeft u na het lezen van deze handleiding nog vragen? Neemt u dan contact op met AKAI Benelux via: 0900-3555333 Avez-vous des questions après avoir lu ce manual? Contactez AKAI Benelux par téléphone au : 070-355505 www.akai.