Contents Notifications & Features & Accessories.................24 Features................................................................24 Connect Power .....................................................25 Remote Control ....................................................26 Connections..........................................................27 Media Browser Menu............................................29 TV Menu Features and Functions.........................30 Using the Channel List.............
Getting Started • AVL (Automatic Volume Limiting). Notifications & Features & Accessories • PLL (Frequency Search). Environmental Information This television is designed to consume less energy to help save the environment. To reduce energy consumption, you should take the following steps: • PC input. If you set the Power Save Mode as Eco, the TV will switch to energy-saving mode. The Power Save Mode settings can be found In the ‘Picture’ section of the Main Menu.
Specification Connect Power IMPORTANT: The TV set is designed to operate on 220-240V AC, 50 Hz socket. After unpacking, allow the TV set to reach the ambient room temperature before you connect the set to the mains. Plug the power cable to the mains socket outlet. Antenna/Cable Connection Connect the “aerial” or “cable TV” plug to the AERIAL INPUT (ANT) socket located on the back of the TV. Notification Manufactured under license from Dolby Laboratories.
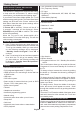
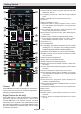
Getting Started Remote Control 1.Standby: On / Off switch of the TV 2.Numeric buttons: Used to navigate channels and enter passwords, text etc. 3.TV: Displays channel list / Switches among broadcast types 4.Mute: Completely turns off the volume of the TV 5.Volume +/- 6.Menu: Displays TV menu 7.Navigation buttons: Helps navigate menus, content etc. and displays the subpages in TXT mode when pressed Right 8.OK: Confirms user selections, holds the page (in TXT mode), views channel list (DTV mode) 9.
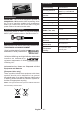
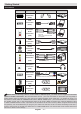
Getting Started Connections Connector Type Cables Device Scart Connection (back) VGA Connection (back) SIDE AV PC/YPbPr Audio Connection (side) Side Audio YPbPr or PC Connection Cable (Not supplied) HDMI Connection (back) SPDIFF Connection (back) SIDE AV Side AV (Audio/Video) Connection (side) HEADPHONE (Not supplied) Headphone Connection HEADPHONE (side) YPbPr Video Connection (back) PC to YPbPr Connection Cable (Not supplied) USB Connection (side) CI Connection CAM module (side) NOTE: Wh
Getting Started First Time Installation - USB Connections Press MENU button to quit channel list and watch TV. Switching On/Off To Switch the TV On Connect the power cord to the 220-240V AC, 50 Hz. To switch on the TV from standby mode either: Press the “ ” button, P+ / P- or a numeric button on the remote control. Press the side function switch until the TV comes on from standby.
not be available to be played on a computer. You can play the recordings only via your TV. recorded). Press the OK button to view the Play Options. Select an option then press OK button. Note: Lip Sync delay may occur during the timeshifting. Radio record is supported. The TV can record programmes up to ten hours. Note: Viewing main menu and menu items will not be available during the playback. Recorded programmes are split into 4GB partitions.
TV Menu Features and Functions Picture Menu Contents Mode You can change the picture mode to suit your preference or requirements. Picture mode can be set to one of these options: Cinema, Game, Sport, Dynamic and Natural. Contrast Sets the lightness and darkness values of the screen. Brightness Sets the brightness value for the screen. Sharpness Sets the sharpness value for the objects displayed on the screen. Colour Sets the colour value, adjusting the colors.
TV Menu Features and Functions Sound Menu Contents Volume Adjusts the volume level. Equalizer Selects the equalizer mode. Custom settings can be made only when in user mode. Balance This setting is used for emphasizing left or right speaker balance. Headphone Sets headphone volume. Sound Mode You can select a sound mode. (If the selected channel supports). AVL (Automatic Volume Limiting) Function sets the sound to obtain fixed output level between programmes.
TV Menu Features and Functions Standby Search (Optional) Store Mode Power Up Mode If the Standby Search is set to On, when the TV is in standby mode, available broadcasts will be searched. If the TV locates any new or missing broadcasts, a menu screen will be displayed, asking you whether or not to execute these changes. Channel list will be updated and changed after this process. If you are displaying the TV in a store, you can activate this mode.
Numeric buttons (Jump): Jumps to the preferred channel directly via numeric buttons. OK: Displays programme options. Note: If the TV fails to come on after the upgrade unplug the TV for 2 minutes and plug in again. Troubleshooting & Tips Text (Search): Displays “Guide Search” menu. Tv will not turn on (Now) : Shows the current programme. (RECORD): The TV will start to record the selected programme. You can press again to stop the recording.
PC Input Typical Display Modes AV and HDMI Signal Compatibility The following table is an illustration of some of the typical video display modes. Your TV may not support all resolutions. Your TV supports up to 1920x1080.
DVD Mode On cleaning • Before playing, clean the disc with a cleaning cloth. Wipe the disc from the center out. Safety Information CAUTION DVD Player is a class 1 laser product. However this product uses a visible laser beam which could cause hazardous radiation exposure. Be sure to operate the player correctly as instructed.
DVD Control Panel Buttons A. Disc loader B. Play / Pause Plays/pauses the disc. When DVD menu (root menu) is active, this button functions as “button select” (selects the highlighted item in menu) if this is not prohibited by the disc. C. Stop / Eject Stop playing disc / Eject or Load the disc Note: • You cannot eject the disc via the remote control. • While playing a file, you should press STOP button three times to eject. 1.Standby 2.Numeric buttons 3.TV Menu 4.Navigation buttons 5.OK / Select 6.Back 7.
General Operation You can operate DVD, movie CD, music or picture CD’s content by using the proper buttons on your remote control. Below are main functions of commonly used remote control buttons.
General Playback Basic Play 1. Press on the power button 2. Please insert a disc to the loader. The disc will be automatically loaded and play commences if the disc does not have any menus recorded on it. A menu may appear on the TV screen after a few moments or the film may start immediately after the introduction of the Film Company. This behaviour depends on the disc content and may change. Note: Step 3 and 4 is available only when a menu is recorded on the disc. 3.
Disc Types Compatible with This Unit Disc Types (Logos) DVD Recording Disc Types Size Max. Playing Characteristics Time Single- Audio + sided; 240 min. 12 cm Double- Video sided; 480 min. AUDIO-CD Audio MP3-CD Audio (xxxx.mp3) PICTURE-CD Video (still picture) 12 cm 74 min. It depends 12 cm on MP3 quality. It depends 12 cm on JPEG quality. • DVD contains excellent sound and video due to Dolby Digital and MPEG-2 System.