ARF-170 Cadre photo numérique : Ecran LCD 7" Lecteur audio-vidéo Station météo Réveil AKAI ARF‐170BE AKAI ARF‐170S Manuel d'instructions
SECURITE 5 1 2 3 1DLe symbole de foudre avec flèche, à l'intérieur d'un triangle équilatéral, avertit l'utilisateur de l'existence d'un courant électrique dangereux à l'intérieur du capot qui peut être suffisamment puissant pour électrocuter une personne.
PRECAUTIONS D'EMPLOI 1- Apres l'ouverture de l'emballage lire le manuel d'instruction attentivement et conserver-le soigneusement avec son emballage pour toutes références ultérieures. 2- Se soumettre à toutes les mises en garde. Suivre toutes les instructions d'opérations 3- Merci de vérifier au déballage que l'appareil n'est pas endommagé .Dans le doute ne pas l'utiliser et contacter le service après-vente. 4- La matière d’emballage tel que le plastique, le polystyrène, etc.
16- Avant d'allumer cet appareil et lorsqu'il est connecté a des amplis ou autre matériel, ajuster le volume au minimum. Une fois branché le volume de l'appareil convient au amplificateur cela évite d'endommager le matériel.
TABLE DES MATIERES 1 Sécurité…………………………………………………………………………………..1 2 Précautions d'emploi……………………………………………………………………2 3 P ré f ac e… … … … … … … … … … … … … … … … … … … … … … … … … … …… … … . . … 5 4 A c c es s o ires ……… …… …… … …… …… … ……… … … ……… … ……… … …… …. . 5 5 Description des faces avant et arrière………………………………………………. 6 6 Description de la télécommande………………………………………………..…… 7 7 Operations de bases…………………………………………………………………... 8 8 Fonctionnement de la mémoire interne ………………………………………….
PREFACE A L'ATTENTION DES CONSOMMATEURS : Nous vous remercions d'avoir fait l'acquisition de ce produit. Son installation et son utilisation sont d'une grande simplicité. Nos ingénieurs ont doté cet appareil de très nombreuses fonctions, lisez attentivement ces instructions pour le faire fonctionner correctement et en profiter dans les meilleures conditions.
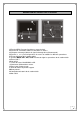
DESCRIPTION DES FACES AVANT ET ARRIERE A Touche MENU. Permet d’accéder au menu principal. B Touche OK. Permet de valider un choix dans les menus. C Récepteur infrarouge (détecte le signal infrarouge de la télécommande). D Touches pour naviguer dans les menus et modifier les différents paramètres. E Écran d’affichage de la station météo. F Touches MODE, SET, ADJ, STOP. Permet de régler les paramètres de la station météo. G Écran LCD 7’’. H Non utilisé II Lecteur de cartes MS/SD/MMC et XD.
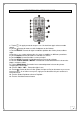
DESCRIPTION DE LA TELECOMMANDE 1- Touche Un appui permet de couper le son. Un deuxième appui revient en mode normal. Permet de mettre en veille l’adaptateur ou de l’allumer 2- Touche 3- Touche REPEAT. Permet de régler le mode de répétition des fichiers photo, audio et vidéo. 4- Touches pour naviguer dans les menus et modifier les différents paramètres. 5- Touche ENTER. Permet de valider un choix dans les menus. 6- Touche MENU. Permet d’accéder au menu principal. 7- Touche SETUP.
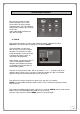
FGHDGH OPERATIONS DE BASES Dès que vous mettrez le cadre Photo numérique sous tension, l’écran affiche le menu principal. Connectez alors une carte mémoire contenant des images, des musiques ou des films. Votre cadre photo numérique est alors prêt à l’emploi. DRAWING OF MAIN A- PHOTO Pour afficher des photos sur votre cadre photo numérique, sélectionnez l’icône Photo dans le menu principal et appuyez sur la touche ENTER.
Pour sélectionner un autre dossier de photos dans le navigateur, appuyez sur la touche puis utilisez les flèches et pour passer d’un dossier à l’autre. Le cadre photo numérique est uniquement compatible avec le format d’image JPEG. Note 1 : La touche PHOTO de la télécommande permet d’accéder directement aux photos.
B –MUSIQUE Pour jouer de la musique sur votre cadre photo numérique, sélectionnez l’icône Musique dans le menu principal et appuyez sur la touche ENTER. Note : La touche MUSIC permet d’accéder directement aux contenus audio. Si aucun fichier audio n’est présent dans la carte, ou qu’aucun support mémoire n’est connecté au cadre photo numérique, le menu principal s’affichera de nouveau après un court temps de chargement.
C- PHOTO + MUSIQUE Votre cadre photo numérique peut afficher vos photos tout en étant accompagnées de musique en arrière plan. Pour lancer ce mode d’affichage, sélectionnez l’icône Photo+Musique dans le menu principal et appuyez sur la touche ENTER. Pour stopper l’affichage des photos, appuyez sur la touche MENU. Le menu principal s’affichera. D – Film Pour regarder des films sur votre cadre photo numérique, sélectionnez l’icône Film dans le menu principal et appuyez sur la touche ENTER.
FONCTIONNEMENT DE LA MEMOIRE INTERNE Grâce à sa mémoire interne, vous pouvez faire défiler des photos de manière autonome, c’est-à-dire sans brancher de carte mémoire. Pour faire défiler les photos de manière autonome, sélectionnez simplement l’option Favori dans le menu principal. En sortie d’usine, quelques photos sont déjà installées, vous pouvez les supprimer et rajouter les vôtre (jusqu’à 15 photos) en suivant les instructions suivantes.
B –Transférer des photos dans la mémoire interne Pour ajouter des photos dans le dossier Favori, allez dans le menu Editer / Copier. Le navigateur de fichiers s’affiche. Sélectionnez une photo favorite avec les flèches et . Puis appuyez sur ENTER. Quand vous vous déplacez sur une photo, un aperçu est visible en bas à gauche après quelques secondes. Quand une photo est sélectionnée, le nom du fichier est encadré en rouge.
REGLAGES DU CALENDRIER ET DE L'HORLOGE A – Calendrier Dans le menu Calendrier / Calendrier, vous pouvez régler la date et visualiser le calendrier mois par mois. • Utilisez les flèches et pour changer le mois. • Utilisez les flèches et pour changer l’année. Dans le menu Calendrier / Réglage Date, utilisez les touches et pour sélectionner le jour, le mois ou l’année. Puis réglez le paramètre en appuyant sur les flèches et . Quand la date est à jour, appuyez sur la touche ENTER pour valider.
FONCTION REVEIL ET ALARME Votre cadre photo numérique possède une horloge interne qui permet de programmer un réveil par sonnerie carillon. Pour utiliser cette option, réglez d’abord l’horloge comme indiqué au paragraphe précédent. • Allez dans le menu Réglages / Système / Réglage timer. • Appuyez sur la touche pour sélectionner Allumage. • Appuyez sur ENTER pour afficher le réglage de l’heure d’activation du réveil. • Utilisez les touches et pour régler l’heure du réveil.
UTILISATION DE LA STATION METEO A – Fonctions La station météo possède les fonctions suivantes : • Heure • Date • Température avec sauvegarde du minimum et maximum • Taux d’humidité avec sauvegarde du minimum et maximum • Station météo • Réveil B – Description de l'écran C - Installation de la batterie La batterie permet à la station météo de sauvegarder les paramètres tels que l’heure, la date et les paramètres du réveil.
D. Operations de bases La station météo possède 3 modes d’affichages : Heure, Réveil et Calendrier. Pour passer successivement d’un mode à l’autre, utilisez la touche MODE en façade. Le mode Heure est le mode par défaut. Lorsque vous accédez aux modes Réveil ou Calendrier, si vous ne faites aucune action pendant 20 secondes, l’appareil revient au mode Heure. a. Fonction Heure Dans ce mode, les doubles points entre heures et minutes clignotent.
Unité de température : • Appuyez brièvement sur la touche SET en façade pour passer d’un affichage de la température en degré Celsius à un affichage en degré Fahrenheit. b. Fonction Réveil Appuyez deux fois sur la touche MODE en façade pour accéder au mode Réveil. Dans ce second mode, vous pouvez modifier les paramètres ci-après. Dans ce mode, les doubles points entre heures et minutes ne clignotent pas, et la case Jour de la semaine affiche ALM.
REMISE A ZERO La remise à zéro correspond à la réinitialisation usine et peut être utile si vous modifiez les paramètres de votre cadre photo numérique et que certaines fonctions ne marchent plus. En réinitialisant le cadre photo numérique, vous revenez dans une configuration identique à celle du produit neuf. Les photos que vous aurez sauvegardées dans le dossier Favori ne seront pas supprimées.
GUIDE DE DEPANNAGE SYMPTOME Le menu de démarrage CAUSE ET SOLUTION -Le cordon d'alimentation est mal inséré -Vérifier la connexion de l'adaptateur à l'appareil -Lorsque vous connecter l’adaptateur à l’appareil mettez le cadre photo numérique sous tension en appuyant sur la touche POWER, même sans carte mémoire un menu de démarrage doit apparaître à l'écran -Si aucun menu de démarrage n’apparaît à l’écran alors vérifiez que la prise de courant de l’appareil est correctement insérée à la prise murale.
CARACTERISTIQUES TECHNIQUES ¾ Alimentation : 110V-240V~ 50-60Hz Consommation en veille : 2W Consommation en marche : 8W ¾ Caractéristiques de l’écran : Ecran TFT LCD 7" Format 16/9 – Zone de visualisation 154x86mm Résolution : 480 x 234 pixels Angle de vue 55/60° Contraste 300 : 1 Luminosité 250 cd/m2 O.S.
Ce logo signifie qu’il ne faut pas jeter les appareils hors d’usage avec les ordures ménagères. Les substances dangereuses qu’ils sont susceptibles de contenir peuvent nuire à la santé et à l’environnement. Faites reprendre ces appareils par votre distributeur ou utilisez les moyens de collecte sélective mis à votre disposition par votre commune. Conformément aux obligations faites par le respect de la norme EN 60065, nous attirons votre attention sur les éléments de sécurité suivants.
SUMMARY 1 General …………………………………………………….……………23 2 Contents………………………………………………………………… 23 3 Product description……………………………………………………… 24 4 Remote description ………………………………………………………25 5 Use………………………………………………………………….…… 26 6 Using the internal memory ……………………………………….………30 7 Adjusting time and date…………………………………………..……… 32 8 Music alarm ………………………………………………………………33 9 Factory reset ……………………………………………………..
General Thank you for choosing this digital photo frame. We believe you will be fully satisfied with this product. The installation and settings are extremely simple. As any other product equipped with an LCD screen, your digital photo frame is fragile. Make sure you take good care of it as the warranty does not cover mechanical damages due to a shock or being dropped. To clean your digital photo frame or its remote, do not use any liquid or detergent.
Description A MENU – to access to the main menu B ENTER – to validate a choice C Infra-red receiver (detects the remote control signal) D Weather station display screen E - to navigate the menu and modify vairous parameters F MODE, SET, ADJ, SNOOZE – to adjust parameters for the weather station G 7“ LCD screen I MS/SD/MMC and XD cards reader J Mains input K Wall mounting hole M Speakers N Battery compartment for weather station U AV output 24
Remote Description 1- Press key once to stop the sound and a second time for the sound to return. 2- Press key to put the receiver on standby or switch it on. 3- Press REPEAT key to adjust the repetition mode for photo, audio and video files. 4- Press keys to navigate in the menus and modify various parameters. 5- Press ENTER key to validate a choice. 6- Press MENU key to access the main menu. 7- Press SETUP key to access the settings menu.
usde USE As soon as you switch on your digital photo frame, the screen will display the menu. Insert a memory card containing images, songs or movies. Your digital photo frame is then ready to use. A - Photo To display photos on your digital photo frame, select the Photo icon in the main menu and press the ENTER key. If there are no photos on the card, or that no memory support is connected to the digital photo frame, the main menu will be displayed again after a small charging time.
To stop the photos slide show, press the PHOTO key (to go back to the photos folder as long as the automatic photo slide show is not activated. See note 2 further down) or the MENU key (to go back to the main menu). To select another file of photos in the navigator menu, press the key and then use the and arrows to go from one file to another. The digital photo frame is only compatible with images in JPEG format. Note 1 : The PHOTO key on the remote allows you to access the photo files directly.
B - Music To play music on your digital photo frame, select the Music icon in the main menu and press the ENTER key. Note : The MUSIC key allows you to access directly to the music contents. If there are no audio files on the card, or that no memory support is connected to the digital photo frame, the main menu will be displayed again after a small charging time. If there are audio files on the card, the digital photo frame will display its files navigator and will select the first audio file.
C - Photo + music Your digital photo frame can display photos whilst playing some background music. To launch this display mode, select the Photo+Music icon in the main menu and press the ENTER To stop the photos slide show, press the MENU key. The main menu will be displayed. D - Video To watch videos on your digital photo frame , select the Video icon in the main menu and press the ENTER key.
The digital photo frame is compatible with most AVI and MPEG files. It is possible that some files may not be read, either because they are using unknow files or because they need a debit that is too high. Note 1 : The MOVIE key on the remote allows you to access the video files directly. Note 2 : By activating the automatic video files reader in the Setup / Auto-Play / Video menu, the videos will be automatically played when you select the Video file.
B - Transferring photos to the internal memory To add photos to the Favorite file, go to the menu Edit / Copy. The files navigator is now displayed. and Select a photo with the arrows and then press ENTER. When a photo is selected, the file name is framed in red. You can select up to 15 photos in one go, even if they are in different folders. To add the photo to the Favorite file, press the arrow to go the menus task bar at the bottom of the screen. Press the arrow to select Copy.
Adjusting date and time A - Calendar In the menu Calendar / Calendar, you can also adjust the date and view a monthly calendar. Use the and arrows to change the month. Use the and arrows to change the year. In the menu Calendar / Set Date, use the and keys to select the day, month or year. The adjust the and parameter by using the arrows. When the date has been updated, press ENTER to validate. B - Clock To display the clock, select the Clock icon and press ENTER.
Alarm Your digital photo frame has an internal clock that allows you to set a musical alarm. In order to do so, you should first set the clocl as indicated in the previous paragraph. - Go to the Setup menu and select Custom / Set time. - Press the key to select Power On. - Press ENTER to display the setting for the activation of the alarm call. - Use the and keys to adjust the time for your alarm. - Then press the key to select the minutes that you can then adjust using the and arrow.
Weather Station A - Features The weather station has the following features : - Hour - Date - Temperature (minimum and maximum) - Humidity (minimum and maximum) - Weather station - Alarm clock B - Description C - Inserting the Battery The battery allows the weather station to save parameter such as the time, date and alarm clock settings. To insert the battery in the weather station : - Unscrew the battery compartment at the back of the digital photo frame.
D - Settings The weather station has 3 display modes : Time, Clock and Calendar. To go from one mode to another, use the MODE key. The Time mode is the default mode. When you access the Clock or Calendar modes, if no action is carried out during 20 seconds, then the weather station will go back to the Time. a. Clock Mode With this mode, the double points in between hours and minutes will flash.
b. Alarm Mode Press the MODE key twice to access the Alarm mode. In this second mode, you can modify the following parameters. In this mode, the double points between the hours and minutes will not flash, and ALM is displayed in the day of the week box. Setting the alarm time: - Press the SET key for 2 seconds to access the setting for the alarm time. - Set the time using the ADJ key. - Press again the SET briefly to select the minutes setting. - Set the minutes with the ADJ key.
Factory Reset A factory reset can be useful if you modify the parameters of your digital photo frame and that some features stop working. By restarting your digital photo frame you will go back to the original settings of the product when purchased. The photos that you have saved in the Favorite folder will not be deleted. If you wish to delete them, you must do so manually in the Edit menu, as explained above. To reset : Go to the Setup menu and select Custom.
TROUBLE SHOOTING SYMPTOM No start-up menu The unit does not play Photo does not appear in full screen mode Small or distorted movie size on the screen No sound CAUSE AND/OR CORRECTIVE ACTIONS The POWER connector to the unit is not securely inserted. Make sure you connect the AC adapter to the unit properly. When you connect the AC adapter to the unit and power up the unit, even without a memory card, you should see a start-up menu screen.
As per the EN 60065 norm requirements, please pay particular attention to the following safety guidelines. Do not obstruct the air vents with objects such as newspapers, table cloths, curtains etc. Allow at least 5 cm around the product to allow enough ventilation. Do not place the product on or near flamable objects such as lit candles. The device may not be exposed to dripping or splashing and no object filled with liquid, such as vases, must be put on the device.