England: ASB90I Index o o o o o 1. Safety 2. Preparations for use 3. Installation 4. Functions 5. Operation 5.1. Master power switch 5.2. Quick start 5.3. iPod functions 5.4. Radio functions 5.5. Clock functions 6. Cleaning and maintenance 7. Technical data 8. Disposal of used electrical and electronic equipment Safety Intended use The iPod Music System functions as a docking station to play music from an iPod. The appliance also plays music from radio.
A note gives additional information, e.g. for a procedure. General safety instructions WARNING Do not put force on the appliance. The appliance can fall and can cause serious injury. CAUTION Do not spill any liquid on the appliance. WARNING Do not insert any objects in the ventilation holes. CAUTION Do not block the ventilation holes. This appliance is double insulated; therefore no earth wire is required. Always check that the mains voltage corresponds to the voltage on the rating plate.
We recommend that you retain the original carton and packing materials in case it ever becomes necessary to return your product for service. This is the only way to safely protect the product against damage in transit. If you do dispose of the carton and the packing materials, please remember to recycle with due care to the environment.
CAUTION Do not put the appliance near a heat source. Do not expose the appliance to direct sunlight. This appliance is equipped with rubber feet to prevent it from moving. The feet are made from nonmigrating material specially formulated to avoid leaving any marks or stains on furniture. However, certain types of furniture polishes, wood preservatives or cleaning sprays cause the rubber to soften and leave marks or a residue on the furniture, and potentially risk the surface to become damaged.
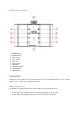
Connections 1. FM 75 OHM antenna input 2. AM 300 OHM antenna input 220V connection On / Off key (POWER) 1. 2. 3. 4. AUX IN Composite video OUT S-Video Warning LED Connecting the system Audio connections (input) These connections allow you to receive audio signal from a connected CD/DVD player or amplifier. Connect a suitable cable to the R/L channels of the AUX IN connection. The video connections allow you to send to video signal (still images or movies) to a connected TV.
Do not make all connections simultaneously as this will affect the output quality. Aerial connection (FM radio) Insert an FM aerial or a suitable cable into the FM ANT connection. Aerial connection (AM radio) Place the aerial on a horizontal flat surface. Place the aerial close enough to the appliance to be able to connect the wires. To connect the aerial to the appliance: 1. Press the latches to open the terminals. Keep the latches depressed. 2. Connect the wire ends to the appliance. 3.
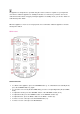
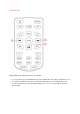
ASB90I Docking Station 1. 2. 3. 4. 5. 6. 7. 8. 9. 10. REPEAT iAUX REPEAT iiPod VOL + button VOL - button IR receiver Input selection SET button REPEAT iALARM TUNER button LED Display Operation All functions of the appliance are accessible using the remote control. All instructions refer to operation with the remote control, unless indicated otherwise. Master power switch The appliance is equipped with a master power switch located at the back panel.
The appliance is designed to be operated using the remote control. For regular use you may find it convenient to switch the appliance to standby mode after use. However, if you wish to care for the environment and not waste energy by leaving the appliance in standby mode, you can also switch off at the master power switch. When the appliance is not in use for longer period, we recommend to switch the appliance off at the master power switch.
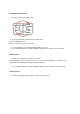
iPod/iPhone/iPad functions Select your type iPad/ iPhone/ iPad. Place your iPad/ iPhone/ iPad in the docking station. Press the IPOD button (3). This key is located on your remote control. To start playback, press the PLAY/PAUSE button (17) once. For extended instructions, read the paragraph "iPod functions" further on in this manual. Radio functions Switch on the appliance. Select the tuner mode.
iPod functions Audio playback During playback, the following functions are available: To select a track, press the PREV button (6) or the NEXT button (16) until the desired track is set. To forward or rewind the track, press and hold the PREV button (6) or the NEXT button (16). To pause playback, press the PLAY/PAUSE button (17) once; to resume playback, press the button again.
Radio functions To select the radio band, press the TUNERbutton (2) to toggle between AM/FM. To skip to the next preset station, press the CH- button (9) or the CH+ button (19). To search for a specific frequency, press the IPOD MENU UP button (15) or the IPOD MENU DOWN button (5) repeatedly until the desired frequency is set. Keep the key IPOD MENU UP (15) or the key IPOD MENU DOWN (5) 3 pressed for seconds to search automatically. The appliance will search for the next available station.
Use the CH-/CH+ (9/ 19) buttons to select your preferred channel. Press ENTER (7) to confirm. Quick installation of the list of stations: Press 3 seconds on the key MEM (11) to start the search programme for automatically setting the available channels. Clock functions Setting the current time Press and hold the ALARM SET button (22). TIME appears on the display. Press the ENTER button (7). The hours are flashing on the display.
Set the hour Use the keys NEXT (16) en PREV (6) for this. Confirm hour To do this, press the ENTER key (7). The minutes are flashing on the display. Set the minutes Use the keys NEXT (16) en PREV (6) for this. Confirm minutes To do this, press the ENTER key (7). Setting the alarm time Press the key ALARM SET twice, The alarm icon appears on the display. Press ENTER (7) to confirm. ON appears on the display. Press ENTER (7) to confirm. The hours are flashing on the display.
During a power failure, or when unplugging the appliance, the time settings are lost. Snooze alarm The default snooze time is: 9 minutes. To snooze the alarm, press any button except the POWER/STANDBY button (1). The alarm sounds again after the snooze time has elapsed. To stop the alarm, press the POWER/STANDBY button (1). The alarm is automatically set for the next day. Using the SLEEP function Press the SLEEP button (20). This key is located on your remote control.
Frequency range FM radio: 87,5 - 108 Mhz Frequency range: 20 Hz ~ 20 kHz Signal/noise ratio: > 80 dB (1kHz) Dynamic range: > 70 dB (1 kHz) Distortion: < -60 dB (1kHz) Remote control Power consumption: 2 x 1,5V Battery size: Cr2025 Working environment Operating temperature: - 10 ~ +40 C(elsius) Relative humidity: 5% ~90% Disposal of used electrical and electronic equipment The meaning of the symbol on the material, its accessory or packaging indicates that this product shall not be treated as household w