2- MANUEL D’UTILISATION 16- USER MANUAL 30- HANDLEIDING 44- BEDIENUNGSANLEITUNG TB340-47 Lire attentivement la notice avant d’utiliser l’appareil Before operating this product, please read user manual completely Lees de handleiding voordat u deze apparaat Lesen Sie die Bedienungsanleitung bevor Sie das Gerät gebrauchen.
Contenu FR Contents GB Avant de commencer 2 Before we begin 16 Importateur exclusif 2 Exclusive Importer 16 Consignes importantes de sécurité 3 Important Safety Instructions 17 SECURITE PRUDENCE 3 4 Mise en place et Instructions de montage 5 Mise en place Montage mural 5 6 Safety Warning Placement and Mounting Placement Wall Mounting 17 18 19 19 20 Description de l’appareil 7 Identifying the Parts 21 Description de la télécommande 8 Remote Control 22 Préparation de la télécom
Inhoud NL Inhalt DE VOORDAT WE BEGINNEN 30 BEVOR WIR BEGINNEN 44 EXCLUSIEF IMPORTEUR 30 EXKLUSIVER IMPORTEUR 44 Belangrijke veiligheidsinstructies 31 WARNHINWEISE 45 SECURITE Voorzichtigheid Plaatsing en montage Plaatsing Wandmontage 31 32 33 33 34 De onderdelen identificeren 35 Afstandsbediening 36 De afstandsbediening voorbereiden 36 SICHERHEITSHINWEISE WARNUNGEN 45 46 Implementierung und Installationsanleitung 47 Implementierung Wandmontage 47 48 AUFBAU DES GER ÄTS UND BEDIE
Avant de commencer Merci d'avoir acheté notre AKAI TB340-47 une BARRE DE SON BLUETOOTH AVEC RADIO FM ET PORT USB. Ce produit a été fabriqué en utilisant des composants de qualité et en respectant des normes de fabrication. Il est une garantie de qualité et de performance. Nos ingénieurs ont inclus dans ce produit de nombreuses fonctionnalités utiles et pratiques. Veuillez lire ce manuel d'instructions entièrement afin de profiter un maximum de chaque fonction.
Consignes importantes de sécurité 7. Ventilation - Les fentes et orifices de l’appareil sont prévues pour la ventilation et pour assurer un fonctionnement fiable du produit et pour le protéger contre toute surchauffe, ces orifices ne doivent pas être obstrués. ATTENTION ! DANGER D΄ÉLECTROCUTION NE PAS OUVRIR ATTENTION: Risque d΄électrocution, ne pas ouvrir la partie arrière de l’appareil, ne pas démonter l’appareil. Aucune pièce á l’intérieur ne doit être réparée par l΄utilisateur.
Consignes importantes de sécurité 14. Dommages nécessitant une réparation – Confiez la réparation à un technicien qualifié dans les conditions suivantes: 20 cm d'espace au-dessus et au moins 5 cm d’espace de chaque côté de l'appareil. 4. Ne placez pas cet appareil à proximité d’un fort champ magnétique. a) Lorsque le cordon d'alimentation ou la fiche est endommagé 5. Ne pas placer l'appareil sur l'amplificateur ou un récepteur.
Mise en place et Instructions de montage Mise en place A. Si votre téléviseur est placé sur une table, vous pouvez placer l’appareil sur la table en face du support TV, centrée à l’écran du téléviseur. B. Si votre téléviseur est fixé au mur, vous pouvez monter l’appareil sur le mur juste en dessous de la TV écran. Option - A Option - B Montage mural (si vous utilisez l'option-B) Notes: • L'installation doit être réalisée par du personnel qualifié.
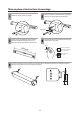
Mise en place et Instructions de montage Fixez les supports muraux à l'unité principale avec les vis retirées de l'unité principale. Retirez les vis de l'unité principale. Wall bracket Percez 2 trous parallèles (Ø 3-8 mm chaque fonction du type de mur) dans le mur. La distance entre les trous doit être de 979 mm. Fixez fermement une cheville dans chaque trou dans le mur si nécessaire. Dowel 979 m Solid wall (i.e.
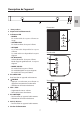
Description de l’appareil POWER AUX/MP3 LINK OPTICAL BT MOVIE / MUSIC 1 Face avant Haut-parleurs 2 Capteur de la télécommande 3 Indicateurs LED • POWER: En mode veille: le voyant s’allume en rouge. • AUX/MP3 LINK En mode auxiliaire: le voyant s’allume. • OPTIQUE: La sortie audio disponible: le voyant s’allume. La sortie audio non disponible: le voyant clignote. Vue de côté • BT (Bluetooth): Lecture Bluetooth : le voyant s’allume. Mode d’appairage Bluetooth: Le voyant clignote.
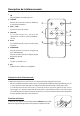
Description de la télécommande 1 Allumer/Mettre en veille l’appareil. 2 SOURCE Permet de commuter entre les différents modes alternativement. 3 VOL + / VOL Ajuster le niveau de volume 4 H/G En mode Bluetooth, permet de sélectionner le fichier audio précédent / suivant. 5 BF En mode Bluetooth, lancer ou interrompre la lecture. 6 APPAIRAGE - Permet d’activer la fonction d’appairage en mode Bluetooth Përmet de déconnecter le périphérique Bluetooth apparié.
Remplacement de la batterie de la télécommande 1. Tirez le plateau et retirez la batterie. 2. Placez une nouvelle pile CR2025 dans le compartiment de la pile en respectant la polarité indiquée. FR 3. Insérez le plateau de la batterie dans son logement. Précautions concernant les piles 1. Lorsque la télécommande est destinée à ne pas être utilisée pendant une longue période (plus d’un mois), retirez la batterie de la télécommande pour éviter toute fuite. 2.
Connexions & Branchements :< :< B. Utilisez un câble RCA audio 3,5 mm (non fourni) pour relier la prise casque du téléviseur à la prise AUX (R / L) sur l’appareil. :< :< PRISE MP3 LINK - Utilisez un câble audio 3,5/3,5 mm (fourni) pour relier la prise casque de l’appareil audio externe à la prise MP3 LINK de la barre de son. Connexion à l'alimentation - Avant de brancher le cordon d'alimentation, vérifiez que vous avez effectué tous les autres connexions.
Fonctionnement de base Mise en marche/ Mise en veille Lorsque vous connectez l'appareil à la prise de courant, l'unité principale est en mode veille. L'indicateur d’alimentation s'allume en rouge. • Appuyez sur la touche /SOURCE sur l'unité principale ou sur la touche de la télécommande pas allumer l'appareil principal. L'indicateur de la dernière mode utilisé d'état s'allume.
Fonctionnement AUX/MP3 LINK /OPTIQUE 1. Assurez-vous que l’appareil est connecté au téléviseur ou un périphérique audio. 2. Lorsque la barre de son est allumée, appuyez sur le bouton /SOURCE de l’unité principale ou sur le bouton SOURCE de la télécommande pour sélectionner un mode AUXILIAIRE, MP3 LINK ou OPTIQUE. 3. Contrôlez la lecture directement de votre appareil audio. 4. Appuyez sur le bouton VOL + / - pour régler le volume au niveau souhaité.
Fonction BLUETOOTH 6. Veuillez vérifier la connexion Bluetooth lorsque l'appareil est replacé dans la portée opérationnelle après avoir été mis hors de celle-ci. 7. Si la connexion est perdue, répétez les étapes ci-dessus pour coupler votre appareil à la barre de son. Écouter de la musique à partir du périphérique Bluetooth - Si le périphérique Bluetooth connecté est compatible A2DP « Advanced Audio Distribution Profile », vous pouvez écouter la musique stockée sur l'appareil via le lecteur.
Spécifications techniques Général Alimentation.......................................................................................................................... AC220-240V~ 50/60Hz Consommation..........................................................................................................................................................20 W Puissance de sortie.....................................................................................................................................
Mise au rebut en fin de vie Attention ! Ce logo apposé sur le produit indique qu’il s’agit d’un appareil dont le traitement en tant que déchet rentre dans le cadre de la directive 2002/96/CE du 27 janvier 2003, relative aux déchets d’équipements électriques et électroniques (DEEE). Ce symbole signifie que les produits électriques et électroniques usagées ne doivent pas être mélangés avec les déchets ménagers généraux. Un système de collecte séparé est prévu pour ces produits.
Before we begin Thank you for purchasing the AKAI TB340-47 a BT sound bar with FM radio and USB port. This is your assurance of quality, performance and value. This product was manufactured using the highest quality components and standards of workmanship. Our engineers have included many useful and convenient features in this product. Please be sure to read this instruction Manual completely to make sure you are getting the maximum benefit from each feature.
Important Safety Instructions 8 Do not install near any heat sources such as radiators, heaters, stoves, or other apparatus (including amplifiers) that produce heat. CAUTION RISK OF ELECTRIC SHOCK DO NOT OPEN 9. Do not defeat the safety purpose of the polarized or grounding plug. A polarized plug has two blades with one wider than the other. A grounding plug has two blades and a third grounding prong. The wide blade or the third prong is provided for your safety.
Important Safety Instructions Caution: - - 8 Do not attempt to clean the unit with chemical solvents as this might damage the finish. Use a clean, dry or slightly damp cloth. Use of controls or adjustments or performance of procedures other than those described herein, may result in hazardous radiation exposure or other unsafe operation. 9 When removing the power plug from the wall outlet, always pull directly on the plug, never yank on the cord.
Placement and Mounting Placement A If your TV is placed on a table, you can place the unit on the table directly in front of the TV stand, centered with the TV screen. B If your TV is attached to a wall, you can mount the unit on the wall directly below the TV screen. Option - A Option - B GB Wall Mounting (if using option-B) Note: • Installation must be carried out by qualified personnel only.
Placement and Mounting Attach the wall brackets to the main unit with the screws removed from the main unit. Remove the screws from the main unit. Wall bracket Drill 2 parallel holes (Ø 3-8 mm each according to wall type) in the wall. The distance between the holes should be 979 mm. Firmly fix 1 dowel into each hole in the wall if necessary. Dowel 979 m Solid wall (i.e., Solid brick, Solid concrete, Solid wood, Solid wooden battens) m Drywall, Plaster wall, Lath wall, etc.
Identifying the Parts Main Unit POWER AUX/MP3 LINK OPTICAL BT MOVIE / MUSIC Front View 1 Speakers GB 2 Remote Control Sensor 3 LED Indicatoren • POWER: In STANDBY mode: Light up red. • AUX/MP3 LINK In AUX mode: Light turn on. In MP3 LINK mode: Light flash. • OPTICAL: Sound output available: Light turn on. Side View Sound output unavailable: Light flash. • BT (Bluetooth): Bluetooth playing mode: Light turn on. Bluetooth pairing mode: Light flash.
Remote Control 1 Switch the unit between ON and STANDBY mode. 2 SOURCE Switches the modes. 3 VOL+/VOLAdjust the volume. 4 H/G In Bluetooth mode, skip to previous/next audio file. 5 BF In Bluetooth mode, star t or pause playback. 6 PAIR Activate the pairing function in Bluetooth mode and disconnect the existing paired Bluetooth device. 7 MUTE Mute or resume the sound. 8 EQ Select a preset sound effect.
Replace the Remote Control Battery 1 Pull out the battery tray and remove the old battery. 2 Place a new CR2025 batter y into the battery tray with correct polarity (+/-) as indicated. 3 Insert the battery tray back into the slot. Precautions Concerning Batteries 1 When the Remote Control is not to be used for a long time (more than a month), remove the battery from the Remote Control to prevent it from leaking.
Connections :< :< B. Use a RCA to 3.5mm audio cable (not supplied) to connect the TV’s headphone socket to the AUX (R/L) socket on the unit. :< :< Use the MP3 Link Socket - Use a 3.5mm to 3.5mm audio cable (supplied) to connect the external audio device headphone socket to the MP3 LINK socket on the unit. Connect Power - Before connecting the AC power cord, ensure you have completed all other connections.
Basic Operation Standby/ON When you first connect the main unit to the mains socket, the main unit will be in Standby mode. The POWER Indicator will light up red. • Press the /SOURCE button on the main unit or the button on the remote control to switch the main unit on. The status indicator of the last used mode will light up. • Press and hold the /SOURCE button on the main unit or press the button on the remote control to switch the main unit back to Standby mode. The POWER Indicator will light up red.
Aux/Mp3 Link/Optical Operation 1 Ensure that the unit is connected to the TV or audio device. 2 While in ON mode, press the /SOURCE button repeatedly on the main unit or the SOURCE button on the remote contro to select AUX or MP3 LINK or OPTICAL Mode. 3 Operate your audio device directly for playback features. 4 Press the VOL +/– button to adjust the volume to your desired level. Play with Bluetooth Device You can listen to tracks from a media device if connected to the unit via Bluetooth.
Play with Bluetooth Device Listen to Music from Bluetooth Device - If the connected Bluetooth device supports Advanced Audio Distribution Profile (A2DP), you can listen to the music stored on the device through the player. - If the device also supports Audio Video Remote Control Profile (AVRCP), you can use the player's remote control to play music stored on the device. 1. Pair your device with the player. 2. Play music via your device (if it supports A2DP). 3.
Specifications General Power requirements............................................................................................................ AC220-240V~ 50/60Hz Power consumption.................................................................................................................................................20 W Output power .........................................................................................................................................................
End of Life Disposal Warning! This logo set on the product means that the recycling of this apparatus comes within the framework of the Directive 2002/96/CE of January 27, 2003 concerning the Waste of Electrical and Electronic Equipment (WEEE). This symbol means that used electrical and electronic products should not be mixed with general household wste. There is a separate collection system for these products.
VOORDAT WE BEGINNEN Dank U voor het kopen van de AKAI TB340-47: SOUND BAR met Bluetooth - USB- MET FM RADIO Dit is uw garantie voor kwaliteit, prestatie en waarde. Onze ontwerpers hebben vele nuttige en makkelijke functies ingevoegd in dit product. Leest u alstublieft deze gebruiksaanwijzing compleet door om er zeker van te zijn dat u het grootste voordeel van elke functie behaald. Dit product is ontworpen met gebruik van de hoogste kwalitatieve componenten en standaarden van vakmanschap.
Belangrijke veiligheidsinstructies u het schoon gaat maken. Gebruik geen vloeibare schoonmaakmiddelen of sprays. Gebruik een vochtige doek om het toestel schoon te maken. 7. VENTILATIE — De sleuven en openingen in de behuizing zorgen ervoor dat het product niet over verhit raakt en naar behoren blijft werken, de openingen mogen niet geblok keerd of afgedekt worden. Blokkeer nooit de openingen door het product op een bed, sofa, tapijt of ander soortgelijk oppervlak te plaatsen.
Belangrijke veiligheidsinstructies 14. S C H A D E D I E R E PA R AT I E V E R E I S T — Trek de stekker van dit product uit het stopcontact en laat het onder de volgende omstandigheden door bevoegd onderhoudspersoneel repareren. a) Wanneer het netsnoer of de stekker beschadigd is. ventilatieopeningen met voorwerpen zoals kranten, tafelkleden, gordijnen etc. Zorg ervoor dat er minstens 20 cm ruimte boven en tenminste 5 cm ruimte aan elke kant van het toestel. 4.
Plaatsing en montage Plaatsing A. Als de tv op een tafel is geplaatst, kunt u de eenheid direct voor de voet van de tv op tafel zetten, in het midden voor het tv-scherm. B. Als de tv aan een muur is bevestigd, kunt u de eenheid direct onder het tv-scherm tegen de muur bevestigen. Option - A Option - B NL Wandmontage (bij gebruik van optie B) Opmerking: • De installatie mag alleen worden uitgevoerd door gekwalificeerd personeel.
Plaatsing en montage Bevestig de muurbeugels aan de hoofdeenheid waarbij de schroeven uit de hoofdeenheid zijn verwijderd. Verwijder de schroeven uit de hoofdeenheid. Muurbeugel Boor 2 parallelle gaten (Ø 3-8 mm elk, afhankelijk van het type muur) in de muur. De afstand tussen de gaten moet 979 mm zijn. Steek zonodig 1 plug stevig in elk gat in de muur. Plug 979 m Massieve muur (zoals baksteen, beton, hout, houten regels) m Droogwand, geplamuurde wand, lattenwand enz.
De onderdelen identificeren Hoofdeenheid POWER AUX/MP3 LINK OPTICAL BT MOVIE / MUSIC Vooraanzicht 1 Luidsprekers 2 Afstandsbedieningssensor 3 LED Indicatoren • AAN/UI: In stand-by-stand: licht rood op. • AUX/MP3-KOPPELING In AUX stand: licht gaat branden. In MP3 KOPPELING stand: licht knippert. NL • OPTISCH: Geluidsuitvoer beschikbaar: licht gaat branden. Geluidsuitvoer niet beschikbaar: licht knippert.
Afstandsbediening 1 Schakel de eenheid tussen de standen AAN en STAND-BY. 2. BRON Schakelt tussen de verschillende standen. 3. VOL+/VOL – Het volume regelen. 4. H/G In de stand Bluetooth, naar het vorige of volgende audiobestand springen. 5. BF In de stand Bluetooth het afspelen starten of onderbreken. 6. KOPPELEN Activeer de koppelfunctie in de Bluetoothstand en verbreek de verbinding met het huidige gekoppelde Bluetooth-apparaat. 7. DEMPEN Het geluid dempen of opnieuw weergeven.
De batterij van de afstandsbediening vervangen 1. Tr e k d e b a t t e r i j l a d e n a a r b u i t e n e n verwijder de oude batterij. 2. Leg een nieuwe CR2025 batterij in de batterijlade met de juiste polariteit (+/-) zoals aangegeven. Stop de batterijlade terug in de sleuf. Voorzorgsmaatregelen voor batterijen 1. Als de afstandsbediening gedurende langere tijd niet wordt gebruikt (langer dan een maand), moet u de batterij uit de afstandsbediening verwijderen om lekkage te voorkomen. 2.
Aansluitingen :< :< B. Gebruik een RCA naar 3,5 mm audiokabel (niet meegeleverd) om de hoofdtelefoonaansluiting van de tv te verbinden met de AUX (R/L)-aansluiting van de eenheid. :< :< De MP3 Link-aansluiting gebruiken - Gebruik een 3,5 mm naar 3,5 mm audiokabel (meegeleverd) om de hoofdtelefoonaansluiting van het externe audio-apparaat aan te sluiten op de MP3 KOPPELING-aansluiting op de eenheid.
Basisbediening Stand-by/AAN Als u de hoofdeenheid voor het eerst op de netstroom aansluit, is de hoofdeenheid in de stand Stand-by. Het indicatielampje AAN/UI licht rood op. • Druk op de knop //BRON op de hoofdeenheid of op de knop op de afstandsbediening om de hoofdeenheid in te schakelen. De statusindicator voor de laatst gebruikte stand licht op. • Houd de knop //BRON op de hoofdeenheid ingedrukt of druk op de knop op de afstandsbediening om de hoofdeenheid terug te schakelen naar de stand Stand-by.
Werken met Aux/Mp3 Koppeling/Optical 1. Zorg ervoor dat de eenheid is aangesloten op de tv of op een audio-apparaat. 2. Druk in de stand AAN meerdere malen op de knop /BRON op de hoofdeenheid of op de knop BRON op de afstandsbediening om de stand AUX , MP3 KOPPELING of OPTISCH te kiezen. 3. Bedien het audio-apparaat rechtstreeks voor afspeelfuncties. 4. Druk op de knop VOL +/– om het volume te regelen naar het gewenste niveau.
Afspelen met Bluetooth-apparaat 4. De speler verbreekt de verbinding ook als het apparaat buiten het bedrijfsbereik gaat. 5. Als u de verbinding van het apparaat met deze speler wilt herstellen, moet u het binnen het bedrijfsbereik plaatsen. 6. Als het apparaat buiten het bedrijfsbereik komt, moet u nadat het is teruggebracht, controleren of het apparaat nog met de speler is verbonden. 7. Als de verbinding is verbroken, volgt u de bovenstaande instructies om het apparaat opnieuw te koppelen met de speler.
Problemen oplossen Ik kan de Bluetooth-naam van deze eenheid niet op mijn Bluetooth-apparaat vinden voor Bluetooth-koppeling - Controleer of de Bluetooth-functie is ingeschakeld op uw Bluetooth-apparaat. - Zorg of u de eenheid hebt gekoppeld met het Bluetooth-apparaat. Specifications Algemeen Stroomvoorziening............................................................................................................... AC220-240V~ 50/60Hz Stroomverbruik...................................................
Afvoer einde levensduur Waarschuwing! Het waarmerk op dit product betekent dat het recyclen van dit apparaat gebeurt binnen de regels van de Directive 2002/96/CE van januari 27, 2003 betreffende de afvoer van elektrische en elektronische apparaten (WEEE). Dit symbool betekent dat gebruikte elektrische en elektronische producten niet moeten worden vermengd met het algemene huishoudelijk afval. Er is een apart inzamelsysteem voor deze producten.
BEVOR WIR BEGINNEN Vielen Dank für Kaufen von TB340-47, Bluetooth-SoundBar. Das ist Ihre Versicherung von Qualität, Leistung und Wert. Unsere Ingenieure haben viele brauchbare und praktische Eigenschaften in dieses Produkt eingeschlossen. Stellen Sie bitte sicher, diese Anleitung vollständig zu lesen, um sicherzustellen, dass Sie maximalen Nutzen von jeder Eigenschaft bekommen. Dieses Produkt ist mit Komponenten höchster Qualität und Standard von Arbeitsausführung hergestellt.
WARNHINWEISE in einen Einbauschrank, Bücherschrank oder Rack-Regal gestellt werden, wenn ausreichend für Belüftung gesorgt ist, Die Öffnungen dürfen nie durch Stellen vom Produkt an einem Bett, Sofa, Teppich oder anderen ähnlichen Oberflächen blockiert werden. 8. Überhitzung: Bitte stellen Sie das Gerät n i c h t i n d e r N ä h e vo n H e i z k ö r p e r n , Wärmespeichern, Ö fen oder anderen Geräten (einschließlich Verstärkern) auf. 9.
WARNHINWEISE 14. BESCHÄDIGUNG BENÖTIGE WARTUNG - Servicefall: Ziehen Sie bitte auf jeden Fall den Netzstecker und wenden sich bitte in folgenden Fällen an qualifiziertes Servicepersonal: a) wenn der Netzstecker oder das Netzteil beschädigt sind b) Flüssigkeit über das Gerät geschüttet wurde oder Gegenstände ins Innere gefallen sind c) das Gerät Regen oder Wasser ausgesetzt war d) we n n d a s G e r ä t n i c h t f u n k t i o n i e r t obwohl Sie die Bedienungsanleitung befolgt haben.
Implementierung und Installationsanleitung Implementierung A. Wenn das Fernsehgerät auf einem Tisch platziert, können Sie das Gerät auf dem Tisch vor dem TV-Ständer zu platzieren, auf den Bildschirm zentriert. B. Falls Ihr Fernseher Wand montiert, können Sie das Gerät an der Wand direkt unter dem TV-Bildschirm montieren. Option - A Option - B Wandmontage (wenn Sie die Option-B verwenden) Hinweise: • Die Installation muss von qualifiziertem Fachpersonal durchgeführt werden.
Implementierung und Installationsanleitung Befestigen Sie die Wandhalterung an der Haupteinheit mit den Schrauben vom Hauptgerät entfernt. Entfernen Sie die Schrauben von der Haupteinheit. Wall bracket Bohren Sie zwei parallele Löcher (Ø 3-8 jeweils in Abhängigkeit von der Art der Wand mm) in der Wand. Der Abstand der Löcher 979 mm. Stecken sie einen Stift in jedes Loch in der Wand, wenn nötig. Dowel 979 m Solid wall (i.e.
AUFBAU DES GERÄTS UND BEDIENELEMENTEN POWER AUX/MP3 LINK OPTICAL BT MOVIE / MUSIC Vorderansicht 1. LAUTSPRECHER 2. Fernfühler 3. LED-Anzeigen • POWER: Im Standby-Modus: Die LED leuchtet rot. • AUX/MP3 LINK AUX-Modus: Die LED leuchtet. • OPTICAL: Die verfügbaren Ausgabe Audio: die LED-Leuchten. Der Audioausgang nicht verfügbar ist: LED blinkt. Seitenansicht • BT (Bluetooth): Spielen Bluetooth: LED-Leuchten. Bluetooth-Pairing-Modus: Die LED blinkt.
Afstandsbediening 1 Schalten / Standby-Gerät. 2. SOURCE K ann z wischen verschiedenen Modi abwechselnd zu wechseln. 3. VOL + / VOL Stellen Sie die Lautstärke 4. H/G Im Bluetooth-Modus, wählen Sie den vorherigen / nächsten Audiodatei. 5. BF Bluetooth-Modus zu starten oder anzuhalten. 6. Paarung Aktiviert die Paarung im Bluetooth-Modus Wird verwendet, um das Bluetooth-Gerät gepaart zu trennen. 7. MUTE Stumm oder Ton. 8. EQ Wählen Sie eine voreingestellte Sound-Effekt.
Ersetzen die Batterie der Fernbedienung 1. Ziehen Sie das BatterieFach, und entfernen Sie die alte Batterie. 2. Legen Sie eine neue CR2025-Batterie in das Batteriefach mit der richtigen Polarität (+ / -) ein. 3. Legen Sie das Batteriefach wieder in den Steckplatz. Batterie-Sicherheitshinweise 1. Wenn die Fernbedienung ist nicht beabsichtigt, für eine lange Zeit (über einen Monat) benutzt wird, nehmen Sie die Batterie aus der Fernbedienung, um ein Auslaufen zu vermeiden. 2.
Verbindungen und Anschlüsse :< :< B. Verwenden Sie ein RCA-Audio 3,5 mm (nicht mitgeliefert) Kabel an die Kopfhörerbuchse des TV an die AUX-Buchse (R / L) auf dem Gerät zu verbinden.. :< :< MP3 / LINK-Buchse - Verwenden Sie ein Audio 3,5 / 3,5 mm-Kabel (mitgeliefert) an die Kopfhörerbuchse externes Audiogerät mit dem MP3 LINK-Buchse an der Soundbar verbinden. Anschließen der Stromversorgung - Bevor Sie das Netzkabel, stellen Sie sicher, dass Sie alle anderen Verbindungen haben.
Grundsätzliche Bedienung Einschalten / Standby Wenn Sie das Gerät an die Steckdose anschließen, wird das Hauptgerät im Standby-Modus. Die Netzanzeige leuchtet rot. • Drücken Sie die /SOURCE-Taste auf dem Gerät oder der Fernbedienung Taste nicht auf dem Hauptgerät einzuschalten. Der Indikator für die neuesten Mode-Status-LEDs verwendet. • Drücken und halten Sie die Taste /SOURCE am Hauptgerät oder drücken Sie die der Fernbedienung nicht das Hauptgerät Standby-Modus.
Betrieb AUX/MP3 LINK / OPTICAL 1. Sicherstellen, dass das Gerät mit dem Fernseh-oder Audiovorrichtung verbunden ist. 2. Wenn das Gerät eingeschaltet ist, drücken Sie die /SOURCE am Hauptgerät oder die SOURCE-Taste auf der Fernbedienung, um die AUX-Modus wählen, MP3 LINK oder OPTICAL. 3. Kontrollieren Sie die Wiedergabe direkt von Ihrem Audio-Gerät. 4. Drücken Sie die VOL + / -, um die Lautstärke auf den gewünschten Pegel einstellen.
Bluetooth Betrieb 5. Wenn Sie Ihr Gerät mit dem Soundbar verbinden möchten, legen Sie sie innerhalb des Betriebsbereichs. 6. Bitte überprüfen Sie die Bluetooth-Verbindung, wenn die Soundbar in der Bluetooth-Reichweite, nachdem er aus der Reichweite platziert. 7. Wenn die Verbindung unterbrochen wird, wiederholen Sie die obigen Schritte, um das Gerät mit dem Soundbar koppeln.
Technische Spezifikationen Algemeen Stromversorgung................................................................................................................ AC220-240V ~ 50/60Hz Leistungsaufnahme..................................................................................................................................................20 W Ausgangsleistung...............................................................................................................................................
Entsorgung Warnung ! Dieses Logo am Produkt bedeutet, dass das Recycling dieses Geräts im Rahmen von Richtlinien 2002/96/CE vom 27. Januar 2003 in Bezug auf Abfall von elektrischen und elektronischen Anlagen (WEEE) kommt. Dieses Symbol bedeutet, dass gebrauchte elektrische und elektronische Produkte nicht mit allgemeinem Hausabfall gemischt werden dürfen. Es gibt ein separates Sammlungssystem für diese Produkte.
www.akai-france.