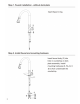
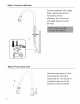
Step 1. Faucet installation ~ without deck plate riser Base Ong: No. Step 2.
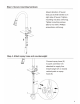
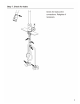
Step 3. Secure mounting hardware Step 4. Attach spray hose and counterweight Faddist direction ol Faust Body 42) so that handle is on hightail of faucet.
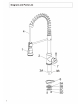
Step 5, Connect waterlines Step 6. Flemish spray hose Connect waterlines (3) fo angle stops, Tighten both ends. of highness With a wench wnt snug. Tae on ho band cold angle stops Gnd check forewarns, Urinate spray hi sad (1) from spray Rose (6 Mold pouf spray has (63, Turn fattest on anf iat the water fin for ad liaisons fo dosh any debs.
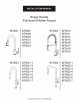
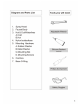
Diagram and Parts List Tools you will need 1. Bray Head 2. Faucet 3. Hot & Cowardliness A Cold B Hot 4. Nylon radiosonde 5, Mounting Hardware A Rubber Washer B. Metal Washer C. Mounting Nut D. Mounting Screws 8. Cam box 7.
Step 1: Remove mounting hardware Ali i ete . dae BE sa 8 pod gg Remove the mounting straws (50) mounting nat (BC metal (6B) rubber washer (5A and the Cambodia) from the mounting ping Step 2: Install faucet and mounting hardware Insert faucet body (2) info hole counterpoint.
Step 3: Secure mounting hardware Stadium direction of faucet Body (2) so that handle soon right side of favorite Tighten pointing aul E303 until snug. Tighten mounting screws (30) with Phillips screw delver until snug Contract wateriness (TREE) to angle stops Tighten bath ends of hose with wirehair until gags.
Steps Flush spray hose 4 Wallpaper spray head (from spy hose WL Bold Noel spray hose 141 Tarn faucet on ard let the water runaround seconds to Thresh any debris MOTE Ease make sure washer (71 is installed Ft aching spray head whose Cheek for leaks at the transactions.
Step 1. Faucet installation «without deck plate = gg Visa Bade Cun Step 2. Install faucet and mounting hardware i gHn 3d a aerate body 10) i Hole in pedophile Arden led amiably Install Mi NEE BA RO ED from Underneath tha nontenured.