
Installation Guide


2. Preparation
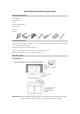
□ Remove the false drawer front from your cabinet.
□ Carefully cut away the top rail and center support.
□ Notch the cabinet as shown to accommodate the thickness of the sink rim. Top of sink should be
flush with the top of the cabinet when installed.
3. Install Wood Supports
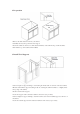
□ Cut two lengths of support framing to extend along the inside walls on each side of the base cabinet.
□ Measure and mark the support mounting locations; ensuring the sink rim will sit at, or slightly below
the top edge of the cabinet.
□ Position and level the supports.
□ Secure the supports with construction adhesive and screws (not provided).
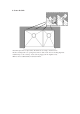
□ Cut four lengths of support framing to extend from the bottom of the installed supports to the floor of
the cabinet.
□ Secure the vertical supports with construction adhesive and screws (not provided).