TO BE A KITCHEN ICON Professional Gas Range AK-JK48A1 AK-JK30A1 AK-JK36A1 User Manual Installation Instructions IMPORTANT: Read and save these instructions. NOTICE: Installer: Leave this guide with the homeowner Homeowner: Keep this guide for future reference Toll Free Number: +1 888-828-2025 WWW.AKICON.
INSTALLERS - Start Here Safety Instructions are on pages 4 to 10 and Installation Instructions are on pages 11 to 24. Please perform these steps: 1. Read the safety instructions. 2. Read all instructions in the Installation section of this manual BEFORE installing the appliance. 3. Remove all packing materials from the oven before connecting the gas supply. 4. Observe all governing codes and ordinances. 5. When finished, make sure to leave these instructions with the consumer. 6.
Before You Begin ......................................................................................................................................... Table of Contents ........................................................................................................................................ Important Safety Information .................................................................................................................... Installation ...........................................
READ ALL INSTRUCTIONS BEFORE USE Read and follow all instructions before using your oven to prevent the risk of fire, electric shock, personal injury, or damage when using the appliance. This guide does not cover all possible conditions that may occur. Always contact your service technician or manufacturer about problems that you do not understand. DANGER: When you see this symbol in the instructions, it indicates a hazardous situation which, if not avoided, could result in death or serious injury.
WARNINGS • Do not store or use gasoline, liquid propane cylinder or other flammable vapors and liquids in the vicinity of this or any other appliance. • Gas leaks cannot always be detected by smell. • Gas suppliers recommend that you use a gas detector approved by UL or CSA. For more information, contact your gas supplier. • If a gas leak is detected, follow the “What to do if you smell gas” instructions on the previous page.
DANGER • Do not store items of interest to children in the cabinets above the appliance or on the backsplash of the appliance. Children should not be left alone or unattended in the area where the appliance is in use. Do not allow children to climb or play around the appliance. They should never be allowed to sit or stand on any part of the appliance. Children climbing on the appliance to reach items could be seriously injured.
DANGER • Use the proper pot/pan sizes. This appliance is equipped with surface units of different sizes. Select pots/pans having flat bottoms large enough to cover the surface unit. The use of undersized utensils will expose a portion of the surface heating unit to direct contact and may result in the ignition of clothing. The proper relationship of the utensil to the surface unit will also improve efficiency. • Do not use stove top grills on your gas appliance.
VENTILATION WARNINGS • The appliance should have proper ventilation in order to keep the unit operating properly and maintain the temperature of immediate surroundings within safe limits. Check your local building codes as they may vary from the general rules outlined in this guide. • If a range hood is installed above the appliance, maintain a minimum clearance of 30" between the cooking surface and the bottom of the range hood. The range hood must be connected directly to flues or to the outside.
INSTALLATION WARNINGS In Canada, the installation of this range must conform to the current standards CAN/CSA-A240-latest edition, CAN/CGA Z240.4.2, or with local codes. To avoid damage to your cabinets, check with your builder or cabinet supplier to make sure that the materials used will not discolor, delaminate, or sustain other damage.
GAS CONNECTIONS (All Units) Important: Do not apply pressure directly to the appliance manifold pipe when tightening supply connections. The manifold pipe should be held securely at the pressure regulator to prevent twisting. Hold the pressure regulator with a wrench during the tightening of the connection, or the manifold pipe may be twisted and split and cause a dangerous leak. Note: Check all piping connections in the unit for leaks. Never use an open flame to check for gas leaks.
Included Parts Range Top Range Griddle (48” models only) Installation Adjustable Feet LPG nozzles Gas pipe adapter with washer 11
Tools and Additional Parts Needed Phillips screwdriver Flat blade screwdriver Hex screwdriver Level Hand or electric drill Wrench or pliers Pipe wrench 15/16” combination wrench Marker or pencil Pipe-joint compound resistant to LP gas Installation Tape measure 12 For Additional Parts: Check local codes, consult gas supplier and check existing gas/ Noncorrosive leak-detection solution Requirements” sections.
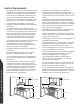
Range Top Dimensions 30” (76.2 cm) 27.25” (69.2 cm) 5” (12.7 cm) 4.25” (10.8 cm) 7.5” (19.1 cm) 5.25” (13.3 cm) 20.75” (52.7 cm) 36” (91.4 cm) 30” (76.2 cm) 27.25” (69.2 cm) 5” (12.7 cm) 9” (22.9 cm) 7.5” (19.1 cm) 4.25” (10.8 cm) 5.25” (13.3 cm) 20.75” (52.7 cm) 1.75” (4.4 cm) 1.75” (4.4 cm) 26.5” (67.3 cm) 36” (91.4 cm) 48” (121.9 cm) 27.25” (69.2 cm) 9” (22.9 cm) 5” (12.7 cm) 4.25” (10.8 cm) 7.5” (19.1 cm) 1.75” (4.4 cm) 32.5” (82.5 cm) 13” (33 cm) Max. 5.25” (13.3 cm) 20.75” (52.
Range Dimensions 30” (76.3 cm) 27.3” (69.4 cm) 7.5” (19.1 cm) 34.8” (88.4 cm) 36”Min.(91.6cm) 37.2”Max.(94.6cm) 20.”1 (51.1 cm) 7.1” (18.2 cm) 2.8” (7.2 cm) 4” (10.2 cm) 27.3” (69.4 cm) 36” (91.5 cm) 7.5” (19.1 cm) 34.8” (88.4 cm) 36”Min.(91.6cm) 37.2”Max.(94.6cm) 20.”1 (51.1 cm) 7.1” (18.2 cm) 2.8” (7.2 cm) 4” (10.2 cm) 27.3” (69.4 cm) 47.9” (121.7 cm) 7.5” (19.2 cm) Installation 36”Min.(91.6cm) 37.2”Max.(94.6cm) 14 34.8” (88.4 cm) 2.8” (7.2 cm) 4” (10.2 cm) 20.”1 (51.1 cm) 7.
GAS RANGE TOP SPECIFICATIONS Installation Note: Minimum clearance for back wall is 0” with backsplash (backguard) or high shelf. If a range hood is installed above the range top, maintain a 30” (76.2 cm) minimum clearance between the range top and the bottom of the range hood. The range top should only be used with ducted range hoods. For best smoke elimination, the minimum clearance of the range hood should be installed 30” to 36” above the range top surface.
STEP 1 Read the Safety Precautions Please read the safety precautions on pages 4 to 10. Safety instructions pertaining to each step have been outlined in the installation steps; however it is important to read ALL the safety instructions. IMPORTANT: It is the installer’s responsibility to comply with installation clearances. STEP 2 Plan Desired Location, Unpack the Appliance and Prepare Tools Plan a desirable location that fits all requirements in the Safety and Install sections of this manual.
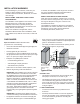
STEP 3B (ranges only) Dimensions and Clearances Before installing the range, you must locate and secure the included anti-tip bracket to the wall for your range. The range may be installed flush to the rear wall. You may install a non-combustible material on the rear wall above the range and up to the vent hood. It is not necessary to install non-combustible materials behind the range below the countertop height.
STEP 4 (Continued) Gas Connection The pressure regulator located at the inlet of the appliance manifold must remain in the supply line regardless of Natural (NG) or Liquid Propane (LP) gas is being used. in length. WARNINGS: Examples of a qualified person include: licensed heating personnel, authorized gas company personnel, and authorized service personnel.
STEP 5 (Optional) (Must be done before Step 6 if converting to Propane) Gas Conversion 3 Unscrew the regulator cap with a wrench (see Figure 9). 4 Remove retainer pin by pulling it out (see Figure 10). 30” & 36” This appliance can be used with Natural Gas or LP/Propane Gas. It is shipped from the factory for use with Natural Gas. A kit for converting to LP gas is supplied with your appliance. 48” Figure 10 WARNINGS: 5 pages 4 to 10.
STEP 5 (Continued) Gas Conversion Changing Burner Nozzles WARNING: Save the natural gas orifices removed from the appliance for possible future conversions to natural gas. You should use the following process to convert to Natural gas. Take extra care when handling steel parts. INSTALLATION TIP: To prevent any omissions, remove ALL existing Natural Gas nozzles before replacing them with the LP nozzles. 7 Remove the burner grates, burner caps and burner rings.
89 53 116 89 53 STEP 5 (Continued) Gas Conversion 89 89 53 53 Changing Burner Nozzles 90 100 INSTALLATION 53 74 89 TIP: To prevent any omissions, remove ALL existing Natural Gas nozzles 90before replacing them116 with the LP nozzles. 89 8 diameter printed on the body. Install the proper nozzles in the exact locations as noted in the illustrations and table below (see Figure 15A, 15B or 15C). 53 89 89 53 53 90 90 100 100 0.94 D B 90 100 1.4 74 116 90 89 89 1.09 116 1.
STEP 5 (Continued) Gas Conversion Changing Oven Nozzles (ranges only) 9 10 11 Open the oven door and remove the bottom drip pan and sliding racks. Remove the upper burner screw. Remove the burner from its connection against the back wall of the oven (see Figure 16). Be careful not to scratch or damage the connection wire that will remain connected throughout this procedure. Using a 10 mm socket wrench, remove the nozzle. Set the natural gas nozzle aside and replace with the liquid propane gas nozzle.
STEP 6 (ranges only) Install Anti-Tip Bracket To reduce the risk of tipping of the range, the range must be secured to the floor with a properly installed Anti-Tip Bracket (included). Make sure the anti-tip bracket is installed: 1 Slide range forward. All ranges can tip and cause injuries. Install anti-tip device packaged with range, follow all Installation Instructions. 2 Make sure the anti-tip bracket is securely attached to the wall behind the range.
The power cord is equipped with a three-prong (grounding) plug which mates with a standard threeprong grounding wall receptacle to minimize the possibility of electrical shock hazard from the appliance. relative to location of the wall receptacle and a warning to the user to disconnect the electrical supply before serving the appliance. encountered, it is the responsibility and obligation of the customer to have it replaced with a properly grounded threeprong wall receptacle.
Safety Precautions Before operating this appliance it is VERY important that you read the safety precautions on pages 4 to 10 as well as all safety precautions listed on this and the following pages with the header, “Safety Before Operating”. gas (natural or LP) that is to be used. Your appliance can be converted for use with either type of gas. See the installation instructions section in this manual. and all codes and requirements of the authority having jurisdiction.
Surface Burner Safety WARNINGS: OFF position. are unstable or easily tipped. Select cookware burner grates. To avoid spillovers, make sure cookware is large enough to contain the food properly. This will save both cleaning time and prevent hazardous accumulations of food which could ignite if left on the appliance. Use pans with handles that can be easily grasped and remain cool. or deep-fat frying. Filling the pan too full of fat can cause spillovers when food is added.
Guidelines for Using Cooktop Burners setting (SIM) for gentle simmering (620 BTU/hr). Use the SIM setting for melting chocolate and butter, cooking rice and delicate sauces, simmering soups and stews, and keeping cooked food hot. Incorrectly or incompletely assembled burners may Never leave the appliance unattended when in use. Boil over causes smoking and greasy spills that may ignite. over, make sure you clean the affected burners before using them again.
Simmer and Boil keeping food warm, melting chocolate or butter, and for slow-cooking over low heat. loads such as water boiling and pasta cooking. Flame Size Approximately height WARNING: Gas appliances can cause minor exposure to four of these substances, namely benzene, carbon monoxide, formaldehyde and soot, caused primarily by the incomplete combustion of natural gas fuel. When operating your appliance on natural gas, the flames from the burners should be blue in color.
Oven Vent (ranges only) the oven and fresh air into the oven burner never be interrupted. Avoid touching the vent opening or nearby surfaces during oven or broiler operation – they may become hot. Oven Operation (ranges only) The blue indicator light turns off when desired oven temperature has been reached. WARNING: Never cover any slots, holes or passages in the oven bottom or cover an entire rack with materials such as aluminum foil.
WARNING: BEFORE BAKING OR BROILING The oven and broiler should be turned on to burn off the manufacturing oils. Turn on the oven to 450°F (230°C) for ventilator above your range at this time. Broiler Operation (ranges only) Note: Door must be closed during broiling operation. Broiling is a method of cooking tender cuts of meat directly under the infrared broiler in the oven. Broiling in the oven is accomplished with the oven door closed.
1.09 90 1.09 1.4 90 100 1.4 100 Griddle Operation (applicable models only) 0.94 Before Using the Griddle Use of the Griddle 1 0.94 0.94 1.09 1.4 1.4 Clean the griddle thoroughly with warm, soapy water to remove dust1.4 or any protective coating. 0.94 2 1.09 1.4 1.4 Rinse with clean water and wipe of f to dry with soft, clean, lint-free cloth. 3 4 0.94 of the surface when the griddle is not being used is provided. Please note that the cover must be removed before turning the griddle on.
Removing the Oven Door and Kick Plate (ranges only) WARNINGS: 3 help removing and replacing it. the door on each side. You can change the color and look of your range by changing the oven door. For normal range use, it is not recommended to remove the oven door. Make sure the oven is turned off and cool when replacing the door. The oven door is heavy, be careful when lifting it. 4 While holding the door on each side, close the door until it touches the levers.
Burner Rings WARNINGS: on pages 4 to 10 and 25 and 26. Electric Shock Hazard. the appliance. - DO NOT attempt to clean the appliance whenever the oven or burner rings are still hot. - DO NOT attempt any of the following cleaning instructions before turning all burners and the oven off, and allow them to completely cool. IMPORTANT: Always follow label instructions on cleaning products.
Ranges: Control Panel, Door Handle, Control Housing Clean the control panel, door handle and control housing with a solution of mild detergent and warm water. Do not use abrasive cleaners or scrubbers; they will Dry the components with a soft, lint-free cloth. Clean all glass surfaces with a solution of mild detergent and hot water. Use a mild glass cleaner to remove Dry completely with a soft, lint-free cloth.
Igniters spark Power supply polarity is reversed. Have polarity corrected. ignition. Igniters are wet or dirty. Dry or clean igniters. Burner parts or igniters may be wet, dirty or misaligned. Check that the burner parts are clean, dry and correctly assembled. Burners will not light. Check that the igniters are clean and dry. Igniters are sparking but burners are not igniting. Top burner will not stay lit. position. Failed thermocouple. Replace thermocouple.
TROUBLESHOOTING RANGE PROBLEM POSSIBLE CAUSE AND/OR REMEDY Range does not function Range is not connected to electrical power. Check power circuit breaker, wiring, and fuses. If all electrical components are properly installed, call +1 (888)-828-2025 for help. Broil does not work Temperature control knob is rotated too far past broil position (500°F); preheating indicator will light intermittently. Burner does not ignite Gas supply valve is in the “OFF” position or gas supply is interrupted.
WARRANTY COVERAGE AKICON Kitchen and Bath range products will be warrantied for five years from the original purchase date for the original purchaser of the product. This warranty covers all parts and labor for necessary repairs if any part of the product proves to be defective in materials or workmanship. The product must be deemed serviceable via troubleshooting with the AKICON Kitchen and Bath service team.
WARRANTY WHAT IS NOT COVERED 1. Installation or start-up, damages or problems caused by improper installation or use. 2. Improper liquid propane gas conversion or damage related to improper liquid propane gas conversion. 3. Range top burner flame adjustments or related complaints. 4. Service by unauthorized service providers or damage related to unauthorized service or unauthorized parts. 5. Installation in any commercial or non-residential application. 6.
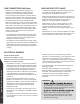
WARRANTY Scan the QR code or enter the URL directly to register for warranty. www.akiconshop.com/registration.html Official contact information. service@akicon.com service@akiconshop.com Toll Free Number: +1 (888)-828-2025 WWW.AKICON.COM WWW.AKICONSHOP.COM SERVICE If you have any questions, please contact us. We recommend using email and attaching photos and videos to better help resolve the issue. Read the safety instructions. Read all instructions in the manual BEFORE operating the appliance.
HARDWARES RANGES FAUCETS SINKS Website: www.akicon.com / www.akiconshop.com Email: info@akicon.