
Operation Manual

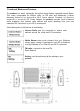

Use
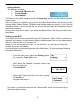
Tune/OK
to
key
in
the
network
key.
Turning
the
knob
left
and
right
will
change
the
numbers,
characters
and
symbols
that
you
wish
to show
in
the
center
of
upper
line
of
the
screen. In
this
example, the
‘5’
is
the
current
active
number,
to
select
it
press
Tune/OK once.
Turning
the
knob
counter
clockwise
or right
will
shift
the
‘character’
to
the
center
of
the
screen
for
selection and
pressing
the
k
nob
will
select
it. Use
the
Back
button
to
delete
a
selected
character.
Once
the
Network
Key
has
been
completed,
next
press and
hold
Tune/OK
to
confirm the
n
etwork ke
y
.
Now
the
product
should
try
to
access
the
Access
point
that
you
have selected
Once
the
product
managed
to
connect
to
the
AP
it
will
now
put
a
star
next
to
the
network
AP
SSID
name
that
you
have
selected.
Press
Tune/OK
and
save
the
profile.
So
that
the
future
connection
to
this
Wi-Fi
AP
you
don’t
have
to
go
through
the
Wi-Fi
AP
selection
process again,
if
you
are
using
the
same
Wi-Fi
AP
for
Internet
Radio
or
Media Streaming
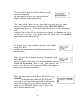
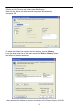
Once
you
select
to
save
the
profile,
it
will
prompt
where
to
save
as
shown.
Use
Tune/OK
to
select
Yes
or
No.
Now
y
our
Wi-Fi
AP
connection
setu
p
is com
p
leted.
5
Remark for troubleshooting: When the device connects with the AP and can’
t
get IP address from DHCP server automatically, it will prompt an erro
r
message as IP 0.0.0.0.
Please check whether router's DHCP service is enabled or not, and try to
connect with the AP again. In company networks it can often happen, that the
network administrator does not provide any DHCP service. In such cases you
can enter the local IP address manually together with Subnet mask, Gateway
and DNS address.(You may ask network administrator for these numbers).
For example: IP Address: 192.168. 0.15 Subnet Mask : 255.255.255.0 ,
Gatewa
y
& DNS 192.168.0.1
(
ever
y
thin
g
de
p
ends on LAN settin
g
s b
y