
Instructions / Assembly

2
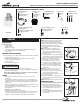
NOTE: Be careful to connect the wires correctly. Make sure no bare strands of wire extend
from the wire nut or other approved wire connectors (sold separately).
INSTALLING THE BULB
1. Screw the bulb (C) securely into socket.
2. Back the bulb (C) out one or two turns, then screw bulb (C) back to insure proper position
in socket.
3. Turn power back ON.
TROUBLESHOOTING
Problem Cause / Solution
Light Does
Not Come On
Or Light Comes
On For Only A
Few Seconds
No power to the fixture.
• Check if circuit breaker tripped.
• Confirm wall switch is ON.
Bulb is not seated properly.
• Refer to “Installing Your Bulb” instructions.
Bulb is faulty.
• Replace bulb.
Sensor is not working properly.
• Check if light is being reflected into the sensor, causing the
fixture to turn OFF.
Wiring to the unit is loose.
• Confirm wiring is properly secured.
Caution: Turn off power before checking.
Light Does Not
Shut Off During
Daytime
Light sensor is not receiving enough light to trigger switch.
• Shine a flashlight into the light sensor for 2-3 minutes. The
fixture should switch OFF after two minutes This means the
sensor is not receiving enough light.
Light Cycles
On and Off
Light sensor is receiving too much reflected light.
• Cover light sensor with a piece of black electrical tape. The
fixture should turn ON after a slight delay. This means that
extraneous or reflected light from the fixture is causing the
sensor to turn the unit OFF. Install fixture where there is no
reflective light.
Bulb is faulty.
• Replace bulb.
2-YEAR LIMITED wARRANTY
THE FOLLOWING WARRANTY IS EXCLUSIVE AND IN LIEU OF ALL OTHER WARRANTIES,
WHETHER EXPRESS, IMPLIED OR STATUTORY INCLUDING, BUT NOT LIMITED TO, ANY
WARRANTY OF MERCHANTABILITY OR FITNESS FOR ANY PARTICULAR PURPOSE.
Cooper Lighting, LLC (“Cooper Lighting”) warrants to customers that, for a period of two years
from the date of purchase, Cooper Lighting’s products will be free from defects in materials
and workmanship. The obligation of Cooper Lighting under this warranty is expressly limited
to the provision of replacement products. This warranty is extended only to the original
purchaser of the product. A purchaser’s receipt or other proof of date of original purchase
acceptable to Cooper Lighting. This is required before warranty performance shall be rendered.
This warranty does not apply to Cooper Lighting products that have been altered or repaired or
that have been subjected to neglect, abuse, misuse or accident (including shipping damages).
This warranty does not apply to products not manufactured by Cooper Lighting which have
been supplied, installed, and/or used in conjunction with Cooper Lighting products. Damage to
the product caused by replacement bulbs or corrosion or discoloration of brass components
are not covered by this warranty.
LIMITATION OF LIABILITY:
IN NO EVENT SHALL COOPER LIGHTING BE LIABLE FOR SPECIAL, INDIRECT, INCIDENTAL,
OR CONSEQUENTIAL DAMAGES (REGARDLESS OF THE FORM OF ACTION, WHETHER IN
CONTRACT, STRICT LIABILITY, OR IN TORT INCLUDING NEGLIGENCE), NOR FOR LOST PROFITS;
NOR SHALL THE LIABILITY OF COOPER LIGHTING FOR ANY CLAIMS OR DAMAGE ARISING
OUT OF OR CONNECTED WITH THESE TERMS OR THE MANUFACTURE, SALE, DELIVERY, USE,
MAINTENANCE, REPAIR OR MODIFICATION OF COOPER LIGHTING PRODUCTS, OR SUPPLY OF
ANY REPLACEMENT PARTS THEREFORE, EXCEED THE PURCHASE PRICE OF COOPER LIGHTING
PRODUCTS GIVING RISE TO A CLAIM. NO LABOR CHARGES WILL BE ACCEPTED TO REMOVE OR
INSTALL FIXTURES.
To obtain warranty service, please contact Cooper Lighting, LLC, at 1-800-334-6871, press
option 2 for Customer Service, or via e-mail ConsumerProducts@cooperlighting.com and
include the following information:
• Name, address and telephone number
• Date and place of purchase
• Catalog and quantity purchase
• Detailed description of problem
All returned products must be accompanied by a Return Goods Authorization Number issued
by the Company and must be returned freight prepaid. Any product received without a Return
Goods Authorization Number from the Company will be refused.
Cooper Lighting, LLC is not responsible for merchandise damaged in transit. Repaired or
replaced products shall be subject to the terms of this warranty and are inspected when
packed. Evident or concealed damage that is made in transit should be reported at once to
the carrier making the delivery and a claim filed with them.
Reproductions of this document without prior written approval of Cooper Lighting, LLC are strictly prohibited.
For assistance, call 1-800-334-6871 or e-mail us at ConsumerProducts@cooperlighting.com
Printed in China
ARTÍCULOS NECESARIOS
(se compran por separado)
• Destornillador en cruz (Phillips)
• Llave inglesa ajustable
• Taladro con broca de 3/16 pulgada
• Conducto portacables flexible de 1/2 pulgada (1,27 cm) de diámetro
(si aplica, la longitud depende de la aplicación)
• Conectores herméticos de conducto portacables de 1/2 pulgada (1,27 cm) (si aplica)
• Conectores de cable
INSTRUCCIONES IMPORTANTES DE SEGURIDAD
• Lea y siga estas instrucciones.
• Tenga en cuenta todas las advertencias, incluyendo las advertencias a continuación
Y aquellas incluidas en el producto.
• Guarde estas instrucciones y advertencias.
• Sólo para uso en exteriores.
• cULus para ubicaciones mojadas.
• Antes de la instalación o reparación, desconecte la alimentación eléctrica en el fusible
o interruptor de circuito.
• Desconecte la alimentación y permita que el accesorio se enfríe antes de cambiar la
bombilla o manipular el accesorio.
• Las orillas pueden cortar. Manipule con cuidado.
Aviso: Las bombillas contienen mercurio y se deben desechar de acuerdo
a las leyes federales, estatales o locales. Para más información,
visite: www.lamprecycle.org.
PRECAUCION
• Conecte el accesorio a una fuente de energía de 120 Voltios, 60 Hz. Cualquier
otro tipo de conexión anula la garantía.
• El accesorio debe ser instalado por personas con experiencia en cableado
doméstico o por un electricista calificado. El sistema eléctricoy el método de conexión
eléctrica del accesorio debe cumplir con el Código eléctrico nacional y los códigos
locales sobre edificios.
• Utilice siempre el mismo vataje y tipo de bombilla que se incluye con el accesorio.
Si no lo hace se anulará la garantía. Vea el accesorio para el vataje requerido.
• Una instalación invertida podría resultar en sobrecalentamiento o acumulación de
agua en el accesorio. Este accesorio debe ser montado en posición vertical.
• UTILICE CONDUCTORES DE SUMINISTRO QUE SOPORTEN UN MÍNIMO DE 90°C.
• Este dispositivo cumple con los limites conforme a la Parte 18 de las reglas de FFC.
• Es posible que este producto cause interferencias al equipamiento de radio. No debe
instalarse cerca de equipamiento de comunicaciones de seguridad marítima, barcos
en el mar u otro tipo de equipamiento de comunicaciones o navegación que opere
entre 0,45 y 30 MHz.
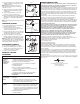
MONTAJE DEL ACCESORIO
NOTA: Este accesorio ha sido diseñado para ser conectado a través de un conducto
portacables a una caja de conexiones (no se suministra) de metal resistente a la
intemperie adecuadamente instalada y conectada a tierra. El conducto portacables,
sus conexiones y las cajas de conexiones (cómprelos por separado) deben ser
clasificadas para ubicaciones húmedas.
1. Con la ayuda del patrón en la caja, marque y taladre
los agujeros para el montaje.
NOTA: Este accesorio debe ser montado en posición
vertical.
2. Instale primero los dos tornillos de montaje de la parte
inferior (E), dejando suficiente espacio entre los dos
tornillos y la superficie de montaje para acomodar
el accesorio.
3. Enrosque el tornillo de montaje (E) de la parte
superior en el agujero previamente taladrado y
sáquelo. Esto dejará el agujero roscado, lo que
facilitará la instalación del accesorio.
4. Retire la cubierta de acceso (D) de la bolsa de piezas.
5. Instale el primer conector del conducto y el
conducto (cómprelo por separado) en la cubierta
de acceso (D).
6. Pase los cables de alimentación en el conducto
portacables y efectúe las conexiones del cableado
como está descrito en “Cableado del Accesorio”.
ESPAÑOL
ADVERTENCIA