
Installation Guide


NOTE: CROWN MOLDINGS AND OTHER TRIM MAKE
ANY KITCHEN LOOK CUSTOM BUILT. IF YOU ARE NOT AN
EXPERIENCED CARPENTER, THIS MAY BE DIFFICULT AND
BETTER LEFT TO THE PROS. BUT IF YOU HAVE MADE
THE DECISION TO DO-IT-YOURSELF, YOU MAY WANT TO
PRACTICE YOUR MITER CUTS ON INEXPENSIVE PIECES OF
MOLDING FROM YOUR HARDWARE STORE.
7.1
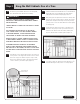
Trim molding is used to trim out cabinetry where cabinets
meet an adjacent wall, soffit or ceiling. Carefully measure
and cut to proper length. Use small finish nails or a pin
nailer to attach where cabinet and wall meet. (Figure 19)
7.2
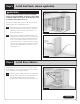
Crown moldings mount along the top edge of the cabinets.
If your cabinets are full overlay, you may need to install
some blocking material to the top of the cabinet first.
(Figure 20)
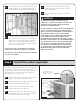
7.3
When moldings meet at an angle, you will need to use a
miter box for a proper cut. Once moldings are cut to fit, use
small finish nails or a pin nailer to attach the molding to the
face frame of the cabinet.
Step 7 Install Moldings (if applicable)
Figure 19
Soffit or ceiling
Trim molding
Wall cabinets
7.4
When trimming molding, keep in mind that the proper
position for the molding in the miter box is upside down
with the bottom edge resting against the fence. (Figure 21)
NOTE: ALWAYS USE A MITER BOX FOR ACCURATE MOLDING
CUTS AND DOUBLE CHECK THE ANGLE REQUIRED BEFORE
CUTTING. SEE DIAGRAMS C–G ON PAGES 12-13 FOR A
HANDY GUIDE.
Figure 20
Soffit or ceiling
Filler materials
as required
Crown moldings
Installed crown moldings
Trim molding
Continued
Figure 21
Flat sides of molding
rest squarely against
table and fence of saw
Place molding
in saw “upside down”
Top of molding
Back of molding
Verify angle
before cutting
11