
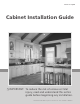
Installation Guide

1.4
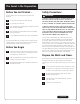
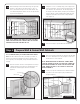
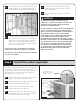
Now measure up from the wall cabinet base line the same
distance as the height of your cabinets (30
1
⁄8”, 36
1
⁄8” or
42
1
⁄8”). This will be the top line for the wall cabinets. Any
non-standard height wall cabinets need to line up with this
top line as well. (Figure 3)
NOTE: IF YOU HAVE A LOW CEILING OR SOFFIT, YOU MUST
MAKE SURE THAT THE WALL CABINETS WILL FIT PROPERLY
BETWEEN YOUR LEVEL LINE AND THE TOP.
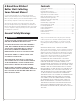
Step 2 Prepare Wall & Corner Wall Cabinets
1.5
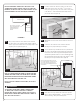
Using the 1 x 2 or 1 x 3 furring strips, screw a support rail
into the studs with 2” wood screws below the baseline you
have drawn for the wall cabinets. This will help support
the weight of the wall cabinets, and give you something to
rest the cabinets on when installing them. Make sure your
support rail (sometimes called a cleat or ledger board) is
level. (Figure 4)
1.6
You are now ready to pre-assemble the wall cabinets.
It is recommended that you install wall-mounted cabinets
first so the base cabinets won’t be in your way as you work. To
begin, most people find it helpful to lay out the cabinets on the
floor in position, level and plumb, and pre-assemble them before
hanging.
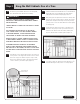
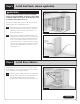
2.1
Remove all shelves and doors. You might want to mark (or
carefully stack them in position) for reinstalling later. This
will make the cabinets lighter and easier to handle.
(Figure 5)
2.2
Refer to the layout provided by your designer and start with
the corner cabinet (if there is one) and place it on the floor
below where it is to be mounted.
NOTE: WHEN INSTALLING A BLIND WALL CABINET, MAKE
SURE THE CABINET IS PULLED OUT FROM THE CORNER THE
APPROPRIATE DISTANCE AS CALLED FOR IN YOUR KITCHEN
PLAN. ALWAYS BE SURE TO USE A FILLER TO ALLOW FOR
HINGE CLEARANCE.
2.3
One by one, align the remainder of the cabinets and fillers
in position on the floor using the plan provided by the
designer. (Figure 6)
Figure 3
Wall cabinet top line
Soffit or ceiling
Wall cabinet
base line
Highest point
level line
20
1
/
2
”
Toekick line
84”, 90”,
or 96”
30
1
/
8
”, 36
1
/
8
”,
or 42
1
/
8
”
19
3
/
8
”
34
1
/
2
”
53
7
/
8
”
Wall stud locations
Continued
Figure 6
Corner wall cabinet
Adjacent wall cabinet
Arrange cabinets
according to plan
Temporary
support rails
Wall stud
locations
Figure 5
Remove screw
Cabinet face frame
Door hinge
Remove doors and shelves
Figure 4
Wall cabinet top line
Soffit or ceiling
Wall cabinet
base line
Temporary
support rails
53
7
/
8
”
Wall stud
locations
2” Wood screws
screw into wall stud
Temporary support rail
Continued
5