
Installation Guide

5
INSTALLATION INSTRUCTIONS
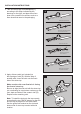
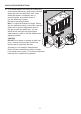
3
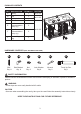
Remove the top foam sheet
Remove the foam sheet
Remove the cutout foam
sheet & hardware
Remove the top and place it
on a scratch free surface
Remove the backsplash and place
it on a scratch free surface
C
B
FRONT
FRONT
C
Foam sheet
B
FRONT
BACK
BACK
FRONT
Foam sheet
B
FRONT
FRONT
Hardware
Pack
1
2
4
BACK
1
D
D
B
BACK
BACK
BACK
BACK
2
2
2
2
BACK
BACK
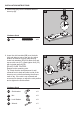
Top
Sink Lip
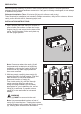
3. Take out the top (B) and backsplash (C)
according to the steps indicated by the
drawings on the right, and place them face
down onto a scratch free surface such as a
foam sheet that came in the packaging.
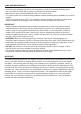
4. Apply silicone caulk (not included) to
the top edge of sink (D). With the help of
another adult, lower the sink onto the back
side of the stone top.
Make sure the sink over-flow hole is facing
the front of stone top.
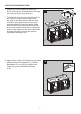
Be sure to align the sink well with the stone top
cut out allowing for equal stone overhang on the
front, back and sides of the ceramic sink (D).
Repeat for the remaining sink.
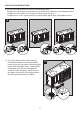
Note: To install the sink onto the top correctly,
ensure that the two "BACK" stamps on the sink
and the top are aligned on the same sides.
Use the guide lines marked on the sink and
bottom side of stone top to assist with sink
location.