
Installation Guide

6
INSTALLATION INSTRUCTIONS
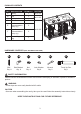
Hardware Used
Bolt x 8
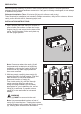
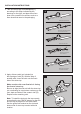
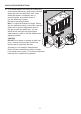
5. Screw bolts (AA) into the threaded holes of
stone top (B).
Hardware Used
Sink bracket x 8
Nut x 8
x 8Lock Washer
Wrench x 2
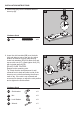
6. Lower the sink brackets (BB) over the bolts
(AA) and allow to rest on the sink lip. Adjust
location of bracket to firmly grasp sink lip.
Lower lock washers (DD) over bolts (AA) and
secure with nuts (CC). Hand tighten nuts (CC)
with included wrench (EE).
DO NOT OVER TIGHTEN!
Repeat for the remaining sink.
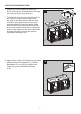
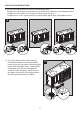
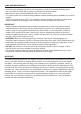
Tip: Check that the sink placement is well
centered front to back and side to side of the
stone top cut out before allowing the silicone
caulk to dry. If the sink is not centered well
unscrew sink clamps, re-adjust the sink position
and re-tighten the sink brackets.
6
1
BB
EE
CC
DD
AA
3
2
BACK
BACK
BACK
BACK
D
B
D
5
D
B
BACK
BACK
D
BACK
BACK
AA
AA
BB
CC
DD
EE