
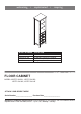
Installation Guide


5
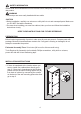
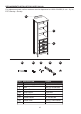
3. Insert shelf pins (BB) at desired height, ensuring
they are level. Place shelves (C) on top of shelf
pins (BB).
INSTALLATION INSTRUCTIONS
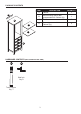
Hardware Used
Shelf Pin
x 8
BB
3
1
BB
2
2
C
C
Baseboard
2
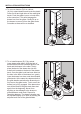
2. Clean area where the cabinet (A) will be
permanently located prior to beginning
installation, ensuring the cabinet (A) will not
interfere with any plumbing or electrical lines
once mounted.
Locate wall studs and mark locations. With the
help of another adult, place completed cabinet
assembly in its final location. Adjust the height
of the cabinet (A) by twisting the adjustable
leveler foot pins on the bottom of each leg.
Twist clockwise to decrease height or twist
counter-clockwise to increase cabinet height.
Using hardware appropriate for your wall type
such as cabinet screw or toggle bolt (not
included), secure cabinet (A) to preferably
two wall studs anywhere through the cabinet
mounting bar. Be careful not to disturb
any electrical or water lines that may be
concealed in the wall.