
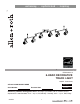
Installation Guide


PREPARATION
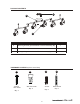
Before beginning assembly of product, make sure all parts are present. Compare parts with
package contents list and hardware contents list. If any part is missing or damaged, do not attempt
to assemble the product.
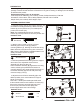
Estimated Assembly Time: 30~60 minutes
Tools Required for Assembly (not included): Ladder, Phillips Screwdriver, Flathead
Screwdriver, Wire Cutters, Pliers, Safety Glasses,
Helpful Tools (not included): Wire Stripper, Tape
4
ASSEMBLY INSTRUCTIONS
Wire Connector
BB
x 3
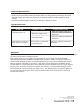
Hardware Used
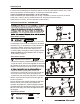
2. Attach hook on inside of canopy of fixture
assembly (B) to loop on hanging strap of
mounting bracket (A), allowing for hands-free wiring.
Make electrical connections using wire connectors
(BB). Refer to ELECTRICAL CONNECTIONS in the
Safety Information section on page 3.
3. Unscrew preassembled bushing from the support
stem nuts on the adjustable arms of fixture
assembly (B). Save for later use.
Place the fixture assembly (B) against the mounting
surface, allowing the preassembled screws on
mounting bracket (A) to pass through the canopy of
the fixture assembly (B). Secure with previously
removed canopy nuts (C).
AA
x 2
Hardware Used
1. Unscrew canopy nuts (C) from fixture assembly (B)
and detach mounting bracket (A). Attach mounting
bracket (A) to the junction box (not included) with
junction box screws (AA).
Note: The preassembled screws on mounting
bracket (A) should protrude out from the junction box.
Junction
Box Screw
AA
A
BB
1
2
3
B
A
A
B
C
4
at the marked locations and install the anchors (CC).
Secure the previously removed bushings to the
anchors (CC) with wood screws (DD), then
thread support stem nuts onto bushings.
Anchor
CC
x 2
Hardware Used
Wood Screw
DD
x 2
CC
DD
Bushing
Bushing
4. Adjust the arms of fixture assembly (B) to the
desired position, then mark locations for support
stems on the ceiling.
Drill and 7/32 in. Drill Bit
Use 7/32 in. drill bit (not included) and drill holes