
Installation Guide


3
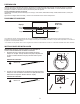
INSTALLATION INSTRUCTIONS
WARNING: Turn off power at circuit breaker or remove fuse
before attempting installation.
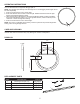
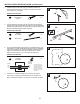
1. Determine the midpoint of where the mirror will be installed and
mark with a pencil. Place the Z-bar (DD) on the wall with the
middle hole of the Z-bar (DD) positioned over the midpoint.
Hardware Used
DD
Z-bar x 1
2. Using a level, make sure the Z-bar (DD) is straight and mark the
other two holes on the Z-bar (DD) located to the right and left
sides. Remove the Z-bar (DD).
Hardware Used
DD
Z-bar x 1
11"
5-1/2"
A
DD
1
DD
2
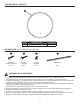
PREPARATION
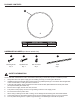
Before beginning assembly of product, make sure all parts are present. Compare parts with package and hardware contents
list. If any part is missing or damaged, do not attempt to assemble the product. Contact Customer Service for replacement
parts.
Estimated Assembly Time: 30 minutes
Tools required for assembly (not included): Tape Measure, Phillips Screwdriver, Hammer, Electric Drill, Drill Bits, Level
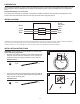
Please follow all local electrical codes and consult an electrician when wiring this product.
WIRING DIAGRAM
Mirror
House
Electrical
Wires*
black
black
white neutral
ground
live
white
green green
Installation may vary depending on how the previous mirror was installed and the presence of the power source. Supplies necessary for installation
of your new mirror are not all included; however, most are available at your local home improvement or hardware store.
*House wires may vary in color. Please be sure to verify actual house wires with a certied electrician before installation.