
Installation Guide
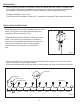
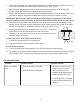

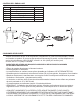

1. Connect the extension wire and all light fixtures end-to-end making one long wire connection.
This is the total distance available when positioning your lights. (Fig.2)
2. Most common light placements are on step risers to illuminate stairs or flat on the deck
surface to delineate extremities and illuminate railings or walls.
3. Position the light fixtures making sure that the extension wire will reach the photo sensor and
transformer. Once in their proper position drill out holes using the included 1” drill bit.
IMPORTANT NOTE: Please make sure that you have properly calculated your distances
and are confident of the positioning of the deck lights before drilling holes into your deck.
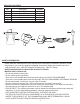
4. Disconnect the lights from each other and insert each fixture into its corresponding hole by
feeding the two (2) wires first then pressing the fixture firmly into the hole so that it fits tightly
against the deck surface. Repeat this step for all eight (8) lights. (Fig.3)
5. Connect the male end of the extension wire to the “OUT” connection
of the photo sensor and the female end to the first fixture.
6. Connect the female end of the extension wire to the first light fixture
and each fixture to the next.
Connect the photo sensor and the transformer
7. Connect the photo sensor to the transformer.
8. Plug the transformer into the electrical GFCI outlet.
How to test the system
9. To test the deck lights during daytime, cover the photo sensor with black tape.
10. The photo sensor reacts to light conditions. It automatically turns ON the light fixtures at dusk
and turns them OFF at dawn. It should not be exposed to direct artificial light sources.
5
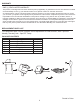
TROUBLESHOOTING
Problem Possible Cause
Corrective Action
1. Problem with the connection
2. Problem with the LED lights.
Only some lights
work
1. Check the connection and
make sure the male and
female connectors are
pressed firmly together and
secure with the screw nut.
2. To check the LED, exchange
it with another fixture that is
working.
(Fig.3)