
Assembly Instructions

14 15
ASSEMBLY INSTRUCTIONS ASSEMBLY INSTRUCTIONS
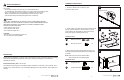
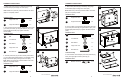
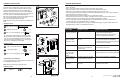
21. Using a stud fi nder, locate the edges of the wood
studs. Find the center line of each stud and draw a
vertical reference line on the wall over each one. Position
installation template (W) at desired location on wall.
Note: The bottom of the installation template (W) should
be no less than 31-1/2 in. from the fl oor.
Mark mounting holes with a pencil (not included) and
discard installation template (W). Drill 3/16 in. pilot holes at
marked locations. Then, with the beveled edge facing up,
attach the wall hanging cleats (O) with large fl at washers
(QQ) and lag bolts (PP).
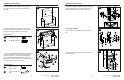
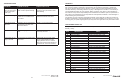
23. With a pencil, draw a level line at the desired
mounting location for long shelf (V). Using L-brackets
(SS) as a guide, mark the screw hole locations with a
pencil. Drill 3/8 in. diameter pilot holes at least 2-1/2 in.
deep
at marked locations, then insert wall anchors (RR)
into the holes until they are fl ush with the wall. Attach
L-brackets (SS) to the wall using M4 x 38 mm screws
(KK) and to the long shelf (V) using M4 x 14 wood screws
(MM).
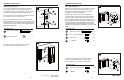
24. Attach long shelves (V) to hutch panel left (A)
and hutch panel right (B) with L-brackets (SS),
securing with M4 x 14 mm wood screws (MM).
21
24
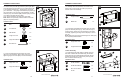
22. With the help from another person, carefully
hang the unit onto wall hanging cleat (O).
22
O
O
O
MM
V
SS
Lowes.com/allenandroth
Lowes.com/allenandroth
39-1/2 in.
Minimum 31-1/2 in.
16 in.
QQ
QQ
PP
PP
O
O
W
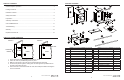
Hardware Used
Wall Anchor
L-Bracket
M4 x 38 mm Screw
M4 x 14 mm Wood Screw
x 8
x 4
x 8
x 8
RR
SS
KK
MM
Hardware Used
L-Bracket
M4 x 14 mm Wood Screw
x 4
x 16
SS
MM
Wall Hanging Installation
Long Shelf Installation
23
KK
RR
V
MM
SS
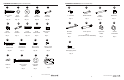
Hardware Used
x 4
x 4
PP
QQ
M8 x 2-1/2 in. Lag Bolt
Large Flat Washer
Note: If long shelf (V) needs cut to fi t inside your closet
space, cut only one side of the shelf and do not use
a hacksaw. It is recommended you hire an insured
remodeler for this type of installation.