
Assembly Instructions

16 17
ASSEMBLY INSTRUCTIONS
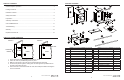
Hardware Used
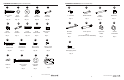
Hardware Used
Hardware Used
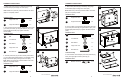
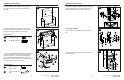
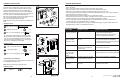
25. Insert 22 mm metal poles (X) into 25 mm metal
poles (Y). Using closed pole holders (ZZ) as a guide,
mark screw hole locations with a pencil. Drill 3/8 in.
diameter pilot holes at least 2-1/2 in. deep
at marked
locations, then insert drywall anchors (not included) into
the holes. Attach closed pole holders (ZZ) with
M4 x 38 mm screws (KK). Insert 25 mm metal poles (Y)
into closed pole holders (ZZ), securing with
M4 x 15 mm self-tapping screws (AB).
Note: Drywall anchors are not required if installing into a
stud.
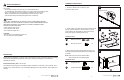
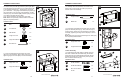
26. Attach open pole holders (YY) to hutch panel
left (A) and hutch panel right (B), securing with M4
x 14 mm wood screws (MM). Insert 22 mm metal
poles (X) into open pole holders (YY), securing with
M4 x 15 mm self-tapping screws (AB).
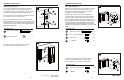
27. Insert shelf pins (OO) where desired in cabinet, then
rest adjustable shelf (G) on top.
Note: Ensure the shelf pins (OO) are level.
25
26
27
Shelf pin
x 4
OO
Y
X
AB
ZZ
KK
Drywall Anchor
YY
AB
MM
YY
G
OO
Lowes.com/allenandroth
Lowes.com/allenandroth
M4 x 38 mm Screw
Closed Pole Holder
M4 x 15 mm Self-tapping Screw
x 9
x 3
x 3
KK
ZZ
AB
M4 x 15 mm Self-tapping Screw
M4 x 14 mm Wood Screw
Open Pole Holder
x 3
x 9
x 3
AB
MM
YY
CARE AND MAINTENANCE
• Periodically check to make certain all components are properly positioned, free from damage and
fi rmly connected.
• Use a soft, clean cloth that will not scratch the surface when dusting.
• Never use water to clean the furniture as it may cause damage to the fi nish.
• Wipe clean using a damp cloth and a mild cleaner. Wipe dry with a clean cloth.
• In the event that the furniture is stained or otherwise damaged during use, it is recommended you
call a professional to repair the furniture.
• Keep furniture away from direct sunlight as it may damage the fi nish.
• It is best to keep the furniture in a climate-controlled environment. Extreme temperature and
humidity changes can cause fading, warping, shrinking and splitting of wood.
• Touch-up pen (XX) has been provided (except in Item #0339205) to repair any small nicks or
scratches that may occur during assembly or shipping.
• If Item #0339205 is damaged and touch-up is required please apply a quality wood polish to the
damaged surface. Polish not included with this item.
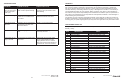
TROUBLESHOOTING
PROBLEM POSSIBLE CAUSE CORRECTIVE ACTION
One end of long
shelf (V) is fl oating.
The closet space is larger than
8 ft.
1. Buy corresponding shelf bracket and
wall bracket (sold separately).
2. Replace long shelf (V) with a longer
shelf of a similar fi nish and style.
Long shelf (V) can
not be installed
inside the closet.
The closet space is smaller
than 8 ft.
1.Shorten one side of the long shelf (V). Hire
an insured remodeler for installation.
2. Replace long shelf (V) with a shorter shelf
of a similar fi nish and style.
The shelf is tilting. The wall brackets and shelf
brackets are not installed at
the same level.
Use a quality level to ensure the brackets
are leveled with each other.
Drawer slide
runner can not
slide into slide
tracks.
Slide runners reversed. Reinstall the slide runner and ensure the
opening of slide runner is pointing backward.
Drawer slides do
not go smoothly.
The slide runners do not align
with the slide tracks properly.
Take out and repeat drawer installation.
Drawer gaps are
not even.
Slide runners are not level with
each other.
Use the pilot holes on the tower as a guide
to level the slide runners.
Pole Installation
Adjustable Shelf Installation