
Owner Manual


Fan Installation (continued)
6
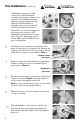
Carefully turn fan assembly over and place face
down on either piece of packing foam. Remove the
stopper screw and loosen the set screw on the fan
collar. Set the stopper screw aside for Step 8.
Run fan wires through selected down rod. Reinstall
stopper screw from Step 6 and firmly tighten set
screw on fan collar against down rod.
Note: If ceiling height allows, using a longer down
rod will increase airflow and efficiency.
Slide fan canopy over down rod and carefully rest
on top of fan body.
6
8
9
Reinstall half ball on end of down rod. Be sure
that stopper pin is inserted through down rod
and seated in half ball. Tighten set screw against
down rod.
10
set screw
stopper screw
Remove stopper pin and half ball from small down
rod by loosening set screw on half ball. Set all
parts aside for Step 10.
7
set screw
stopper pin
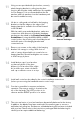
Feed bridge connector through
center hole of LED board and
carefully insert two-pin connector into
terminal on the LED board. Gently
push excess wire behind light cup
and place LED board flat on
light plate with cutouts positioned
over the three attachment holes.
Align LED cover with fastening holes
positioned over cutouts in LED
board and attachment holes on light
plate. Use short panhead screws to
secure LED cover and LED board in
place on light plate.
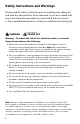
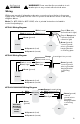
WARNING
See Page 2
POWER OFF
Circuit Breaker