USE AND CARE GUIDE HELIUM 24 INCH CEILING FAN Questions, problems, missing parts? Before returning to the store, call, text, or email Customer Service 9 a.m. - 7 p.m., EST, Monday-Friday, 9 a.m. - 5 p.m., EST, Saturday. 1-833-888-FANS (3267) support@altitudefans.com www.altitudefans.com THANK YOU v.ERTE1708065.
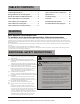
TABLE OF CONTENTS Unpacking Instructions . . . . . . . . . . . . . . . . . . . . . . 3 Energy Efficient Use of Ceiling Fans . . . . . . . . . . 4 Electrical and Structural Requirements . . . . . . . 4 How to Operate Your Ceiling Fan . . . 12 Maintenance . . . . . . . . . . . . . . . . . . . . . . 14 Troubleshooting . . . . . . . . . . . . . . . . . . . 15 How to Assemble Your Ceiling Fan . . . . . . . . . . . 6 How to Hang Your Ceiling Fan . . . . . . . . . . . . . . . 8 How to Wire Your Ceiling Fan. . . .
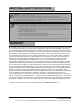
ADDITIONAL SAFETY INSTRUCTIONS WARNING: Do not operate this fan with a variable (Rheostat) wall controller or dimmer switch. Doing so could result in damage to the ceiling fan's remote control unit. This device complies with Part 15 of the FCC Rules. Operation is subject to the following two conditions: (1) This device may not cause harmful interference, and (2) this device must accept any interference received, including interference that may cause undesired operation.
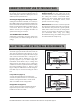
ENERGY EFFICIENT USE OF CEILING FANS Ceiling fan performance and energy savings rely heavily on the proper installation and use of the ceiling fan. Here are a few tips to ensure efficient product performance. Using the Ceiling Fan Year Round Summer Season: Use the ceiling fan in the clockwise direction. The airflow produced by the ceiling fan creates a wind-chill effect, making you “feel” cooler. Select a fan speed that provides a comfortable breeze, lower speeds consume less energy.
ELECTRICAL AND STRUCTURAL REQUIREMENTS (CONTINUED) Brace use (Figure 3) Paired with a deep box, this hanger is meant to span between two joists and takes the place of wooden blocking. CEILING JOIST WARNING: To reduce the risk of fire, electrical shock, or personal injury, mount fan to outlet box marked acceptable for fan support of 15.9 kg (35 lbs) or less. Use screws supplied with outlet box.
PRE-INSTALLATION This manual is designed to make it as easy as possible for you to assemble, install, operate and maintain your ceiling fan Tools Needed for Assembly (Not Included) Phillips Wire strippers/ screwdriver One stepladder cutters One 1/4” blade screwdriver MATERIALS NEEDED Wiring outlet and connectors of type required by the local code. The minium wire would be a 3-conductor (2-wire with ground) of the following size: Installed wire length Up to 50 ft. 50-100 ft. Wire Size A.W.
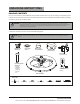
UNPACKING INSTRUCTIONS PACKAGE CONTENTS For your convenience, check-off boxes are provided next to each step. As each step is completed, place a check mark in the box. This will insure that all steps have been completed and will be helpful in finding your place should you be interrupted. WARNING: Do not install or use fan if any part is damaged or missing.
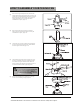
HOW TO ASSEMBLE YOUR CEILING FAN ☐ Remove the hanger ball portion from the downrod/ hanger ball assembly by loosening the set screw in the hanger ball until the ball falls freely down the downrod. Remove the pin from the downrod, then remove the hanger ball. Retain the pin and hanger ball for reinstallation in Step 6. (Figure 1) ☐ Remove the hairpin clip and clevis pin from the bottom of the downrod. Retain the pin and clip for reinstallation in Step 4.
HOW TO ASSEMBLE YOUR CEILING FAN (CONTINUED) ☐ Reinstall the hanger ball on the downrod as follows. Route the black, white and blue wires through the hanger ball. Position the pin through the two holes in the downrod and align the hanger ball so the pin is captured in the groove in the top of the hanger ball. Pull the hanger ball up tight against the pin. Securely tighten the set screw in the hanger ball. A loose set screw could create fan wobble.
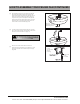
HOW TO HANG YOUR CEILING FAN WARNING: To avoid possible re or shock, be sure electricity is turned off at the main fuse box before hanging. (Figure 1) NOTE: If you are not sure if the outlet box is grounded, contact a licensed electrician for advice, as it must be grounded for safe operation. WARNING: The fan must be hung with at least 10’ of clearance from floor to ceiling fan.
PAIR REMOTE & RECEIVER NOTE: The remote unit has 16 different code combinations. To prevent possible interference from or to other remote units, simply change the combination code in the remote and receiver. ☐ To set the code on receiver unit, slide dip switches to the same positions as set on the remote. (Figure 1) NOTE: Factory default setting is dip switches all up. Do not use this position.
WIRING YOUR CEILING FAN White to AC IN N Green Wire to Black to AC IN L Listed Outlet Box AC IN L White to Motor N AC IN N Black to Motor L Blue to Light Green Wire (Ground)from wave filter MOTO R N OR MOT MOTO N R L OR MOT LIGH T L H LIG T MODELE:KLJSQ 3001 MODÈLE:KLJSQ 3001 WH TO MOTOR N VERS MOTEUR N AC IN N ENTRADA CA N TO MOTOR L VERS MOTEUR L BLK AC IN L ENTRADA CA L Green Wire (Ground)from Hanger Ball LIGHT LUMIERE ANT ANT ENNE RECOGNIZED COMPONENT COMPOSANT RECONNU wave filte
WIRING YOUR CEILING FAN (CONTINUED) WARNING: Check to see that all connections are tight, including ground, and that no bare wire is visible at the wire connectors except for the ground wire. Do not operate fan until the blades are in place. Noise and motor damage could result. ☐ After connections have been made, turn leads upward and carefully push leads into the outlet box, with the white and green leads to one side of the box and the black leads to the other side.
HOW TO INSTALL YOUR CANOPY HOUSING NOTE: This step is applicable after the neccessary wiring is completed. ☐ Assemble canopy by rotating key slot in canopy over shoulder screw in hanger bracket, taking care not to pinch the wires. Tighten shoulder screw. Fully assemble and tighten second shoulder screw that was previously removed.
HOW TO OPERATE YOUR CEILING FAN ☐ IMPORTANT: Using a full range dimmer switch (not included) to control fan speed will damage the fan. To reduce the risk of fire or electrical shock, do not use a full range dimmer switch to control the fan speed. (Figure 1) For illustrative purposes only ☐ Restore electrical power to the outlet box by turning the electricity on at the main fuse box.
HOW TO OPERATE YOUR CEILING FAN (CONTINUED) ☐ Remote functions: (Figure 5) • Indicator LED light: When the remote control is operated to send commands, the indicator light is on normally (if the indicator light is not on when sending the command, the battery may be low or the remote control may be damaged) • 0 = Turns fan off. • 1 = Low speed • 2 = Medium speed • 3 = High speed The light button turns the light ON or OFF and also controls the brightness setting.
HOW TO OPERATE YOUR CEILING FAN (CONTINUED) NOTE: Wait for the fan to stop before reversing the direction of the blade rotation. ☐ If airflow is desired int he opposite direction, turn the fan off and wait for the blades to stop turning.
TROUBLESHOOTING WARNING For your own safety turn off power at fuse box or circuit breaker before trouble shooting your fan. TROUBLE 1.FAN WILL NOT START PROBABLE CAUSE 1. Fuse or circuit breaker blown. 2. Loose power line connections to the fan, or loose switch wire connections in the switch housing. 3. Dead battery in remote control. 2.FAN SOUNDS NOISY SUGGESTED REMEDY 1. Check main and branch circuit fuses or circuit breakers. 2.
REPLACEMENT AND DISASSEMBLY DIAGRAM OF FAN BLADES. ☐ Fan blade cleaning and disassembly installation diagram,wipe with dry cloth or chicken blanket Do not wash with water (Figure 1) screwdriver (not furnished) Clamping Blade Assembly Nut Figure 1 PARTS LIST MODEL NO.
EXPLODED REVIEW ILLUSTRATION NOTE: The illustration shown is not to scale or its actual con guration may vary. Product/parts are subject to change without notice. 20 Visit www.altitudefans.
Questions, problems, missing parts? Before returning to the store, call, text, or email Customer Service 8 a.m. - 7 p.m., EST, Monday-Friday, 9 a.m. - 5 p.m., EST, Saturday 1-833-888-FANS (3267) support@altitudefans.com www.altitudefans.com Retain this manual for future use. Para las translaciones en español, visit www.altitudefans.