
Instructions / Assembly


ALTITUDEFANS.COM
Please call or text 1-833-888-FANS (3267) or email support@altitudefans.com for further assistance.
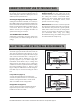
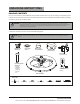
Paired with a deep box, this hanger is meant
to span between two joists and takes the
place of wooden blocking.
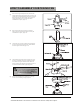
If your fan is to replace an existing light fixture,
turn electricity off at the main fuse box at this
time and remove the existing light fixture.
Angled ceiling maximum 20 angle
5
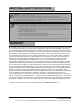
WARNING:
To reduce the risk of fire, electrical shock, or
personal injury, mount fan to outlet box
marked acceptable for fan support of 15.9 kg
(35 lbs) or less. Use screws supplied with
outlet box. Most outlet boxes commonly used
for support of light fixtures are not
acceptable for fan support and may need to
be replaced. Consult a qualified electrician if
in doubt.
WARNING:
Turning off wall switch is not sufficient. To
avoid possible electrical shock, be sure
electricity is turned off at the main fuse box
before wiring. All wiring must be in
accordance with National and Local codes
and the ceiling fan must be properly
grounded as a precaution against possible
electrical shock.
WARNING:
To avoid fire or shock, follow all wiring
instructions carefully. Any electrical work
not described in these instructions should be
done or approved by a licensed electrician.
WARNING:
Do not operate this fan with a variable
(Rheostat) wall controller or dimmer switch.
Doing so could result in damage to the
ceiling fan's remote control unit.
CEILING JOIST
CEILING
OUTLET BOX
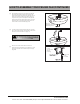
NOTE:
You may need a longer downrod (sold
separately) to maintain proper
clearance when installing on steep,
sloped ceiling.