
Owner's manual


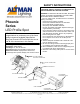


Altman Lighting, Inc. 57 Alexander Street., Yonkers, NY 10701 1-800-4-ALTMAN
SPECIFICATIONS SUBJECT TO CHANGE WITHOUT NOTICE. COPYRIGHT 2012© ALTMAN LIGHTING, INC/ ALL RIGHTS RESERVED
1/24/14 rev:C
4
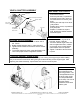
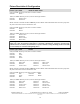
YOKE & SHUTTER ASSEMBLY
Short Yoke
Position
Shutter Rotation
Lock Knob
Yoke Bolts
Cup W ashers
Pivot Covers
T-Handles
Shutter Handle
Shutter Assembly
Lens Tube
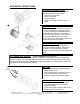
USING SHORT YOKE POSITION
1. Remove T-Handle and its
associated hardware.
2. Remove yoke bolts, cup washers
and pivot covers. Note: use a 1/4:
hex head wrench to remove yoke
bolts.
3. Stretch yoke and snap it into short
yoke position.
4. Replace pivot covers, cup washers
and yoke bolts.
5. Replace T-Handle into square
hole, keeping the washer between
handle and yoke.
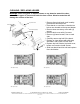
ROTATING SHUTTER ASSEMBLY
1. Loosen shutter rotation lock knob on either side of
the fixture.
2. Rotate shutter assembly 360° in either direction.
3. Tighten shutter rotation lock knobs to secure shutter
assembly.
4. To lock the shutters in place, rotate the Shutter Lock
Lever until proper tension is applied to shutters.
ADJUSTING YOKE
1. With one hand on ring handle to
hold unit, loosen T-Handle.
2. Tilt unit to desired angle. Note: Ref-
erence angles have been ,molded
on the pivot cover to make adjust-
ments easier and more precise.
3. Tighten T-Handle to secure fixture
in place.
INSTALLING C-CLAMP
The C-clamp is used to
mount the fixture to a
pipe hang position. The
C-clamp attaches to the
top of the yoke via the
1/2”boltprovidedwith
the C-clamp. Be sure to
keep the washer
between the bolt head
and the yoke.
***SHUTTER ASSEMBLY SCREW GUIDES
These two screws prevent the shutter assembly from coming off the light engine while rotating.
Only remove these screws when taking the light shutter assembly off of the light engine. After
replacing the shutter assembly, replace these two screws to avoid injuries.
***Shutter Assembly Screw Guides