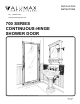
INSTALLATION INSTRUCTIONS Tel: 800-643-1514 www.alumaxshowerdoor.com 700 SERIES CONTINUOUS-HINGE SHOWER DOOR Copyright © Alumax Bath Enclosures 2000. All rights reserved.
LIMITED WARRANTY AND REMEDY ALUMAX BATH ENCLOSURES warrants to its dealers, customers, and all subsequent purchasers and users, that the products supplied by it shall be free from material defects in material and workmanship for a period of one (1) year after shipment, provided they are installed and maintained according to ALUMAX BATH ENCLOSURE's recommended practices and installation instructions.
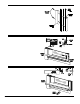
700 PARTS LIST A. B. C. D. E. F. G. H. 1 Curb 2 Wall Jambs 6 Plastic Wall Anchors 6 #8 x 1 1/2" Truss Head Screws 1 Glazed Door Panel 1 Strike Jamb with Magnet 6 #8 x 1/4" Truss Head Screws 2 #6 x 1 1/4" Pan Head Screws J. K. M. N. P. R. S.
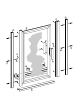
1 The ALUMAX 700 Continuous-Hinge Shower Door is completely reversible and may be installed hinge-left or hinge-right. Refer to the illustration to determine the correct position for your installation. For maximum waterproofing, the hinge jamb should always be opposite the shower head. These instructions depict a hinge-left installation. CAUTION: For safety, the door must always open outward. 2 NOTE: The 700 unit may be installed without using the sloped curb [A] provided.
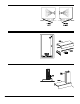
4 Slide the strike jamb [F] over one of the mounted wall jambs [B] with the magnet facing outward. Measure the wall-to-wall opening at the top and at the bottom of the wall jambs and note the smaller dimension. Measure the width of the door panel [E] at the bottom rail. Add 2 1/4" to the door width, subtract the total from the minimum wall-to-wall opening and divide the result by two. This should be the distance from the wall to the strike jamb at the closest point.
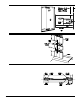
7 Attach the interior door handle [J] and the exterior door handle [K] to the door panel [E] with two #6-32 x 1 1/4" round head screws [H]. 8 Cut the drip rail [M] to the length of the bottom rail minus 11/16". Clean the bottom door rail and the drip rail thoroughlytoensureproperadhesion. Unrollthedoublestick tape[R]andcarefullyapplyittothebackofthedriprail(donot peelthetapebackingyet). Insertthetapereddripvinyl[N]intothedriprail.
10 Neatly caulk the inside perimeter of the shower curb and the hinge and strike jambs. NOTE: Improper caulking will result in leaks. NOTE: The caulking should be allowed to cure for twenty-four hours before using your new shower enclosure. The Care and Cleaning of your new ALUMAX Bath Enclosure. The simplest and preferred method of cleaning your unit is by washing it with clean water and drying with a soft cloth.