
User Manual


EPH-N00-06077
6-3-02
Page 6 of 7
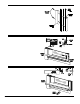
7
9
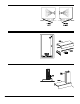
Cut the drip rail [M] to the length of the bottom rail
minus 11/16". Clean the bottom door rail and the drip rail
thoroughly to ensure proper adhesion. Unroll the double stick
tape [R] and carefully apply it to the back of the drip rail (do not
peel the tape backing yet).
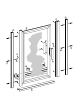
Insert the tapered drip vinyl [N] into the drip rail. Position the
drip rail flush with the bottom and pivot side of the door panel
[E], then raise the strike side until the bottom edge of the drip
vinyl is parallel to the curb [A]. Mark the location of each end
of the drip rail.
NOTE: Cleaners with alcohol content can dissolve the
adhesive that attaches the drip rail. To prevent this
possibility, place a small bead of clear sealant at the
top of the drip rail where it is attached to the bottom
rail.
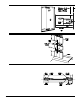
Adjust the drip vinyl [N] by sliding it left or right
until it just touches the curb. Trim the vinyl (flush with
the pivot end and notch 1/4" longer than the drip rail as
shown on the strike end). Secure it with one #6 x 3/8"
truss head screw [S] in the pivot end of the drip rail.
The drip plug [P] is supplied with a left and right hand
plug together. Break the right and left drip plugs apart and
insert the appropriate plug into the high (strike) side of the
drip rail. Discard the unused drip plug. Peel off the tape
backing and carefully press the drip rail [M] to the door in the
marked position.
Attach the interior door handle [J] and the exterior
door handle [K] to the door panel [E] with two #6-32 x 1
1/4" round head screws [H].
8