Internet Radio Alarm Clock with Built-in WiFi model AIRMM01F Instructional Manual mnl M10086
Table of Contents Chapter 1: Introduction............................................................................... 1.1 Overview .............................................................................................. 1.2 Features ............................................................................................... 1.3 Requirements ...................................................................................... 1.4 Package Contents .................................................
Chapter 1: Introduction 1.1 Overview Thank you for choosing Aluratek’s® Internet Radio Alarm Clock with Built-in WiFi. Soon, you will easily connect to a wireless or wired Internet connection to access 11,000 radio stations worldwide. In addition to making sure only quality materials are used for manufacturing, Aluratek® is also dedicated to provide the best customer satisfaction and support. The goal of Aluratek is to embody “Simple Elegance” in every product it designs, manufactures and sells.
Chapter 1: Introduction 1.2 Features • Choose between more than 11,000 radio stations worldwide via built-in vTuner with no monthly cost • Search music by genre, country or state • Compatible with universal Plug-n-Play audio servers such as: Microsoft Media Player 11 (WMP11), Microsoft Media Connect, MusicMatch Jukebox • Wireless access WIFI 802.11 b/g, Ethernet and USB 2.
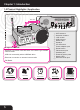
Chapter 1: Introduction 1.5 Product Highlights / Application back view A C D 7 14 2 1 8 6 5 1 2 3 B 3 9 4 4 5 6 7 8 4 ways to connect: 9 A Wireless connection with WiFi 802.11b & 802.11g to stream internet radio 10 B USB 2.0 connectivity with a USB flash drive 12 C Ethernet connection to stream internet radio D FM Radio Internet Radio 6 FM Radio 11 13 14 Alarm Clock 10 11 12 13 WiFi antenna Selection buttons LCD screen USB 2.
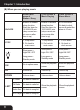
Chapter 1: Introduction 1.6 Keypad Functions The following tables shows the keypad function definition at various situations when you operate AIRMM01F. (A) When you are browsing the menu list, or when the device is idle Screen with Menu List Clock Screen (Standby Screen) SNOOZE No function No function STOP 1. Stop music 2.
Chapter 1: Introduction (B) When you are playing music Screen with name of Station / Song Clock screen & Music Playing Clock Screen & Alarm Music SNOOZE Enable or disable sleep function. Start the timer for 15/30/45/60 min. (stop current music source after time is up) Enable or disable sleep function. Start the timer for 15/30/45/60 min. (stop current music source after time is up) STOP the music. Go back to clock screen & restart the alarm in 10 min. STOP 1. Stop music 2. Go back to main menu 1.
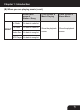
Chapter 1: Introduction (B) When you are playing music (cont.) Screen with name of Station / Song RIGHT Int. Radio Go back to radio list FM Radio Go back to radio list Media Serv.
Chapter 2: Getting Started 2.1 Hardware Installation Please fasten the wireless antenna and the FM antenna to appropriate antenna connectors at the rear panel of the device. If you prefer to use Ethernet for wired network connection, please plug in your Ethernet cable to the LAN (RJ45) port. Please plug in the DC power adapter to the outlet and the DC power jack carefully. To operate the device, you can use both the supplied remote control and also the keypad buttons. 2.
Chapter 3: Configuration There are three modes of network configuration for AIRMM01F. It can be a wireless client, a wired client, or even a wireless access point (Wireless AP). 3.1 Configure as an Wireless Client The factory default mode is the wireless client code. According to the availability of an Ethernet cable, the device will automatically select a suitable client mode to operate.
Chapter 3: Configuration First time using device without an Ethernet cable plugged in (cont.): Instructions Go to next screen Notes “ ” button or “OK” button Select the desired AP to connect 5. Numeric key pads “OK” button Type in the encryption key if the AP is encrypted. 6. “OK” button Set a proxy server if any. 7. “OK” button Confirm to the settings. 4. “ 8. 12 ” button Screenshot Apply new settings.
Chapter 3: Configuration Manually configured as the Wireless Client Mode: Instructions Screenshot Go to next screen Notes 1. “OK” button Select “Setup” menu 2. “ ” button (4 times) “ ” button or “OK” button Enter “Advanced Setup” menu 3. “ ” button (1 time) “ ” button or “OK” button 4. “ ” button or “OK” button 5. 6. “ Manually select the wireless client mode. Scanning for available APs. ” button 7.
Chapter 3: Configuration Manually configured as the Wireless Client Mode (cont.): Instructions Go to next screen Notes 8. “OK” button Set a proxy server if any. 9. “OK” button Confirm to the settings above. 10. 14 Screenshot Apply new settings.
Chapter 3: Configuration 3.2 Configure as a Wired Client If there is no 802.11b/g wireless network, AIRMM01F can also connect to the wired network through an Ethernet cable. For this case, prior to power on the device, you have to plug in the Ethernet cable into the LAN (RJ45) connector on the back of the unit. After you power on the device, it will automatically go into the wired client mode when it detects a link status through the Ethernet connection.
Chapter 3: Configuration Manually configured as the Wired Client Mode: Instructions Go to next screen Notes 1. “OK” button Select “Setup” menu 2. “ ” button (4 times) “ ” button or “OK” button Enter “Advanced Setup” menu 3. “ ” button (1 time) “ ” button or “OK” button 4. “ ” button (1 time) “ ” button or “OK” button Manually select the wired client mode. 5. “ ” button (1 time) “ ” button or “OK” button Select the DHCP for auto configured IP address. 6.
Chapter 3: Configuration 3.3 Configure as a Wireless Access Point (AP Mode) AIRMM01F can also be configured as a wireless AP. With such feature, you can easily extend the wireless coverage without purchasing another AP. To configure theAIRMM01F as an wireless AP, you have to manually setup the device through selecting the setup menu “Setup / Advanced Setup / Configure Network/AP mode”. And then further setup the IP address scheme, SSID, channel number and the encryption key of the AP.
Chapter 3: Configuration Manually configured as a Wireless Access Point ((AP Mode) (cont.)): Instructions Go to next screen Notes 6. Numeric key pads “OK” button Type in the Identifier (name) of this AP. 7. Numeric key pads “OK” button Select the wireless channel to be allocated to this AP. 8. “ ” button (1 time) “OK” button Select one of the security schemes. 9. Numeric key pads “OK” button Type in the encryption key if the AP is encrypted. 10. “OK” button Set a proxy server if any. 11.
Chapter 4: Listen to Various Music 4.1 Listen to Internet Radio To listen to music or broadcast programs from Internet radio stations, please select the “Internet Radio” function from the main menu and then press the OK button to enter the Internet Radio function. The first screen of Internet Radio function shows 2 items for you to select: “Station List”: Retrieve the Internet radio station lists from the Internet portal server.
Chapter 4: Listen to Various Music It takes few seconds to get the latest list from Internet. And you will see the next screen. This means the AIRMM01F is connected to the Internet server and received the information from the server. If you see the following screen instead, it means that the device has encountered problem in retrieving the list from the internet server, please try again.
Chapter 4: Listen to Various Music The following screen shots illustrate the sequence to browse to a specific ratio station such as “4U Classic Rock” in France and start to playback the music from it. Instructions Screenshot Go to next screen 1. Notes Select “Internet Radio” function 2. “ ” button or “OK” button 3. “ ” button or “OK” button 4. “ ” button (4 times) “ ” button or “OK” button 5. “ ” button (14 times) “ ” button or “OK” button 6.
Instructions 7. “ ” button (5 times) Screenshot Go to next screen Notes “ ” button or “OK” button Press the “ ” button to add current station to favorite list for quick access later. 8. Connecting to the radio station. 9. Start buffering the music from the radio station. 10..
Chapter 4: Listen to Various Music 4.2 Listen to FM Radio Before you can listen to the FM radio, please install the supplied FM antenna to the back of the device. To listen to music or broadcast programs from local FM radio stations, please select the “FM Radio” function from the main menu and then press the OK button to enter the FM Radio function. The first screen of FM Radio function shows 5 items for you to select: “Station List”: Retrieve the tuned radio station lists from the device.
Chapter 4: Listen to Various Music The following screen shots illustrate the sequence to pre-set the FM stations and tune to a specific ratio station 98.70 MHz and start the broadcast program. Instructions Screenshot Go to next screen Notes 1. “ ” button or “OK” button Select “FM Radio” function 2. “ ” button or “OK” button 3. Scanning for available FM stations. 4. Found 15 stations 5. “ 6.
Chapter 4: Listen to Various Music 4.3 Listen to Music in Your Computer To listen to music from your own computers, you have to install and activate the media server utility. Please refer to Appendix A or B for example on how to install a media server software. After you installed and activated the media server, you can enjoy listening to the streaming music from AIRMM01F. Please select the “Media Server” function from the main menu and then press the OK button to enter the Media Server function.
Chapter 4: Listen to Various Music If there is no server found, you will see the below message. Please check if you had already started the media server on your computer. If the media server not found problem still exists, please refer to the trouble shooting chapter to identify the problem and resolve it step by step. The following screen shots illustrate the sequence to connect to a media server “JAMES-NB: James:” and browsing to the Music album “Best of Roxette”. Instructions 1.
Chapter 4: Listen to Various Music Instructions 5. Screenshot Go to next screen Notes “ ” button or “OK” button 6. “ ” button “ ” button or “OK” button 7. “ ” button “ ” button or “OK” button 8. “ ” button or “OK” button Press the “ ” button to add current station to my song queue for quick access. 9. Wait till end of song, or press “ ” to next song. Music started. 10. Next song started.
Chapter 4: Listen to Various Music 4.4 Listen to the Music in Your USB Drive To listen to music on your USB drive or portable MP3 player, please plug in the USB drive into the USB connector of AIRMM01F. Then select the “MP3 Player” function from the main menu and then press the OK button to enter the MP3 player function. The first screen of MP3 Player function shows the root folder content of the attached USB drive. If you see the screen “NO DEVICE”, there was a problem accessing the USB device.
Chapter 4: Listen to Various Music The following screen shots are an example of how to play a music file. Instructions Screenshot Go to next screen Notes 1. “ ” button or “OK” button Select “MP3 Player” function 2. “ ” button (2 times) “ ” button or “OK” button Select the folder where the music file is located 3. “ ” button (1 time) “ ” button or “OK” button 4. “ ” button or “OK” button 5. Music started 4.
Chapter 5: Advanced Tools There are some useful setup functions that can help you to operate the device properly. 5.1 Network Setting Check current network information. 5.2 Configure Network Please refer to chapter 3 for network configuration. 5.3 Reset to Default When you reset the device to its factory default, your “favorites” Internet radio and FM radio will not be erased.
Chapter 5: Advanced Tools 5.4 Clear Favorites Clear all “favorites” Internet radio station and FM radio station stored. 5.5 Device MAC Address Check MAC address of the device. 5.6 Firmware Version Check current firmware version. 5.7 Firmware Upgrade If there is any new firmware released, please download and follow the upgrade procedure below.
Chapter 5: Advanced Tools Steps to upgrade new firmware in the device via a USB drive Step 1. Copy the new firmware to the ROOT directory of a USB drive or a USB MP3 player. (Note. Please DON’T modify the file name, otherwise the AIRMM01F can’t find the new F/W) Step 2. Power on the AIRMM01F and then plug-in the USB drive into the front USB port of the AIRMM01F. Step 3. Operate the AIRMM01F to get into the F/W upgrade menu (“Setup\Advanced Setup\F/W Upgrade(thru.
Chapter 6: Misc. 6.1 Clock Setting Prior to setting the alarm, you need to set the clock of AIRMM01F. First, select the Setup function from the Main Menu. The first item “Clock” is for the date and time setting. Press OK or “ button to set the clock value. ” There are 3 items in the clock menu, the first one will display the current date and time; the second item is for you to set the date and time manually or via auto-Sync (automatically synchronize with network time server).
Chapter 6: Misc. 6.1.1 Time Setup - Manually If you decide to set the clock manually, press the OK or “ ” button to go into the date and clock screen. You can use the four directional buttons and the OK button to set the current date/time. Use “ ” , “ ” buttons to switch between the items to be adjusted. The selected item will be flashing. Use “ ” , “ ” buttons to adjust (increase or decrease) the value of the specific item. Press the OK button to confirm and finish the time setup.
Chapter 6: Misc. 6.1.2 Time Setup – Auto-Sync (NTP) If you choose to set the clock automatically, please go into the “Auto-Sync (NTP)” menu, and select the correct time zone for your location. After that, the device will set the date and time automatically. 6.1.3 Time Display Format Choose time display format bewteen 12-Hour or 24-Hours.
Chapter 6: Misc. 6.2 Alarm Setting To setup an alarm, you have to setup the time and alarm music properly. The following procedures illustrate a typical alarm setting operation. It sets Alarm 1 to generate alarm (play music) at 7:00 AM with Internet radio station “4U Classical Rock” as the source of the music. Instructions Go to next screen Notes 1. “OK” button Alarm Menu 2. “ ” button or “OK” button Set Alarm 1 3. “ ” button (1 time) “ ” button or “OK” button Enable Alarm 1 4.
Chapter 6: Misc. Instructions 7. Screenshot Go to next screen Notes “OK” button Use the 4 directional buttons to set the volume 8. Final alarm setting, lasting for 3~5 seconds 9. The setting is finished. After you set and enabled the alarm, you will see there is a bell icon on the clock screen. When the alarm time is up, the device will activate the alarm operation and playback the specified music.
Chapter 6: Misc. 6.3 Backlight Setting You can adjust the backlight ON / OFF settings as you wish. The default setting is Always ON. You can set the backlight to be turned OFF once the device is idle (no key press) after a specific time elapsed. The backlight can be switched off automatically in 1/3/10/30 minutes. 6.4 Equalizer Setting In the Setup menu, you can change the setting of the equalizer. The options available are Normal, Classic, Rock, Jazz, and PoP.
Appendix A: Listen to Music via WMP 11 Install & Connect to Windows Media Player 11 Please follow the steps below: Step 0. Download WMP11. - Please download Windows Media Player 11 (WMP11) installation file, e.g., wmp11-windowsxp-x86-enu.exe, from Microsoft’s web site. - Install wmp11-windowsxp-x86-enu.exe without any changes needed. - Just click on ‘next’ to finish the installation. Step 1. Activate the Media Player.
Appendix A: Listen to Music via WMP 11 Step 2. Change the view - Change the view from “Now Playing” to “Library” view by clicking on the Library Tab to manage the content and share your media. You will see the following view: Step 3. Add your Media content to WMP11 media library. - Click on the “Library” tab again, you can see a pull-down menu.
Appendix A: Listen to Music via WMP 11 - You will see the following view: - Click on the add button and select the media folder in your computer, and then click the OK button. For example, you can put all the music files in the directory D:\Music, so you just need to add the folder to the share list.
Appendix A: Listen to Music via WMP 11 - You will see the specified folder included in the WMP11 monitor folder lists. - Then press the OK button. A pop-up window will appear and show you the WMP11 is searching for the media files. - When it finished, click on the “Close” button. - Now, you can browse and manage your media content with the WMP11 Library manager.
Appendix A: Listen to Music via WMP 11 Step 4. Share the WMP11 media library. - Similar to Step 3, click on the “Media Sharing” item to activate the media sharing function. - The following dialog windows will appear. - Check the “Share my media” checkbox and click on “OK” button. - The WMP11 will try to discover the available network devices in your LAN. - The following display showed that no device is found at this moment.
Appendix A: Listen to Music via WMP 11 If AIRMM01F is already connected to your home network, you will see the following display that WMP11 found a network device named “Aluratek AIRMM01F”. Step 5. Manage the setting of sharing media. - Click on the “Settings” button, and specify the name of the WMP11 server to be displayed on your AIRMM01F. Then, press OK to exit.
Appendix A: Listen to Music via WMP 11 Step 6. Authorize the access from your AIRMM01F. The WMP11 provides simple access control setting. When WMP11 detects new network device (as the final screen in Step 4), you have to decide whether you want to allow or deny the requests from that device. - Please select the device icon and then click on the “Allow” button to grant further streaming requests from that device. Then you will see that the device icon state changed consequently.
Appendix A: Listen to Music via WMP 11 Step 7. Establish the connection between AIRMM01F and WMP11 server. - From AIRMM01F, select “Media Server” function from the main menu (or press the hot key “Media Player” on the remote control), and then AIRMM01F will start the server discovery process. After a few seconds, it will find server like “PC_Hostname: Server Name”. This is the WPM11 server that you installed. - Press the ‘OK’ button to try to connect to the server.
Appendix B: Listen to Music via WMC 2.0 Install & Connect to Windows Media Connect V2.0 Please follow the steps below: Step 0. Download WMC server. - Please download the Windows Media Connect (WMC) installation file, wmcsetup.exe, from Microsoft web site. - Install the wmcsetup.exe without any changes needed. - Just click on ‘next’ to finish the installation. Step 1. Activate WMC. You can find a new installed file icon “Windows Media Connect” from the Windows XP Program list.
Appendix B: Listen to Music via WMC 2.0 Step 3. Then, you will be asked to select the folders you want to share with your devices. Select the desired folder for your computer. For example, you can put all the music files in the directory D:\Music, so you select “Let me choose which folders” and add the folder to the share list. Finally, press ‘Finish’ to finish the setup of the Windows Media Connect.
Appendix B: Listen to Music via WMC 2.0 Step 4. Establish the connection between AIRMM01F and WMC server. - From AIRMM01F, select “Media Server” function from the main menu (or press the hot key “Media Player” on the remote controller), and then AIRMM01F will start the server discovery process. After a few seconds, it will find server like “PC_Hostname: 1: Windows Media Connect”. - Then press the ‘OK’ button to try to connect to the server. You will see the AIRMM01F screen shows “ Connecting…”.
Appendix B: Listen to Music via WMC 2.0 Select the device and then click on the ‘Allow’ button. Then, press the ‘close’ button to finish the authorization process. At this moment, AIRMM01F can get the contents or service from the WMC server. You can browse the list and playback the music you want.
Technical Support If you need further assistance, please contact Aluratek support department prior to returning this device. E-mail: support@aluratek.com Web: www.aluratek.
Radio and TV Interference Statement WARNING!!! This equipment has been tested and found to comply with the limits of a Class B digital device, pursuant to part 15 of the FCC rules. These limits are designed to provide reasonable protection against harmful interference in a residential installation This equipment generates, uses and can radiate radio frequency energy and, if not installed and used in accordance with the instruction, may cause harmful interference to radio communications.
Warranty Aluratek warrants this product against defect in material or workmanship for 1 Year from the date of purchase. This warranty becomes invalid if the factory-supplied serial number or “warranty void” sticker has been removed or altered on the product. This warranty does not cover: A) Cosmetic damage or damage due to acts of God B) Accident, misuse, abuse, negligence or modification of any part of the product.
aluratek.com Aluratek, Inc. 12A Mauchly Irvine, CA 92618 sales@aluratek.com 949.419.6504 • office 949.419.
Réveil-matin avec fonction de radio sur Internet avec WiFi intégré modèle AIRMM01F Manuel d’instruction mnl M10086
Table des matières Chapitre 1: Introduction.............................................................................. 1.1 Aperçu général .................................................................................... 1.2 Caractéristiques .................................................................................. 1.3 Exigences ............................................................................................ 1.4 Contenu ...............................................................
Chapitre 1: Introduction 1.1 Aperçu général Merci pour choisir Aluratek’s® Réveil-matin avec fonction de radio sur Internet avec WiFi intégré. Se branche facilement à une connexion Internet avec ou sans fil afin d’accéder à plus de 11 000 stations de radio à travers le monde En plus de s’assurer d’utiliser que des matériaux de qualité pour la fabrication, Aluratek® s’engage aussi à offrir la meilleure satisfaction aux clients, de même que le meilleur soutien.
Chapitre 1: Introduction 1.2 Caractéristiques • Choisissez parmi plus de 11 000 stations de radio à travers le monde grâce au vTuner intégré, sans aucun frais mensuel • Chercher musique par genre, pays et état • Compatible avec les serveurs audio universels Brancher et Jouer, tels que: Microsoft Media Player 11 (WMP11), Microsoft Media Connect, MusicMatch Jukebox • Accès sans fil WIFI 802.11 b/g, connectivité Ethernet et USB 2.
Chapitre 1: Introduction 1.5 Caractéristiques de produit / Fonctionnement vue arrière A C D 7 14 2 1 8 6 5 1 2 3 B 3 9 4 4 5 6 7 8 4 façons de se connecter: 9 A Connexion sans fil avec WiFi 802.11b et 802.11g pour faire jouer en continu la radio sur Internet 10 B Connectivité USB 2.
Chapitre 1: Introduction 1.6 Le clavier numérique fonctionne Les tableaux suivants affichent la définition des fonctions du clavier lors de diverses situations au moment d’utiliser l’appareil AIRMM01F. (A) Lorsque vous naviguez dans la liste de type de menu, ou lorsque l’appareil est arrêté Écran avec liste de type menu Écran de l’horloge (écran d’attente) SNOOZE [Rappel d’alarme] Aucune fonction Aucune fonction STOP [Arrêt] 1.ARRÊTER LA MUSIQUE 2.
Chapitre 1: Introduction (B) Lorsque vous faites jouer de la musique Écran avec le nom de la station/ chanson Écran de l’horloge et chanson en cours Écran de l’horloge et musique d’alarme SNOOZE [Rappel d’alarme] Activer ou désactiver la fonction sommeil. Démarrer la minuterie pour 15, 30, 45, 60 minutes (arrêter la source de musique actuelle lorsque temps est dépassé) Activer ou désactiver la fonction sommeil.
Chapitre 1: Introduction (B) Lorsque vous faites jouer de la musique (suite) Screen with name of Station / Song RIGHT [Droit] Radio sur Internet Retour à la liste de radio Radio FM Retour à la liste de radio Retour à la liste Serveur multimédia de chansons Lecteur MP3 Clock screen & Music Playing Clock Screen & Alarm Music Afficher l’écran de lecture Afficher l’écran de lecture Retour à la liste de chansons 9
Chapitre 2: Pour vous aider à démarrer 2.1 Installation du matériel Veuillez fixer l’antenne sans fil et l’antenne FM aux connecteurs d’antenne appropriés situés sur le panneau arrière de l’appareil. Si vous préférez utiliser Ethernet pour la connexion du réseau câblé, veuillez brancher votre câble Ethernet au port LAN (RJ45). Veuillez brancher le bloc d’alimentation en CC à la sortie et la prise de courant en CC avec soin.
Chapitre 3: Configuration Il existe trois modes de configuration de réseau pour l’appareil AIRMM01F. Il peut s’agir d’un client sans fil, d’un client avec fil ou même d’un point d’accès sans fil. 3.1 Configuration à titre de Client sans fil Le code client sans fil est le mode de paramètre d’usine par défaut. Selon la disponibilité d’un câble Ethernet, l’appareil sélectionnera automatiquement un mode client approprié pour fonctionner.
Chapitre 3: Configuration Appareil utilisé pour la première fois, sans câble Ethernet branché (suite): Instructions 4. Touche “ ” Capture d’écran Aller à l’écran suivant Remarque Touche “ ou “OK” Sélection du point d’accès désire pour la connexion. ” 5. Pavés numériques Touche “OK” Saisie de la clé de cryptage si le point d’accès est crypté. 6. Touche “OK” Établissement d’un serveur mandataire, le cas échéant. 7. Touche “OK” Confirmation des réglages. 8. 12 Application de nouveaux réglages.
Chapitre 3: Configuration Configuration manuelle en mode client sans fil: Instructions 1. Capture d’écran Aller à l’écran suivant Remarque Touche “OK” Sélection du menu “Configuration” Accès au menu “Configuration avancée” 2. Touche “ (4 fois) ” Touche “ ou “OK” ” 3. Touche “ (1 fois) ” Touche “ ou “OK” ” Touche “ ou “OK” ” 4. 5. 6. Touche “ 7. Pavés numériques Sélection manuelle du mode client sans fil. Recherche de points d’accès disponibles.
Chapitre 3: Configuration Configuration manuelle en mode client sans fil (suite): Instructions Aller à l’écran suivant Remarque 8. Touche “OK” Établissement d’un serveur mandataire, le cas échéant. 9. Touche “OK” Confirmation des réglages. 10. 14 Capture d’écran Mise en application des nouveaux réglages.
Chapitre 3: Configuration 3.2 Configuration à titre de Client avec fil Advenant l’absence d’un réseau sans fil 802.11b/g, l’appareil AIRMM01F peut également se brancher au réseau câblé par l’entremise d’un câble Ethernet. Dans ce cas, avant de mettre en marche l’appareil, vous devez brancher le câble Ethernet au connecteur LAN (RJ45) situé à l’arrière de l’appareil.
Chapitre 3: Configuration Configuration manuelle en mode client avec fil: Instructions 1. Capture d’écran Aller à l’écran suivant Remarque Touche “OK” Sélection du menu “Configuration” Accès au menu “Configuration avancée” 2. Touche “ (4 fois) ” Touche “ ou “OK” ” 3. Touche “ (1 fois) ” Touche “ ou “OK” ” 4. Touche “ (1 fois) ” Touche “ ou “OK” ” Sélection manuelle du mode client avec fil. 5. Touche “ (1 fois) ” Touche “ ou “OK” ” Sélection du DHCP pour l’adresse IP auto-configurée 6. 7.
Chapitre 3: Configuration 3.3 Configuration à titre de Point d’accès sans fil (Mode point d’accès) Il est également possible de configurer l’appareil à titre de point d’accès sans fil. Avec cette caractéristique, vous pouvez facilement accroître la couverture sans fil sans vous procurer un autre point d’accès.
Chapitre 3: Configuration Configuration à titre de Point d’accès sans fil (Mode point d’accès) (suite)): Instructions Aller à l’écran suivant Remarque 6. Pavés numériques Touche “OK” Saisie de l’identifiant (nom) du point d’accès. 7. Pavés numériques Touche “OK” Sélectionner le canal sans fil à attribuer à ce point d’accès. Touche “OK” Sélection de l’un des schémas de sécurité. 9. Pavés numériques Touche “OK” Saisie de la clé de cryptage si le point d’accès est crypté. 10.
Chapitre 4: Écoute de diverses musiques 4.1 Écouter la radio sur Internet Pour écouter de la musique ou diffuser des programmes depuis des stations de radio sur Internet, veuillez sélectionner la fonction “Radio sur Internet” depuis le menu principal, puis appuyer sur la touche OK pour accéder à la fonction Radio sur Internet.
Chapitre 4: Écoute de diverses musiques Il en prendra quelques secondes pour obtenir la plus récente liste sur Internet, et le prochain écran apparaîtra. Ceci signifie que l’appareil AIRMM01F est branché au serveur Internet et reçoit les informations depuis le serveur. Si vous voyez plutôt cet écran, ceci signifie que l’appareil a rencontré un problème lors de l’extraction de la liste depuis le serveur Internet.
Chapitre 4: Écoute de diverses musiques Les copies d’écran suivantes démontrent la séquence pour naviguer vers une station de radio spécifique, telle que “4U Classic Rock” en France et commencer à faire jouer la musique. Instructions Capture d’écran Aller à l’écran suivant 1. Sélection de la fonction “Radio sur Internet” 2. Touche “ ou “OK” ” 3. Touche “ ou “OK” ” 4. Touche “ (4 fois) ” Touche “ ou “OK” ” 5. Touche “ (14 fois) ” Touche “ ou “OK” ” Touche “ ou “OK” ” 6.
Chapitre 4: Écoute de diverses musiques Instructions 7. Touche “ (5 fois) ” Capture d’écran Aller à l’écran suivant Remarque Touche “ ou “OK” Appui sur latouche “ ” pour ajouter la station actuelle à la liste de favoris pour un accès ultérieur plus rapide. ” 8. Connexion à la station de radio. 9. Mise en tampon de la musique depuis la station de radio. 10..
Chapitre 4: Écoute de diverses musiques 4.2 Écouter la radio FM Avant de pouvoir écouter la radio FM, veuillez installer l’antenne FM incluse à l’arrière de l’appareil. Pour écouter de la musique ou diffuser des programmes depuis des stations de radio FM, veuillez sélectionner la fonction “Radio FM” depuis le menu principal, puis appuyer sur la touche OK pour accéder à la fonction Radio FM.
Chapitre 4: Écoute de diverses musiques Les captures d’écran suivantes illustrent la séquence de sorte à prérégler les stations FM et les syntoniser à une station de radio spécifique 98.70 MHz et débuter le programme de diffusion. Instructions Capture d’écran Aller à l’écran suivant Remarque 1. Touche “ ou “OK” ” Sélection de la fonction “Radio FM”. 2. Touche “ ou “OK” ” 3. Recherche de stations FM disponibles. 4. Quinze (15) stations trouvées 5. Touche “ 6.
Chapitre 4: Écoute de diverses musiques 4.3 Écouter de la musique depuis votre ordinateur Pour écouter de la musique depuis votre propre ordinateur, vous devez installer et activer l’utilitaire de serveur multimédia. Veuillez vous référer au Annexe A et B, par exemple, quant à la manière d’installer un logiciel de serveur multimédia. Après avoir installé et activé le serveur multimédia, vous pouvez écouter la musique en continu depuis l’appareil AIRMM01F.
Chapitre 4: Écoute de diverses musiques Si aucun serveur n’est trouvé, le message suivant apparaîtra. Veuillez vous assurer d’avoir déjà mis en marche le serveur multimédia sur votre ordinateur. Si le serveur multimédia ne trouve toujours pas le problème, veuillez vous référer au chapitre relatif au dépannage afin d’identifier le problème et le résoudre étape par étape.
Chapitre 4: Écoute de diverses musiques Instructions 5. Capture d’écran Aller à l’écran suivant Touche “ ou “OK” ” 6. Touche “ ” Touche “ ou “OK” ” 7. Touche “ ” Touche “ ou “OK” ” 8. Touche “ ou “OK” ” 9. Attendre jusqu’à la fin de la chanson ou appuyer sur “ ” pour aller à la chanson suivante. 10. Remarque Appui sur la touche “ ” pour ajouter la station actuelle à ma liste de chanson en attente pour un accès ultérieur plus rapide. La musique commence. La prochaine chanson commence.
Chapitre 4: Écoute de diverses musiques 4.4 Écouter de la musique depuis votre clé USB Pour écouter de la musique depuis votre clé USB ou lecteur MP3 portatif, veuillez brancher la clé USB dans le connecteur USB de l’appareil AIRMM01F. Puis sélectionnez la fonction “Lecteur MP3” depuis le menu principal, et appuyez sur la touche OK pour accéder à la fonction Lecteur MP3. Le premier écran de la fonction Lecteur MP3 affiche le contenu du fichier racine de la clé USB.
Chapitre 4: Écoute de diverses musiques Les captures d’écran suivantes représentent des exemples quant à la manière de faire jouer un fichier de musique. Instructions Capture d’écran 1. Aller à l’écran suivant Remarque Touche “ ou “OK” ” Sélection de la fonction “Lecteur MP3” Sélection du fichier où est situé le fichier de musique 2. Touche “ (2 fois) ” Touche “ ou “OK” ” 3. Touche “ (1 fois) ” Touche “ ou “OK” ” Touche “ ou “OK” ” 4. 5. La musique commence 4.
Chapitre 5: Outils avancés Il existe quelques fonctions de configuration utiles qui peuvent vous aider à faire fonctionner l’appareil adéquatement. 5.1 Configuration du réseau Prenez note de informations du réseau actuelles. 5.2 Configurer le réseau Veuillez vous référer au chapitre 3 pour la configuration du réseau. 5.3 Réinitialiser aux valeurs par défaut Lorsque vous réinitialisez l’appareil à ses valeurs par défaut, votre radio sur Internet et radio FM « favorites» ne seront pas supprimées.
Chapitre 5: Outils avancés 5.4 Effacer les favoris Effacez toutes les stations de radio sur Internet et de radio FM “favorites” enregistrées. 5.5 Adresse MAC de l’appareil Vérifiez l’adresse MAC de l’appareil. 5.6 Version du micrologiciel Vérifiez la version actuelle du micrologiciel. 5.7 Mise à jour du micrologiciel Si de nouveaux micrologiciels sont autorisés, veuillez télécharger et suivre la procédure de mise à jour ci-dessous.
Chapitre 5: Outils avancés Étapes à suivre pour la mise à jour de nouveaux micrologiciels dans l’appareil par l’entremise d’une clé USB Step 1. Copier le nouveau micrologiciel dans le répertoire RACINE d’une clé USB ou d’un lecteur MP3 USB. (Remarque. Veuillez NE PAS modifier le nom du fichier, autrement l’appareil AIRMM01F ne pourra trouver le nouveau micrologiciel). Step 2. Mettre en marche l’appareil AIRMM01F, puis brancher la clé USB dans le port USB frontal de l’appareil AIRMM01F. Step 3.
Chapitre 6: Divers 6.1 Réglages de l’horloge Avant de configurer l’alarme, vous devez régler l’horloge de l’appareil AIRMM01F. D’abord, sélectionnez la fonction Configuration depuis le Menu principal. Le premier élément “Horloge” est pour le réglage de la date et l’heure. Appuyez sur la touche OK ou “ ” pour régler l’horloge. Il y a trois éléments dans le menu de l’horloge.
Chapitre 6: Divers 6.1.1 Configuration de l’heure - Manuellement Si vous décidez de régler l’horloge manuellement, appuyez sur la touche OK ou “ ” pour accéder à l’écran de la date et de l’heure. Vous pouvez utiliser les quatre touches directionnelles et la touche OK pour régler la date et l’heure actuelles. Utilisez les touches “ ”, “ ” pour alterner entre les éléments à régler. L’élément sélectionné clignotera. Utilisez les touches “ ”, “ de l’élément spécifique.
Chapitre 6: Divers 6.1.2 Configuration de l’heure – Auto-Sync (NTP) Si vous décidez de régler l’horloge automatiquement, veuillez vous rendre au menu “Auto-Sync (NTP)”, et sélectionner le fuseau horaire pour votre emplacement. Par la suite, l’appareil réglera la date et l’heure automatiquement. 6.1.3 Format d’affichage de l’heure Choisissez le format d’affichage de l’heure entre 12 h ou 24 h.
Chapitre 6: Divers 6.2 Réglages de l’alarme Pour configurer une alarme, vous devez configurer l’heure et la musique d’alarme correctement. Les procédures suivantes démontrent une opération de configuration d’alarme typique. Elles règlent l’Alarme 1 à générer une alarme (jouer de la musique) à 7 h avec la station de radio sur Internet « 4U Classical Rock » à titre de source de musique. Instructions Aller à l’écran suivant Remarque 1. Touche “OK” Menu d’alarme 2.
Chapitre 6: Divers Instructions 7. Capture d’écran Aller à l’écran suivant Remarque Touche “OK” Utilisation des 4 touches directionnelles pour régler le volume 8. Configuration finale de l’alarme, durant de 3 à 5 secondes 9. La configuration est complétée. Après avoir réglé et activé l’alarme, vous verrez une icône de cloche sur l’écran de l’horloge. Lorsque l’heure de l’alarme est réglée, l’appareil activera la fonction d’alarme et la lecture de la musique spécifiée.
Chapitre 6: Divers 6.3 Configuration du rétro-éclairage Il est possible d’ajuster les réglages ON/OFF du rétro-éclairage, tel que vous le désiré. La configuration par défaut est Always ON [Toujours EN MARCHE]. Vous pouvez régler le rétro-éclairage pour qu’il soit à OFF [Arrêt], une fois que l’appareil est inactif (aucune touche appuyée) après un certain temps. Il est possible d’éteindre le rétro-éclairage automatiquement après 1, 3, 10 ou 30 minutes. 6.
Annexe A: Écouter de la musique avec WMP 11 Installation et connexion du Windows Media Player 11 Veuillez suivre les étapes suivantes : Étape de base. Téléchargez WMP11. Veuillez télécharger le fichier d’installation de Media Player 11 (WMP11), p. ex., wmp11-windowsxp-x86-enu.exe, depuis le site Web de Microsoft. Installez le fichier wmp11-windowsxp-x86-enu.exe tel quel. Vous n’avez qu’à cliquer sur ‘suivant’ pour terminer l’installation. Étape 1. Activez le Media Player.
Annexe A: Écouter de la musique avec WMP 11 Étape 2. Changer la vue Modifiez l’affichage “Lecture en cours” pour “Bibliothèque” en cliquant sur l’onglet Bibliothèque afin de gérer le contenu et de partager vos éléments. L’affichage suivant apparaîtra: Étape 3. Ajoutez votre contenu multimédia à la bibliothèque multimédia WMP11. Cliquez une fois de plus sur l’onglet « Bibliothèque » pour afficher un menu déroulant.
Annexe A: Écouter de la musique avec WMP 11 L’affichage suivant apparaîtra: Cliquez sur la touche Ajouter, puis sélectionnez le fichier multimédia sur votre ordinateur et cliquez sur la touche OK. Par exemple, vous pouvez mettre tous les fichiers de musique dans le répertoire D:\Music, ainsi vous n’avez qu’à ajouter le fichier à la liste de partage.
Annexe A: Écouter de la musique avec WMP 11 Vous verrez le fichier spécifié inclus dans la liste de dossiers du moniteur WMP11. Puis appuyez sur la touche OK, une fenêtre contextuelle apparaîtra et vous montrera que WMP11 recherche les fichiers multimédias. Lorsque terminé, cliquez sur la touche “Fermer”. Maintenant, vous pouvez naviguer et gérer votre contenu multimédia avec le gestionnaire de la bibliothèque WMP11.
Annexe A: Écouter de la musique avec WMP 11 Étape 4. Partagez la bibliothèque multimédia WMP11. De façon similaire à l’Étape n° 3, cliquez sur l’élément “Partage de fichiers multimédias” pour activer la fonction de partage de fichiers multimédias. Les fenêtres de dialogue suivantes apparaîtront. Cochez la case “Partager mes fichiers multimédias” et cliquez sur la touche “OK”. Le WMP11 essaiera de détecter les appareils réseaux disponibles dans votre LAN.
Annexe A: Écouter de la musique avec WMP 11 Si l’appareil AIRMM01F est déjà connecté à votre réseau maison, l’affichage suivant apparaîtra mentionnant que le WMP11 a détecté un appareil réseau “Aluratek AIRMM01F”. Étape 5. Gérez les réglages du partage de fichiers multimédias. Cliquez sur la touche “Configuration”, et précisez le nom du serveur WMP11 qui sera affiché sur votre appareil AIRMM01F. Puis, appuyez sur OK pour quitter.
Annexe A: Écouter de la musique avec WMP 11 Étape 6. Autorisez l’accès depuis votre appareil AIRMM01F. Le WMP11 offre une configuration de contrôle d’accès simple. Lorsque le WMP11 détecte le nouvel appareil réseau (comme à l’écran final de l’étape n° 4), vous devez décider si vous désirez autoriser ou refuser les demandes de cet appareil. Veuillez sélectionner l’icône de l’appareil, puis cliquez sur la touche « Autoriser » pour autoriser d’autres demandes en continu de cet appareil.
Annexe A: Écouter de la musique avec WMP 11 Étape 7. Établissez une connexion entre l’appareil AIRMM01F et le serveur WMP11. Depuis l’appareil AIRMM01F, sélectionnez la fonction “Serveur multimédia” dans le menu principal (ou appuyez sur la touche de raccourci “Lecteur multimédia” sur la télécommande), et l’appareil AIRMM01F débutera le processus de détection du serveur. Après quelques secondes, il détectera un serveur similaire à “PC_Adresse Internet : Nom du serveur”.
Annexe B: Écouter de la musique avec WMC 2.0 Installation et connexion du Windows Media Connect V2.0 Veuillez suivre les étapes: Étape de base. Téléchargez le serveur WMC. Veuillez télécharger le fichier d’installation Windows Media Connect (WMC), wmcsetup.exe, depuis le site Web de Microsoft. Installez le fichier wmcsetup.exe tel quel. Vous n’avez qu’à cliquer sur ‘suivant’ pour terminer l’installation. Step 1. Activez WMC.
Annexe B: Écouter de la musique avec WMC 2.0 Étape 3. Puis, on vous demandera de sélectionner les fichiers que vous désirez partager avec vos appareils. Sélectionnez le dossier désiré pour votre ordinateur. Par exemple, vous pouvez mettre tous les fichiers de musique dans le répertoire D:\Music, ainsi vous pouvez sélectionner “Me laisser choisir les dossiers” et ajouter le fichier à la liste de partage. Finalement, appuyez sur ‘Terminé’ pour terminer la configuration de Windows Media Connect.
Annexe B: Écouter de la musique avec WMC 2.0 Étape 4. Établissez une connexion entre l’appareil AIRMM01F et le serveur WMC. Depuis l’appareil AIRMM01F, sélectionnez la fonction “Serveur multim dia” dans le menu principal (ou appuyez sur la touche de raccourci “Lecteur multimédia” sur la télécommande), et l’appareil AIRMM01F débutera le processus de détection du serveur. Après quelques secondes, il détectera un serveur similaire à “PC_Adresse Internet : 1: Windows Media Connect”.
Annexe B: Écouter de la musique avec WMC 2.0 Sélectionnez l’appareil et cliquez sur la touche ‘Autoriser’. Puis, appuyez sur la touche ‘fermer’ pour terminer le processus d’autorisation. À ce moment, l’appareil AIRMM01F peut obtenir le contenu ou le service depuis le serveur WMC. Vous pouvez maintenant naviguer jusqu’à la liste et lire la musique désirée.
Support Technique Pour toutes autres questions, veuillez communiquer avec le service de soutien Aluratek avant de retourner votre appareil. Courriel: support@aluratek.com Site Web: www.aluratek.
Énoncé d’interférence avec la réception radio et télévisée AVERTISSEMENT!!! Cet appareil a été testé et est conforme aux limites d’un appareil numérique de Classe B, en vertu de la Section 15 des règles CFC. Ces limites ont été conçues pour assurer une protection raisonnable contre de telles interférences néfastes dans une installation résidentielle. Cet équipement génère, utilise et peut émettre de l’énergie de fréquence radio.
Garantie Aluratek garantit se produit contre les défauts de matériel et de fabrication pour une période de 1 an, à compter de la date d’achat. Cette garantie devient invalide si le numéro de série de l’entreprise ou l’étiquette “garantie annulée” a été retirée ou modifiée sur le produit. Cette garantie ne couvre pas : A) Dommages de fabrication apparente ou dommages à la suite de cas imprévus B) Accident, mauvaise utilisation, abus, négligence ou modification de toute pièce du produit.
aluratek.com Aluratek, Inc. 12A Mauchly Irvine, CA 92618 sales@aluratek.com 949.419.6504 • office 949.419.