
User manual

Version 1.0 ©Copyright 2012, Ambient LLC. All Rights Reserved. Page 5
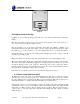
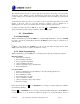
13. Dew point temperature display
14. Outdoor temperature low/high alarm
15. Outdoor t temperature and humidity alarm
on indicator
16. Temperature display unit
17. Outdoor temperature display
28. Radio Controlled Time icon (flashes when
updated)
29. Time
30. Second
31. Day of week/ time zone
32. Alarm on indicator
33. Date (M / D / Y)
2.5 Sensor Operation Verification
Verify the indoor and outdoor humidity match closely with the console and sensor array in the same
location (about 10’ apart). The sensors should be within 10% (the accuracy is ± 5%). Allow about 30
minutes for both sensors to stabilize.
Verify the indoor and outdoor temperature match closely with the console and sensor array in the same
location (about 10’ apart). The sensors should be within 4°F (the accuracy is ± 2°F). Allow about 30
minutes for both sensors to stabilize.
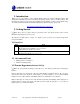
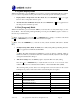
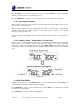
3. Remote Sensor Installation
It is recommended you mount the remote sensor on a north facing wall, in a shaded area. Direct
sunlight and radiant heat sources will result in inaccurate temperature readings. Although the sensor is
water resistant, it is best to mount in a well protected area, such as an eve.
Use 3 screws to affix the mounting bracket to the wall with a precision screwdriver. Connect the
remote sensor to the wall bracket.
Figure 3
4. Console Operation
Note: The console has four keys for easy operation: SET key, ALARM key, MIN/MAX key and
+ key. There are four program modes: Quick Display Mode, Set Mode, Alarm Mode and Min/Max
Mode.
Any program mode can be exited at any time by either pressing the SNOOZE/LIGHT key, or waiting
for the 10-second time-out to take effect (the snooze/light key is on the top of the unit and is labeled
SNOOZE/LIGHT).