
User's Manual

T
a
bl
e 1
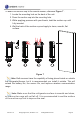
6.
A
f
t
e
r in
ser
t
in
g
th
e
b
at
te
r
ie
s
, t
he
re
mot
e
se
nso
r
LED
i
n
d
ica
to
r
wil
l
l
ig
ht
f
o
r 4
s
e
c
on
d
s
,
a
n
d
t
he
n
f
la
s
h
on
c
e p
er 6
0
s
e
c
o
n
ds th
ere
aft
er.
E
a
c
h
t
im
e it fla
s
h
e
s
, th
e se
n
s
o
r i
s t
ra
n
smit
t
in
g d
a
ta
.
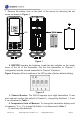
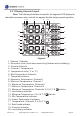
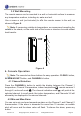
7. V
erify the correct channel number (CH) and temperature units of measure
(°F vs. °C) are on the display
, as shown in Figure 3
.
Figure 3
(1
) te
mp
era
t
u
r
e
(
2) temp
er
a
tu
re u
n
it
s (°
F vs. °
C)
(
3) ch
ann
e
l nu
m
b
e
r
8.
Close
the
battery door
.
Make
sure the gasket
(around the battery
compartment) is
properly
seated in its
trace
prior
to
closing the
door
. T
ighten
the set screw.
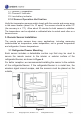
2.3 Display Console Set Up
1. Move
the
remote
probe
thermometer(s)
about 5
to
10' away from
the
display console (if the sensor is too close, it may not be received by the display
Version 1.0 ©Copyright 2013, Ambient LLC. All Rights Reserved. Page 4
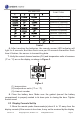
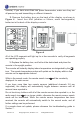
1
2
3
(optional)
(optional)
(optional)
(optional)
(optional)
(optional)
DIP SWITCH
FUNCTION
Channel 1(refrigerator)
Channel 2(freezer)
Channel 3
Channel 4
Channel 5
Channel 6
Channel 7
Channel 8
°F
°C