
Specifications


Body Pack Transmitter setup
1. Before starting, please open the battery cover and insert 2AA alkaline batteries.
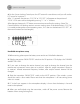
2. Slide the transmitter ON/OFF switch to the ON position. LCD displays the CHANNEL and
BATTERY LEVEL.
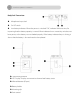
3. If you want to change the active channel, you need to change the channel into the
receiver and set receivers menu status as in picture1. After this, target transmitter’s IR port in
to receiver’s infrared automatic frequency window, after couple seconds channel will be
changed.
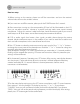
4. For the transmitter locking control press the SET button for several times until text “Lod set”
appears on the LCD screen.
After 2 -3 seconds, "LOC ON“ or "LOC OFF " will appear on the display. LOCK status can be
changed by pressing " ^ " or " v " buttons. After changes please push SET button one more
time to confirm the settings.
5. You can control transmitters input gain by adjusting “GAIN” potentiometer. Input gain
knob you can find near IR port in the body pack transmitter.
6. If you want you can set transmitters RF power. If you set RF power switch to “Lo” position
transmitter power consumption became smaller. In this case battery’s life became longer, but
working distance became smaller. If you set RF power switch to “Hi” position transmitter
power consumption became higher and working distance became higher too. Life of
batteries became shorten in this case.
7. If “Lo bat” text appears in the microphone display, and “BAT LOW” LED starts lighting all the
time, it shows that the battery is low and needs to be replaced.
8. When you are finished using the transmitter, switch off the power source. Remove the
batteries when storing for long time.