
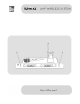
Specifications


Receiver setup
1. Before turning on the receiver, please turn off the transmitters and turn the receiver’s
volume knobs down to the smallest volume.
2. If you want turn on/off the receiver, please push the POWER button for 3 seconds.
3. After transmitters turning on, the corresponding RF level will be illuminated on the LCD.
Now you can adjust receiver's volume to a proper level and make some sounds towards
microphone. During this, receiver’s audio level meter should illuminate signal of your voice. If
audio output or RF level meters are not illuminated, please examine the device.
4. If RF or audio signals level meters show signals unstable, please change the receiver
channel. Maybe interference causes is the problem. If you want to avoid the unstable work,
don’t use both microphones in the same channel at one time.
5. Press SET button to select the main menu one by one in a cycle. Press " ^ " or " v " buttons
to change the current state of the selected menu. Hold the " ^ " or " v " button for a long time
to quickly select the frequency or channel.
After parameters’ changes, LCD screen will be flashing as a reminder in 2-3 seconds, and the
flashing will be stopped after pressing SET button one more time. After this procedure your
settings will be confirmed.
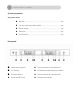
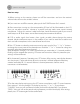
6. For Automatic Frequency Operation press SET button. After pressing, main display became
as in the picture1. Target transmitter IR port in to receiver’s infrared automatic frequency
window and hold it for 2-3 seconds. Receiver’s channel parameters shall be sent to
transmitters via infrared date.
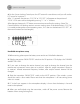
Picture 1 Picture 2
7. For the main display settings press the SET button several times until LCD screen becomes
like in picture 2. You can change LCD display by pressing " ^ " or " v ". If you choose
"CHANNEL", then you will see channel number on the main display field. If you choose
"FREQU", then you will see the actual working frequency on the main display. After settings,
please press SET button again for the confirmation.